Shading is SO important for art, especially realistic. There are 5 distinct elements of shading that you need to know to be able to learn how to shade your art yourself.
The five elements of shading are full light, halftone, shadow edge, reflected light, and cast shadow. Some of these five shading elements are on the object itself while others, like the cast shadow, are found on the surface the object is sitting on.
We’re going to walk through these 5 elements, one-by-one.
- Full Light
- Halftone
- Shadow Edge
- Reflected Light
- Cast Shadow
But, before we dive into each of the 5 elements, here’s a quick overview of how shadows work in general.
Also, a quick reminder. Shadows can be really hard to master. If you’re struggling with shadows, keep working at it before you decide to quit drawing. With practice, you’ll get the hand of it.
How Shadows Work
Shadows are just a result of shining light on solid objects. Wherever the light doesn’t hit the object, you’ll have a shadow.
Yes, it’s a very simple process with a very complicated result. The complexity of a shadow depends on how many lights are shining, how many sides an object has, and whether it’s translucent or opaque.
A lot of us draw with only one light source, whether it be the sun or an indoor lamp. This makes shadows more predictable. Even if we’re drawing a complicated object, with practice, we can start to understand how shadows will turn out if the light is coming from a certain direction.

But, imagine you were drawing a still life in your kitchen that has some awesome track lighting in it. Now you have 4 or 5 light sources all hitting your still life from different directions. This makes the shadows a lot more fun.
The complexity of your object also impacts how challenging your shadows will be. There’s a good reason that we all shade spheres in our first art classes. Since circles don’t have any edges, you can produce the textbook definition of shadows from them.
This makes them the easiest objects to shade. I actually think that circles can be hard to shade, but I’m allergic to symmetry, so that’s just me.
The more edges your object has, the more shadows you’ll have to grapple with. Every nook and cranny has its own shadow, which can either be really fun or really frustrating depending on your relationship with shadows.
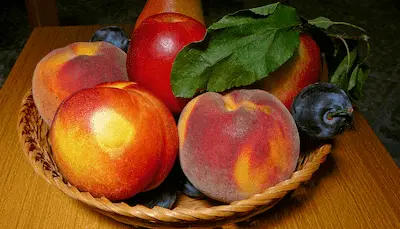
You’ll also complicate things if you have multiple objects in your image. If you take a look at the still life, you’ll see that some fruits are blocking the light from the other ones, which messes with the shadows.
Lastly, whether your object is opaque or translucent will impact the complexity of your shading. With opaque objects, light fully bounces off of them and creates fairly predictable shadows.

With translucent objects, some of that light will shine through the object, which can make the shadows more complicated. Take a look at your water glass shining in the sun and see how the shadows fall. If there’s water in it, your shadows will be especially wonky.


So, that’s how shadows work. Even though they sound complicated based on all of the lights and sides you might be working with, there’s a formula to them that can make your life easier. All you have to worry about are these 5 elements of shading.
As we go through these 5 elements, one-by-one, it can be helpful to have a reference to look at to help you draw. This can either be a photo or a still life you set up.
1. Full Light
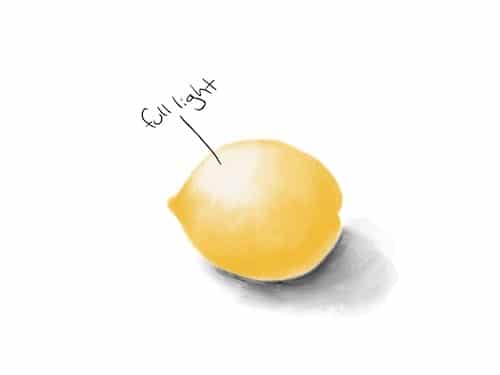

We’re going to use this little drawing of a lemon that I did to guide us through how shadows are formed and come together. In this example, our light is coming from the top left, which means that our full light appears on the top left of our lemon.
It’s a little counterintuitive, but the full light area of your shadow is where your shadow isn’t. This is the area where your light is shining the most brightly upon your object.
Think of your full light area as the epicenter of your shadow.
This is where your entire shadow will ripple out from. The direction of this ripple will depend on where your light is coming from. In general, the more angled your light is, the more angled your shadow will be. Also, the more direct and bright your light is, the more dramatic your shadow will be. A soft light tends to make soft shadows.
To figure out where your full light should go, imagine a straight line coming from your light source and hitting your object. If it helps, draw a tiny light on your paper with a line coming out of it to hit your object.
2. Halftone
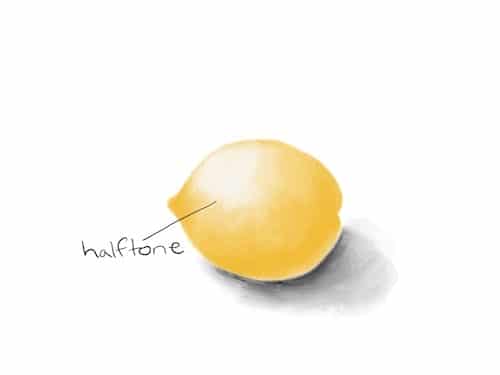
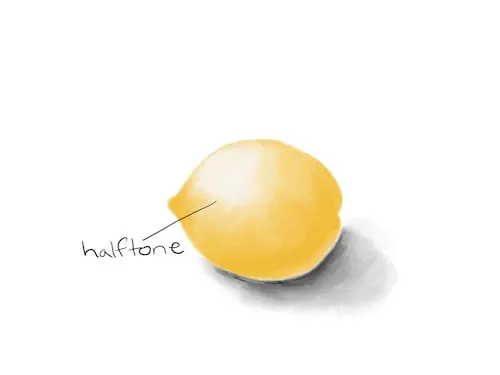
After your full light hits your object, it starts to spread and fade. The result is called a halftone, which is basically the “tone” you get “halfway” to your shadow. Your halftone will generally be a shade of color halfway between the color you used for your full light and the color you will use for your shadow. Yeah, the name “halftone” is pretty self explanatory.
In our lemon drawing, you can see that the halftone is a nice shade of light yellow that fades down from the full light.
Once you introduce your halftone, this is where the fun of shading begins.
You’ll want to have a smooth transition between your full light and your halftone. Remember that a halftone is the result of your full light fading away, which means we have to create a “fading” effect. If you’re new to shading, this might take some time and practice.
It might be tricky to master, but keep at it. The halftone is an important element to drawing realistically.
For pencil drawing, this is when you’ll become best friends with your kneaded eraser. For painting, this is when you’ll start to learn how to mix many shades of subtle colors. For digital art, this is when you’ll use Procreate’s snazzy erasing feature a lot.
Regardless of the medium, my strategy for effective fading is to start on the edge of the light color and slowly smudge it down. Then, I head over to my colored edge and slowly smudge it down. I go back and forth until these smudges meet in the middle.
Given my strategy for fading my halftone, I usually add the next element that we’re about to talk about first, before I start working on my halftone. Let’s talk about the shadow edge.
3. Shadow Edge
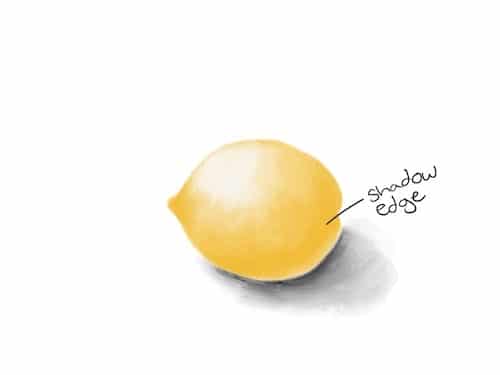

The shadow edge is where your shadow is going to be the darkest on your object, which means you’re going to have your darkest and deepest tones. Think of your shadow edge as the place where your object is turned away from your light.
As you can see in our lemon picture, the shadow edge is located on the part of the lemon where the light isn’t shining. Because the lemon is curved, this is naturally where the lemon starts to curve away from the light.
When I work on shading, I like to put in my full light and my shadow edge and then work them towards each other until I get the halftone I’m looking for.
As you build your shadow edge, keep in mind the ripple effect you get from your full light. Depending on how big your canvas or object is, your shadow edge might be far away from your full light. Keep checking back on your full light to make sure that shadow edge is properly placed.
Also remember that your shadow edge needs to accommodate the shape of your object. They like to “hug” edges and flow with curves. Wherever your object goes, its shadow will too.
Always follow the shape of your object when building your shadows.
So, if we’re working on a round object like our lemon, our shadow edge will be curving down and to the right. This is different from our full light which was curving up and to the left.
4. Reflected Light
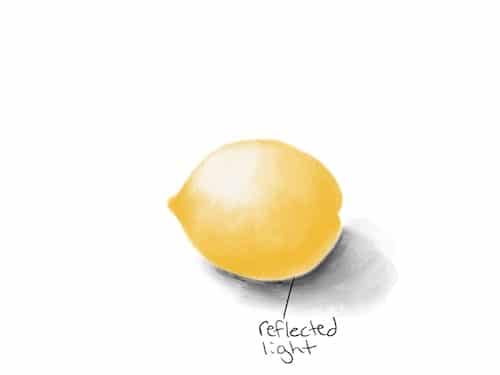

Reflected light is the final element of shading that is actually included on your object. This element can be a little tricky because the source of the light isn’t always clear. Reflected light is simply light that is reflected back onto your object, usually by a light source that’s different than your primary light source.
Most often, your reflected light will show up on the outer edge of your object right before the cast shadow. It’s the break in between your dark shadow edge and your dark cast shadow.
Your reflected light WILL be light, but it won’t be as light as your full light, or even your halftone in most cases. The reason why reflected light often looks so light is because it is sitting next to two dark tones: the shadow edge and cast shadow. You’ll learn this lesson quickly the first time you make your reflected light too bright.
5. Cast Shadow

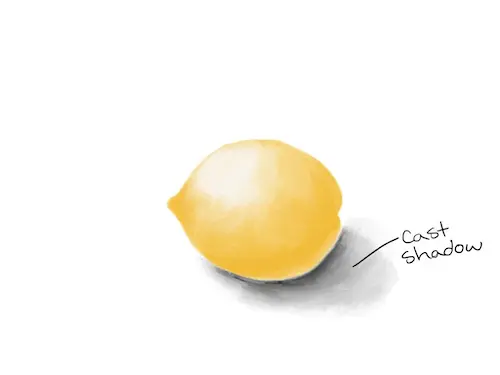
The cast shadow is our final 5th element of shading. And, as I’ve alluded to, this isn’t actually included on your object. The cast shadow is the shadow that is cast onto the ground by an object. Yes, these names are pretty self-explanatory.
The shape of your cast shadow will depend on the angle of your light. For example, a light that is shining higher up will cause a smaller cast shadow. A light that is shining lower down, or directly horizontal to your object, will have a longer cast shadow.
This is why our bodies create more dramatic shadows on the pavement when the sun is setting instead of when the sun is shining directly above us.
Every object has a cast shadow, but you might not always include it in your artwork. I very rarely draw cast shadows in my work because I often draw standalone objects or portraits instead of entire scenes. A cast shadow doesn’t directly impact the shading of your actual object.
A cast shadow is the effect that an object has on the surrounding environment. If you’re not planning to draw the surrounding environment, you don’t need to include it.
If you’re new to shading and trying to improve your skills, practicing cast shadows is a great idea. When you draw a cast shadow, you’re forced to think about how your light is hitting your object and make some serious decisions about it.
There’s nothing subtle about a cast show. Once you lay it down, your cast shadow will be a big dark splotch on your paper. If you get it right, it will fade into the background and be a natural part of your work. If you get it wrong, it will look like a random polka dot.
Cast shadows are also a great way to check your work. Once you figure out your cast shadow, it can give you clues about whether you went wrong somewhere when shading your object. Does your shadow edge make sense given where your cast shadow is?
Does your reflected light seem a little wonky once your cast shadow is in place? Even if you don’t want to include a cast shadow in your final piece of artwork, it can be helpful to sketch it out so that you can double check the shading of your object.
Tips for Conquering the 5 Elements of Shading
Once you get a hang of shading, you will fall in love with it. Or, you’ll at least fall in love with the results. Shading really is a game changer for your art, especially your realistic art. Here are some tips for improving your shading skills more quickly.
Focus on one element at a time. Yes, you will eventually need to master all 5 elements of shading, but you can start slowly. Start by figuring out where your light source is and where your direct light will be coming from. Once you feel comfortable with that, move on to the next element. When you learn a new skill, you need time to practice. Shading requires that you learn 5 different skills. Yes, they’re related skills, but they’re actually pretty different. Creating a halftone is a lot different than creating a cast shadow. Don’t overwhelm yourself with trying to learn all 5 elements at once.
Go back and adjust your work. As we mentioned in the cast shadow section, you might realize that you made a mistake with your shading work somewhere along the way. Even though there are 5 distinct elements of shading, they all need to work together to bring your object to life. Continually check your work as you go and make adjustments as needed.
Use a light box to practice. Light boxes can give you a great way to practice your shadows. Grab a picture with intense shadows and use a light box to trace over them and get a feel for how they work.
Try different shading techniques. Just because there are 5 distinct elements of shading that need to be honored doesn’t mean you can’t be creative with how you express them. Try your hand at cross-hatching, stippling, blending, and smudging. Grab your paints, pencils, pens, or craft paper. The best way to really master your shading is to practice it in a lot of different contexts. Have fun with it and get creative.
Be patient and practice. It might take you a while to master shading. I mean, there are 5 distinct elements that have to come together to make your shading work. That’s a lot! I know it’s hard to stay patient when you’re learning new art skills, especially when you see so much amazing shading in all of the artwork that you admire, but take your time and don’t rush it. You WILL improve your shading skills and eventually master it if you give it time.
Learning how to shade can seem like a big undertaking. To be honest, it’s one of those skills that really makes you feel great once you’ve mastered it. Almost like an art right of passage. After this overview of all of the 5 elements, hopefully you now feel more confident about conquering your shading skills.


Diana has been an artist for over 27 years and has training in drawing, painting, digital drawing and graphic design. Diana’s latest obsession is digitally drawing with Procreate and Procreate Dreams. Diana has experience selling her art across a number of platforms and loves helping other artists learn how to make money from their art as well.