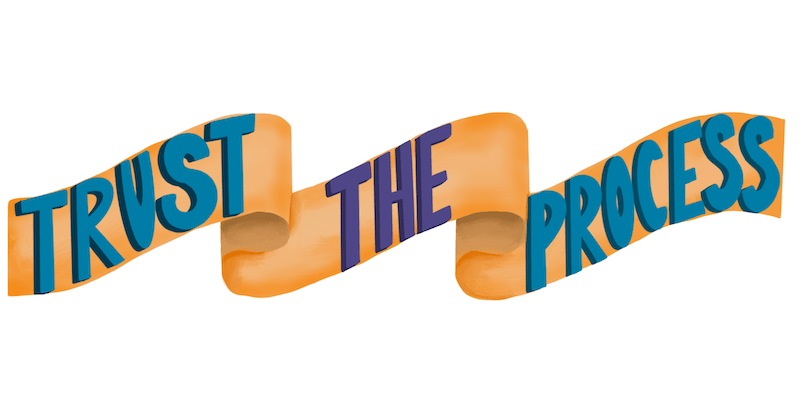
Whether you’re making logos, quote art, or any other creative lettering designs, curved text is key. Even though Procreate doesn’t have a one-click, magical way to turn your straight text into curved text, there are some really simple and easy strategies to make some beautiful curved text in Procreate.
To curve text in Procreate for both handwritten lettering and font-based text, you can use quick hacks with the liquify tool with the push option or the transform tool with the warp option. To curve your text by hand, lay down a circular guide on your canvas that you can follow as you work.
While we all wish there was an instant way to curve text in Procreate, that wouldn’t be as fun. Also, this is digital drawing, not graphic design, so it makes sense that there isn’t a magical button we can click to make our curved text.
And, you’ll ultimately be happier creating your curved text in Procreate by hand, as it will give you a LOT more freedom to create the unique curved text we’re looking for, as opposed to a cookie cutter version spit out by software.
Luckily, the term “by hand” is misleading in regards to how much work this will be. There are some really neat and easy tips and tricks you can use to make perfectly curved text in Procreate in just a few minutes – not hours of slaving away. While curving text in Canva is more challenging, it’s not that way with Procreate.

Let’s get started and look at our options for curving text in Procreate. First off, we’re going to talk about two hacks you can use to curve your text SUPER quickly. These hacks will work regardless of whether you have drawn your lettering by hand, or have added it through Procreate’s text function.
This post may contain affiliate links, which means I may earn a commission if you decide to purchase through my links.
How to Curve Text in Procreate with the Liquify Tool
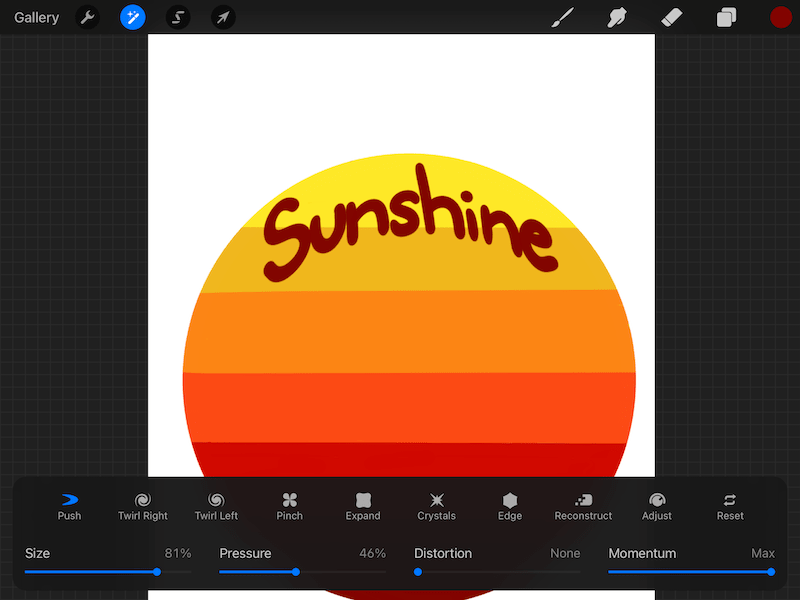
To curve text in Procreate with the liquify tool, make sure that all of your text layers are selected. Open the Adjustments tab and click on Liquify. Choose the Push option. Pull the ends of your text down and push the middle up. Keep doing this until you get the curve you’re looking for.
Here’s a step-by-step guide:
1. Make sure that all of your text layers are selected, or that all of your text is on a single layer.
2. Open the Adjustments tab. This is the magic wand icon in your top toolbar.
3. Click on Liquify.


4. Choose the Push option.
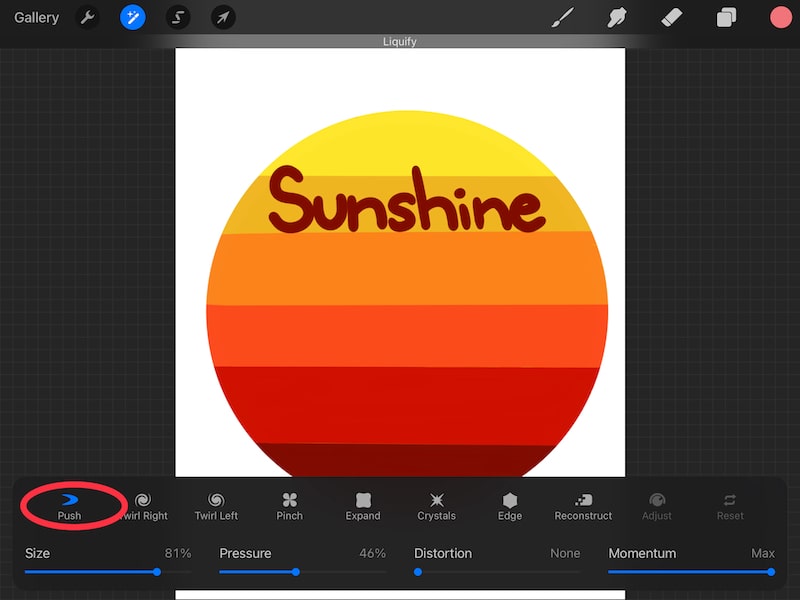
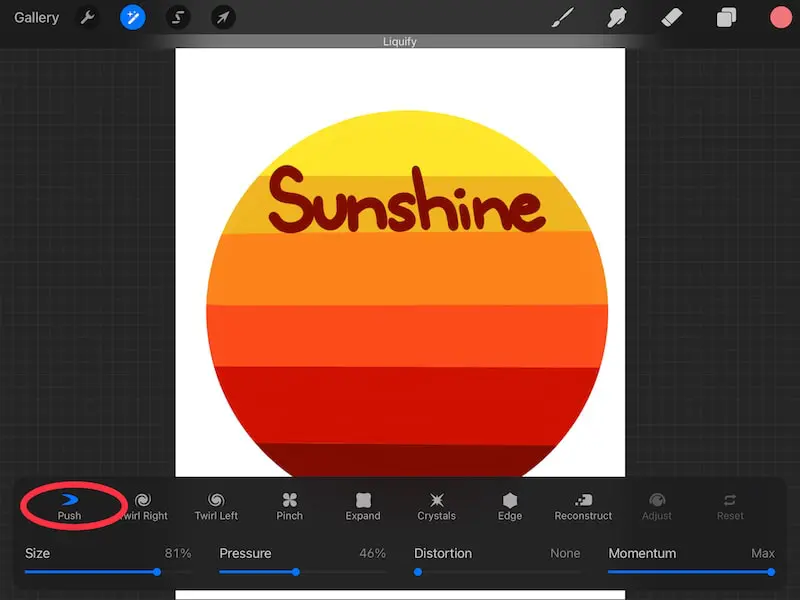
5. Use your stylus to drag the ends of your text down.
6. Use your stylus to push the middle of your text up.
7. Repeat steps 5 and 6 until your text is curved in the way that you want it to be.

I LOVE using the push option within the liquify tool to quickly make objects look the way I need them too. In fact, this is one of my go-to ways of creating banners. Simply draw a box and then push it around until you get the banner you want!
This hack also works really well for curving text. In fact, you can create any shape with your task that you would want. For example, if you create a banner, you can make sure that your words fit perfectly inside of your banner by “pushing” them around until they’re the shape that you need.
No more fussing around with making sure that you draw every single letter correctly.
Important note: the push option within the liquify tool works with multiple layers at once. So, if your text is on multiple layers, you don’t need to worry about merging them into one single layer. Simply make sure that all of the layers with your text on it are selected. I have a tutorial on selecting multiple layers at a time in Procreate that can be helpful if you need a review.
Using the liquify tool with your text WILL take practice. Depending on how detailed or long your text is, you might end up with some wonky results.
Make sure that you take it slowly and have patience with yourself. It’s also good to start off with shorter words to begin with.
If your text ends up being too long or complicated and you can’t seem to get it right with the liquify tool, you might want to explore one of the other text curing options on this list. Soooooo, let’s look at those other options!
How to Curve Text in Procreate with the Warp Tool
To curve text in Procreate with the warp tool, make sure that all of your text layers are selected. Click the Transform tool tab and choose the Warp option. Pull the ends of your text down and push the middle up. Keep doing this until you get the curve you’re looking for.
Here’s a step-by-step guide:
1. Make sure that all of your text layers are selected, or that all of your text is on a single layer.
2. Click the Transform tool. This is the arrow icon in your top toolbar.
3. Click on Warp.
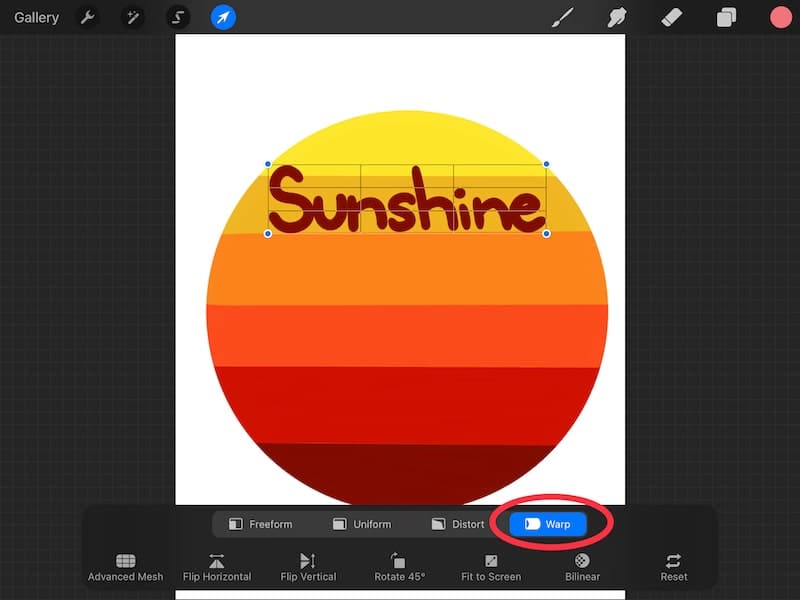

4. Use your stylus to move the ends of your text downwards.
6. Use your stylus to move the middle of your text upwards.
7. Repeat steps 5 and 6 until your text is curved in the way that you want it to be.
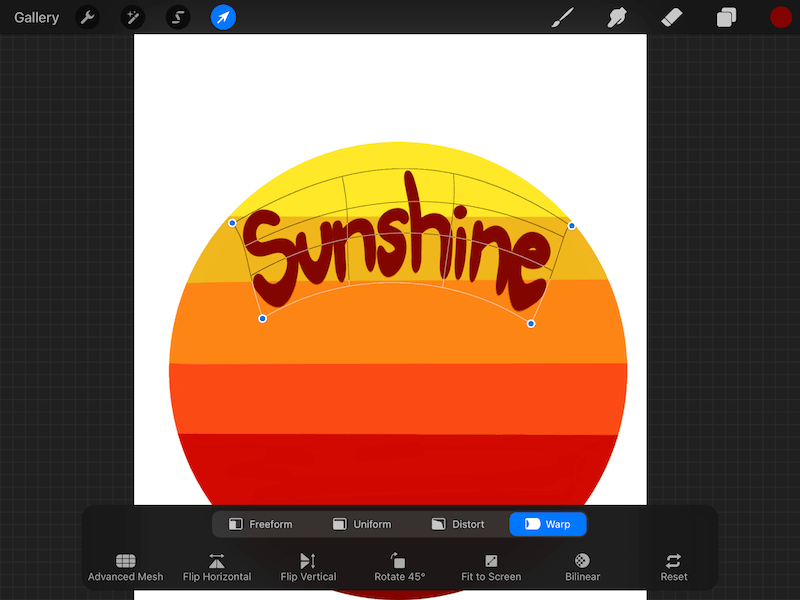
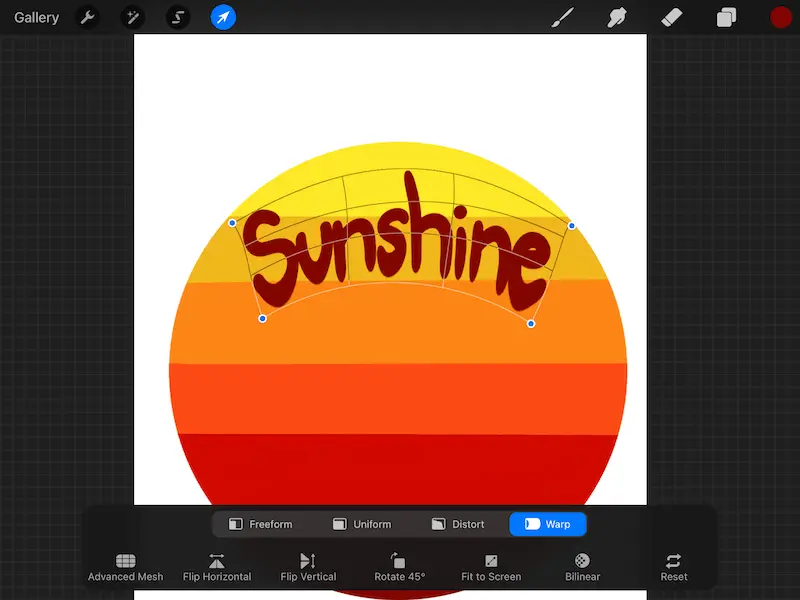
Curving text with the warp tool is similar to curving it with the liquify tool, but it gives you more freedom with how you want your text to look. You can make more nuanced movements and changes with the warp tool that you can’t do with the push option within the liquify tool.
That said, with greater power and freedom comes bigger headache…at times. It’s REALLY easy for your text to look wonky with the warp tool. I mean, it’s called the warp tool for a reason.
With the warp tool, your best bet is to pull or push your text from the middle. If you target the top or bottom of your text, it will stretch it in weird ways. By working from the middle, you’ll be able to keep the shape of your text as consistent as possible.
By the middle, I mean the horizontal middle line of your text. Even if you’re working on moving the ends of your text, put your stylus in the middle of that last letter. This will give you the least amount of distortion as you work.
Important note: the warp option within the transform tool works with multiple layers at once. So, if your text is on multiple layers, you don’t need to worry about merging them into one single layer. Simply make sure that all of the layers with your text on it are selected. I have a tutorial on selecting multiple layers at a time in Procreate that can be helpful if you need a review.
Like liquifying your text, warping it is really quick and easy, but it can get messy depending on the text you’re trying to curve.
Here’s how you can manually curve your text in a way that’s really precise, yet won’t take you a decade to complete.
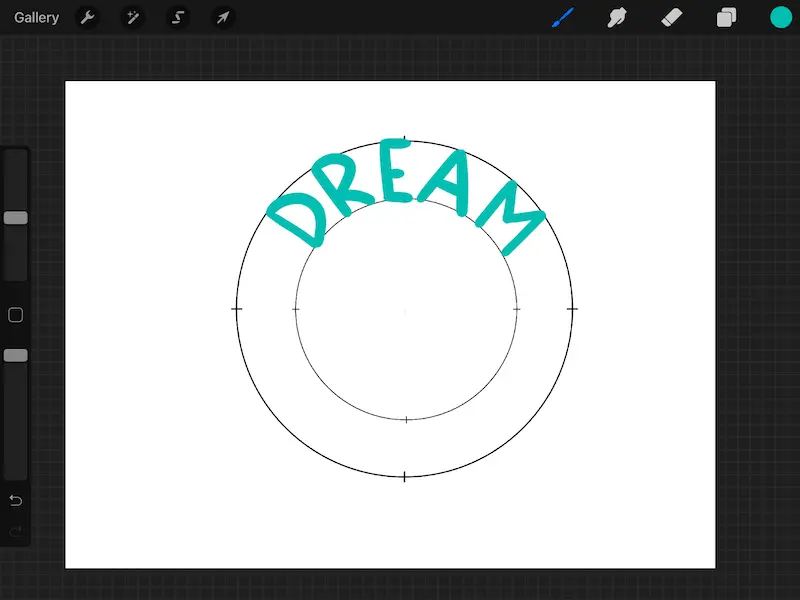
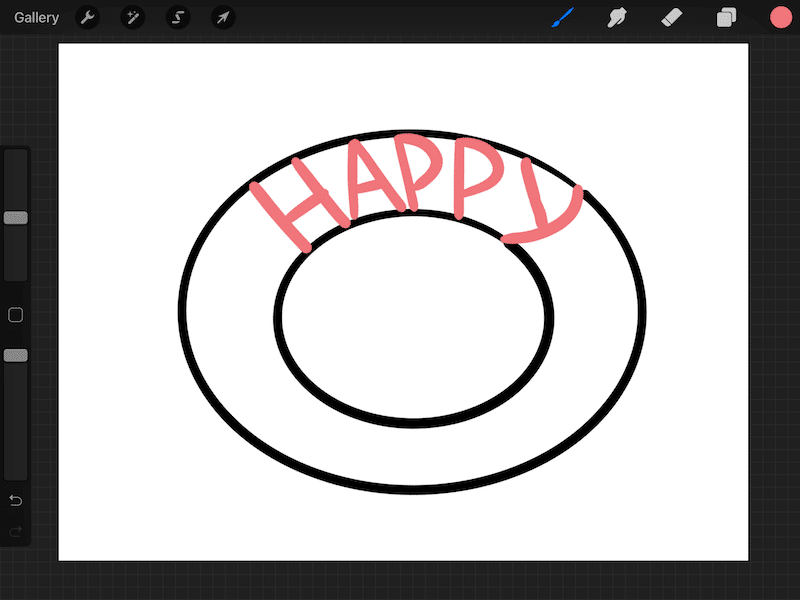
How to Hand Drawn Curved Text in Procreate with a Circular Guide
To curve text by hand with Procreate, use a circular guide to help you align your text. You can make a circular guide using Procreate’s quick shape function, or by using a circle stamp. Make sure your text is on a different layer than your circle.
If using the liquify or the warp quick tips didn’t work for you, it’s time to create your curved text by hand. Or, maybe you simply like creating curved text by hand given the freedom it affords you.
Whatever your reason, creating curved text on Procreate by hand isn’t hard.
My go-to strategy is to use a circle stamp. I create a larger circle that will be the top barrier of my lettering, and a smaller circle that will be the bottom barrier of my lettering.
That way, my letters don’t end up as different sizes.
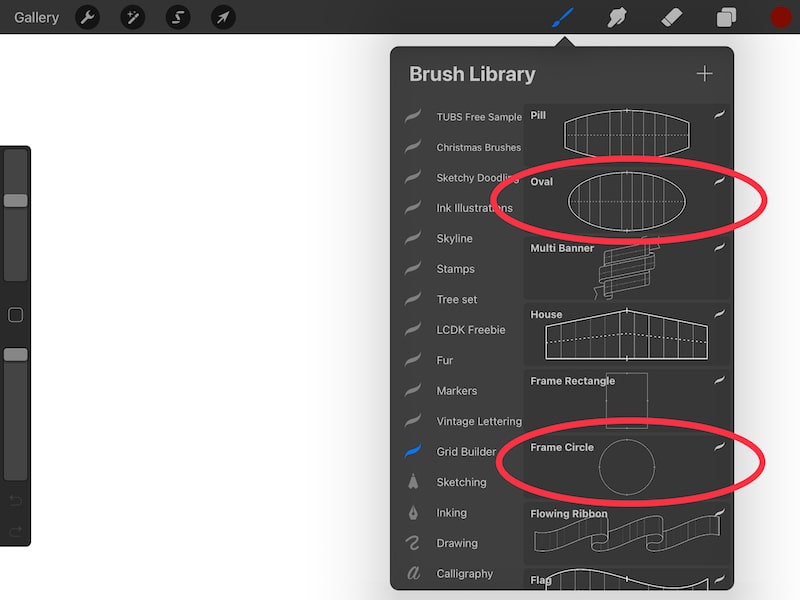
If you’re wondering where I got my circle stamp, you can find it in the Grid Builder brush package on Design Cuts.
I LOVE the Grid Builder package for everything relating to lettering. It has 35 lettering grids you can use to make the perfect lettering projects, from banners, blocks, circles, and more. They even have these really neat banners that make your letters look like they’re in perspective without you needing to figure out the perspective aspects yourself.
It’s REALLY cool. To say that I use this pack of grid brushes a lot is an understatement. It’s also really darn cheap given everything you get with it. You can check out the Grid Builder brush pack here!

Here’s how to make your circular guides with the Grid Builder package:
1. Choose the circle or oval within the Grid Builder list in your brushes pack.
2. Adjust the size of your brush so that the circle is the size you want it to be and plop it onto your canvas. This might take a bit of trial and error.
3. Reduce the size of your circle to be a little bit smaller than your original circle and plop it down on your canvas. This will depend on how big you want your letters to be. Again, this might take a little bit of trial and error.
4. Use the transform tool to adjust the shape of your circle, if needed.

When we curve our letters, it’s rare that we want them to be in a perfect circle. Normally, we aim for a stretched eclipse, or something like that.
Simply use the transform tool to adjust the shape of your circular guides until you have what you’re looking for.
I have a full guide on how to use the transform tool if you need a refresher.
If you’re handwriting your lettering, use these guides to place all of your letters around your curve.
If you’re drawing your letters by hand, make sure to start a new layer before you get started. It’s REALLY easy to forget to do this and wind up bummed because your circular grids are on the same layer as your finished text. Whomp whomp.
If you’re using Procreate’s text function, put down each letter of text individually. Each letter will naturally end up on its own, new layer. Use the transform tool to move each letter, rotate it, and align it with the curve.
Using the Grid Builder brushes isn’t the only way to make circles though. If you need circular guides for your text, you can make great circles by hand using Procreate’s quick shape function.
Here’s how to make your circular guides with the quick shape function:
1. Draw a circle that’s roughly the size you want your circular gird to be. Once you’ve finished your circle, do not lift your stylus from the canvas. Hold it there. This will trigger the quick shape function. Once your hand drawn circle snaps into a perfect circle, you can lift up your stylus.
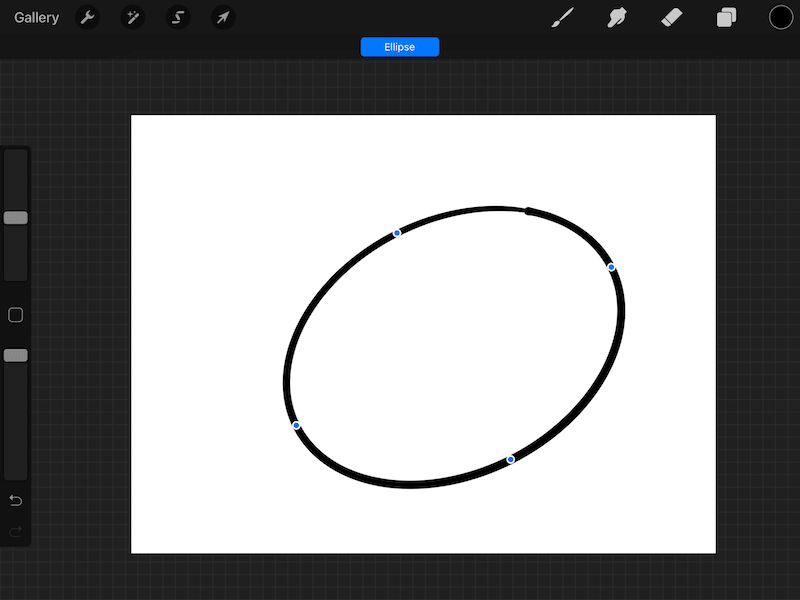
2. Click the “Edit Shape” button that appears at the top of your screen, below your toolbar.
3. Use the dots along your circle to adjust the size of your circle and turn it into the shape you want it to be.
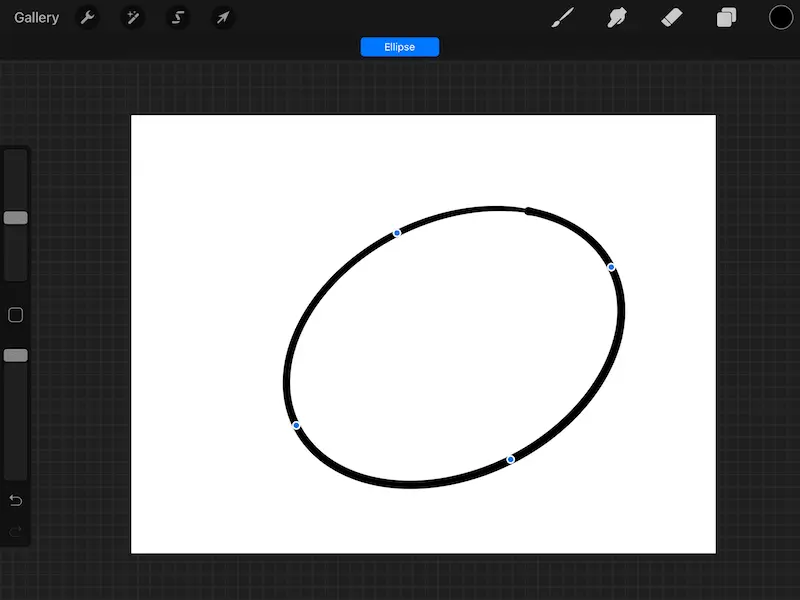
4. For your second circle, repeat steps 1-3.
5. When you edit the shape of your second circle, make sure that it is smaller than your first circle and is a good bottom barrier for your lettering.

If you’ve drawn your circular guides by hand with the quick shape function and realize that you don’t like them, don’t worry. You don’t have to start over. Simply use the transform tool to adjust them and resize them again.
Once you’ve finished drawing and adjusting your circular guides, start a new layer and begin your lettering process. It’s as simple as that!
Even though it can seem daunting to create curved text in Procreate, there are a lot of methods and tricks you can use to make the process quick and easy. Find the method that works for you and stick with it! Once you’ve developed a system, you’ll be creating curved text in your Procreate art without even thinking about it.


Diana has been an artist for over 27 years and has training in drawing, painting, digital drawing and graphic design. Diana’s latest obsession is digitally drawing with Procreate and Procreate Dreams. Diana has experience selling her art across a number of platforms and loves helping other artists learn how to make money from their art as well.