When you’ve spent a lot of time and energy creating a beautiful piece of art on Procreate, it can be disappointing to realize that it’s low quality once you share it or print it. Exporting high resolution images from Procreate takes careful planning from the beginning.
To export high resolution images from Procreate, make sure your canvas size and DPI are what you need them to be from the very beginning. Once you’re finished with your art, export it as a PNG file for the highest resolution image. If printing your work, make sure not to stray too far from your Procreate canvas size.
If you want to export high resolution images from Procreate, there are some very important things you need to do and keep in mind. This is very much a “preparation is the key to success” situation.
Let’s run through everything you need to know to wind up with the highest resolution images possible from Procreate.
Set Your Procreate Canvas to the Correct Size and DPI
A lot of image resolution issues are due to incorrect canvas sizes and low DPI. Before you begin drawing, make sure that your canvas size and DPI are what you want them to be. You do not want to change these later. This is especially important if you plan to print your work.
When you create a new Procreate canvas, it can be tempted to choose the “Screen Size” option and call it a day. Personally, that’s what I use for basic sketching.
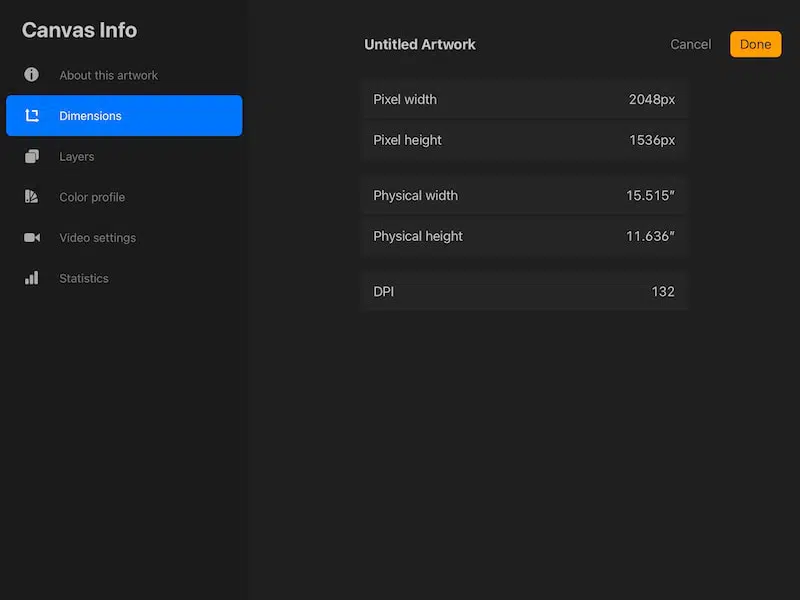
The size will depend on what size iPad you have. For me, it’s 2048px x 1536px, which measures 15.5” x 11.6”.
There can be issues with the screen size option though, depending on what you plan to do with the final result.
For example, if I make a 15.5″x11.6″ piece of art and then try to print it at 20″x24″, I could end up with a problem.
The best practice is to choose the canvas size that makes the most sense for your art. If you’re planning to print an 8” x 10” piece of art, make your canvas 8” x 10”. Do your best to plan ahead and think about the size that you need your final result to be.
If you’re not sure about the size you’ll want your finished art to be printed at, take your best guess and aim a little bit higher than you think you’ll need. If you scale your art either up or down too much during printing, you could end up with resolution issues that result in pixelation.
That said, I tend to have more issues with scaling my work up than scaling it down, so I usually say to aim higher in your canvas size if you aren’t sure what your final size needs to be.
Best case scenario, figure out your final size before creating your canvas and set it at that.
The bigger your canvas, the fewer layers you’ll have available to you, so you don’t want to make your canvas too big for no reason.
I have a full guide about choosing the correct digital canvas size for your digital art that you can read if you want to learn more.
Ok, so while canvas size is an issue, DPI is often a bigger problem.
With my own iPad, if I choose the default screen size canvas option, the DPI automatically gets set to 132. Eeek, that’s not great if I want to print my work.
That’s why I suggest creating custom canvases and not going with the defaults. That way, you can control the size and DPI of your canvas before you get started.

For artwork that you solely share digitally, you might be able to get away with DPI that low. If you go to print your work though, you’ll be faced with a low resolution image and probably be bummed about it.
When printing your art, you’ll want 300 DPI. There’s no real benefit to going much higher than that. You won’t notice better quality images, but you will notice a smaller layer limit, which can be frustrating.
So, unless you have specific reasoning, set your DPI to 300 and call it a day. Don’t overthink it.
The easiest way to do this is within the custom canvas creation settings. You can set the size and DPI of your image all in one place and be guaranteed that everything is good to go.
There are some preset canvas sizes that are at 300 DPI, but not all of them, so you’ll need to check.
To check the size and DPI of your canvas, click on the wrench to open the Actions tab and then click on the Canvas button. At the bottom, click on the Canvas Information button.
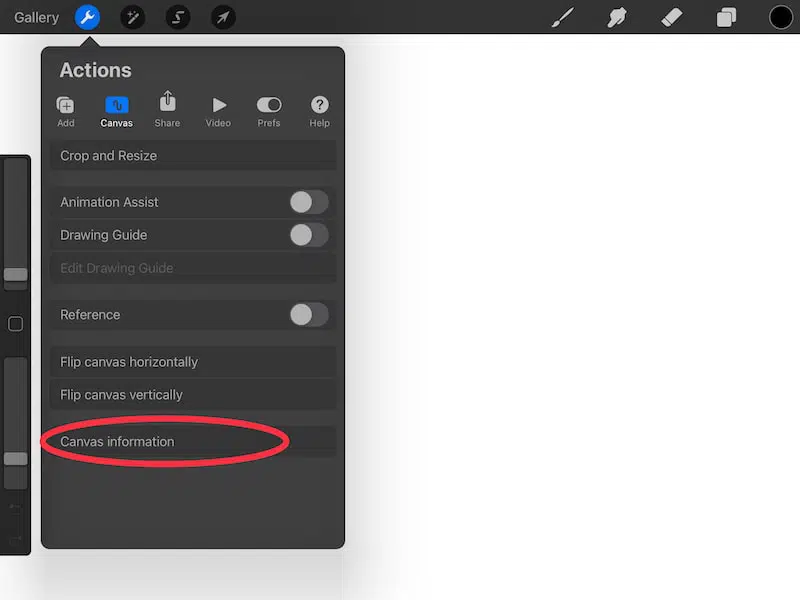
This will bring up a screen with way more information than you’ll ever need to know about your canvas. Click on the Dimensions tab and you’ll see information about your canvas’s size and DPI.
Setting up your canvas correctly from the get-go is a big part of the battle against low resolution images. If you can get this right, you’ll likely have high resolution images when exporting from Procreate.
There is one last thing that you need to keep in mind though
Export Your Procreate Images as PNG Files for the Highest Resolution
PNG files use lossless compression and hold more data than a JPG does, which makes them a good choice for complex things, such as images. PNGs are also capable of preserving transparent backgrounds, which can be useful for exporting art for merchandise.
A PNG file will be larger than other files types, but it will give you the best results as far as quality and resolution is concerned. In most cases, the larger file type will be worth the boost in quality.
PNG files are able to hold more information than JPG files and are great for images as a result (source).
They’re also the only file type that’s able to retain transparent backgrounds, so if you need transparent images for selling your art on products, PNG will be your only option anyways. Luckily, it’s also the highest quality choice, so it’s a win-win.
Exporting high resolution images from Procreate is doable! Taking the time to set up your Procreate canvas properly, with the correct sizing and DPI, will save you a lot of headache down the road when worrying about exporting high resolution images.
In addition, by exporting PNG files, you’ll be in an even better position to have high resolution images that really show off your art for everything that it’s worth.

Diana has been an artist for over 27 years and has training in drawing, painting, digital drawing and graphic design. Diana’s latest obsession is digitally drawing with Procreate and Procreate Dreams. Diana has experience selling her art across a number of platforms and loves helping other artists learn how to make money from their art as well.

