Collecting Procreate brushes is a lot of fun and gives you a lot of options for your art. That said, it can be REALLY hard to find your favorite few Procreate brushes amidst all of the other brushes you’ve acquired. Until now.
Procreate doesn’t let you favorite brushes, but you can group brushes together for the same effect. The first way to group brushes is to make copies of your brushes and put them in a folder at the top of your brushes list. Another strategy is to add your favorite brushes to your QuickMenu.
Organization is probably not the fun thing you love to think about when sitting down to use Procreate.
Whomp whomp.

That said, organizing your Procreate app can save you SO much time in the long run. Of course, Procreate organization extends beyond brushes, but we’ll focus on brushes for today.
If you don’t have to spend even a few extra seconds finding your favorite brushes every time you need to make a switch, that time will add up. Not to mention the accumulating frustration of scrolling through endless lists of brushes to find the one brush you need.
So, let’s get to it. We’re diving into two strategies for grouping your favorite Procreate brushes so that you can always find them quickly and easily.
1. Group Your Favorite Procreate Brushes in a Folder
To have quick access to your favorite Procreate brushes, make a copy of each of them and put them all into the same brush folder. Move this folder to the top of your Procreate brush list for easy access to any of your favorite Procreate brushes when you need them.
Here are the step-by-step instructions for grouping your favorite Procreate brushes:
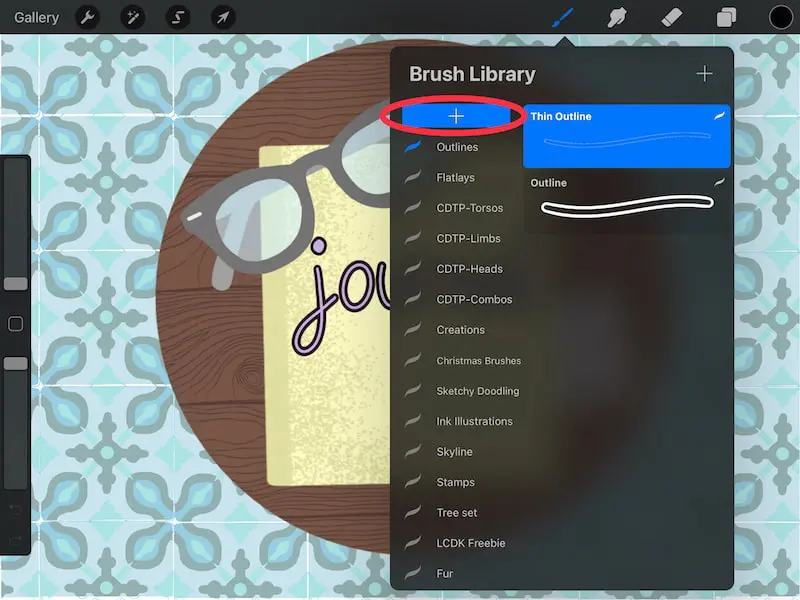
1. Open your Brush Library and scroll up on your list of brush folders until you see the plus sign. Click on it.
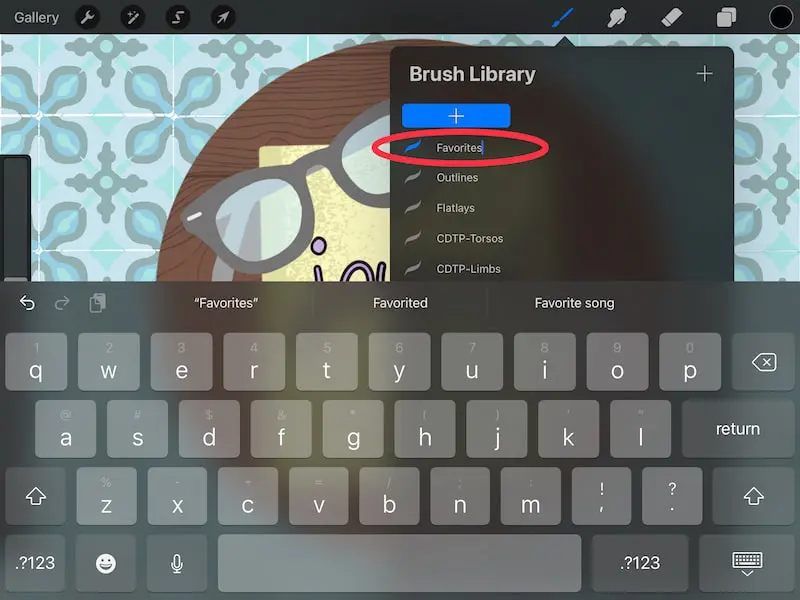
2. Change the name of your new brush folder from Untitled Set to favorites, or whatever you prefer.
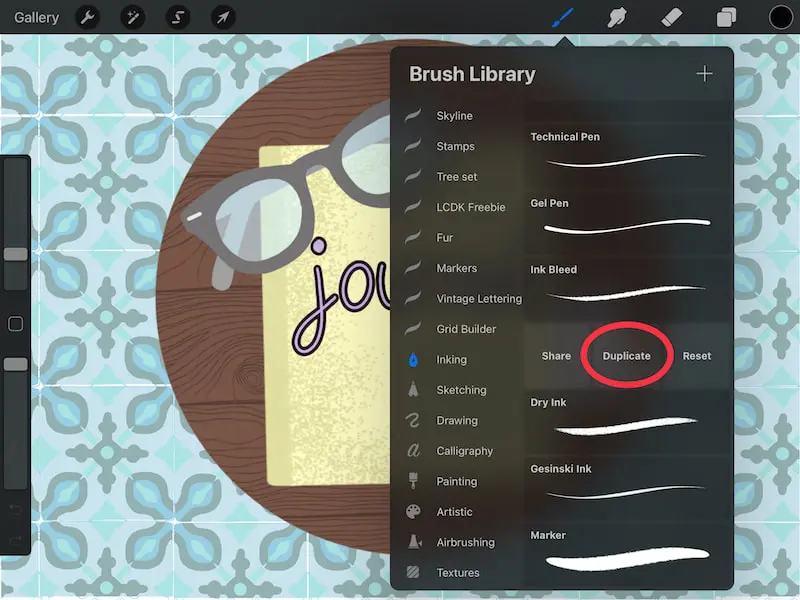
3. Find one of your favorite brushes and swipe left on it. Click the Duplicate button.
4. Hold your finger down on your new brush until it pops out of its current brush folder.
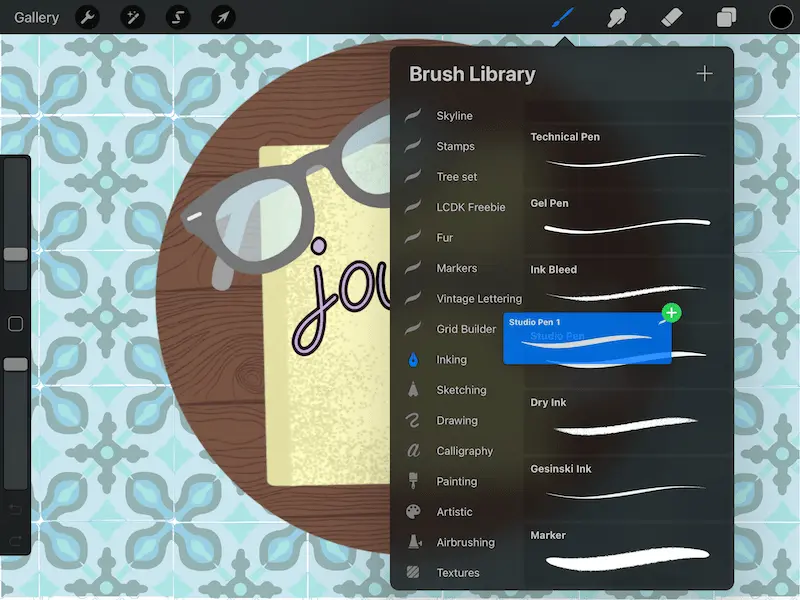
5. Drag it and drop it into your new Favorites folder. Sometimes it can be hard to move brushes to the top most folder. Move your Favorites folder down if you are having issues. I normally do!
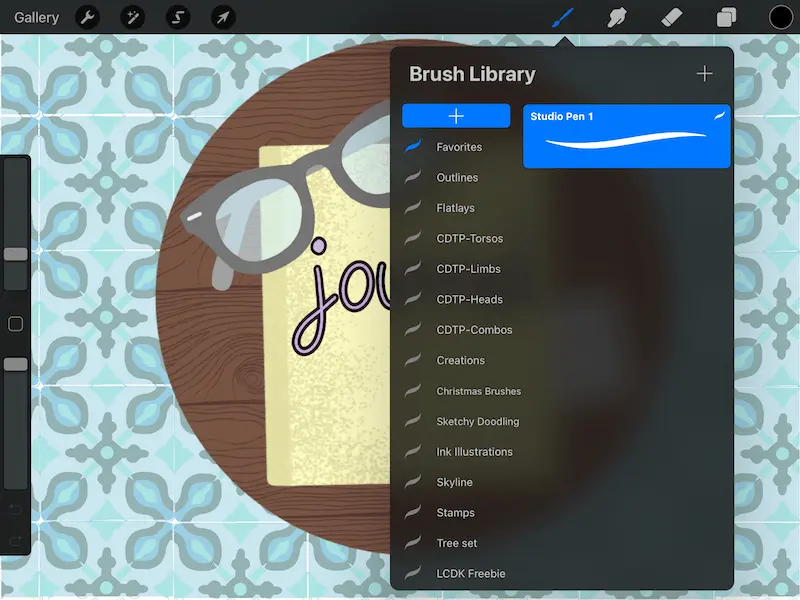
6. Repeat steps 1-5 with all of your favorite brushes until they are all in your Favorites folder.
You might be wondering why I suggest putting copies of your brushes into your Favorites folder instead of putting the original brushes directly into the folder straightaway.
Well, I’m REALLY careful about messing with original brushes. If I’m changing any Procreate brush settings, moving brushes, or anything else, I make copies of them.
One reason for this is so that I don’t have to worry about resetting my original brushes if I make changes to them that I want to undo. Procreate makes it pretty easy in the brush settings, but I don’t want to deal with it.
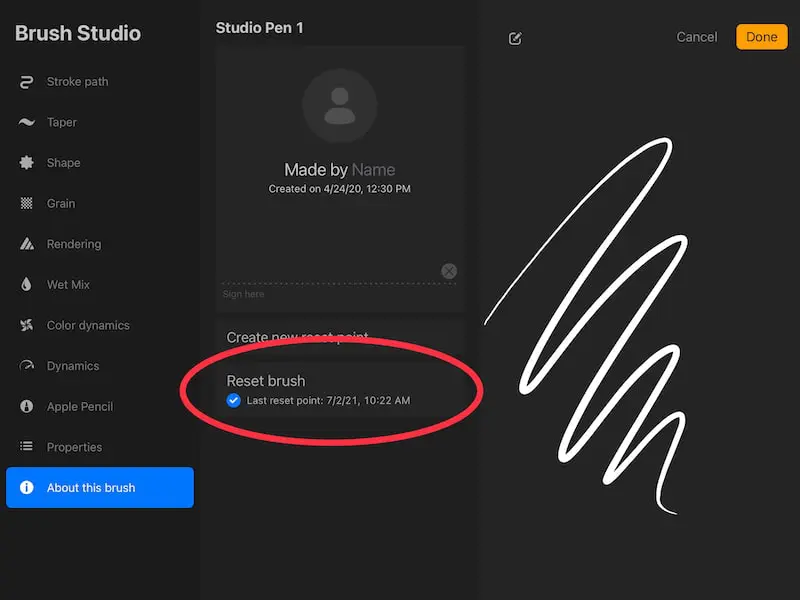
Also, if I make enough changes to a brush that I want to keep, I don’t want to have to make a copy of the brush in order to preserve those changes and then revert the old brush back to the original. Too much work.
When it comes to grouping favorite brushes into a single folder, I like for these to be copies so that I can still see the original brush in its original folder. For example, when I scroll through the Inking folder, I still want to see my favorite Inking brush, even if I have another copy of it in my Favorites folder.
Also, I like to be able to delete brushes from my Favorites folder without having to worry about deleting the original brush.
Copies are great.
Ok, now that we’ve talked about how to, in effect, favorite your Procreate brushes by grouping them within a folder, let’s talk about how to have easy access to them through the QuickMenu.
2. Favorite Your Procreate Brushes with the QuickMenu
To favorite your Procreate brushes in the QuickMenu, make a brushes folder within your QuickMenu folders. Choose 6 of your favorite Procreate brushes and individually set each one to each of the QuickMenu options.
The QuickMenu is an AWESOME organizational tool that will make your Procreate life a lot more efficient, both when using brushes and any other Procreate functions.
Let’s talk about how to set this up, step-by-step. While we’ll be using Procreate brushes as our example here, you can apply these steps to any Procreate features.
1. Choose how you’d like to access your QuickMenu. To do this, click on the wrench to open the Actions menu. Click on Preferences and then Gesture Controls.
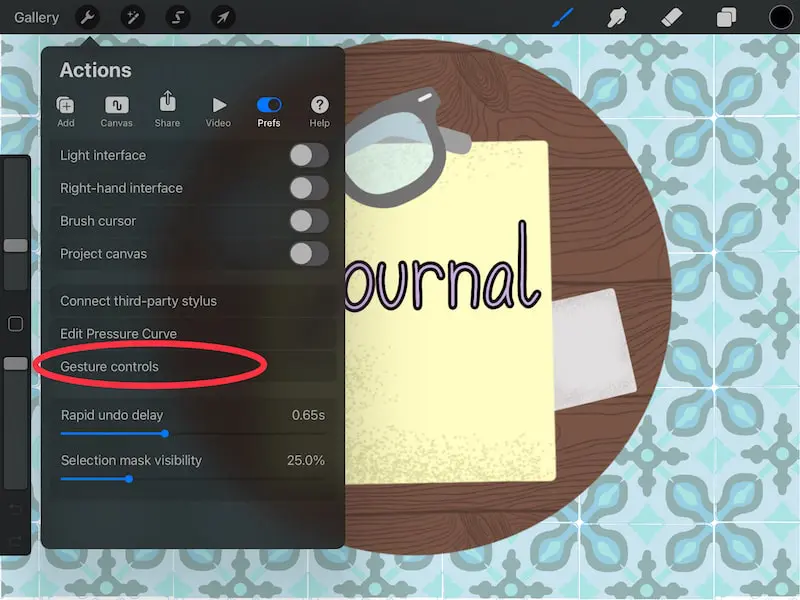
2. Click on the QuickMenu button in the Gesture Controls options. Choose how you’d like to activate and access your QuickMenu.
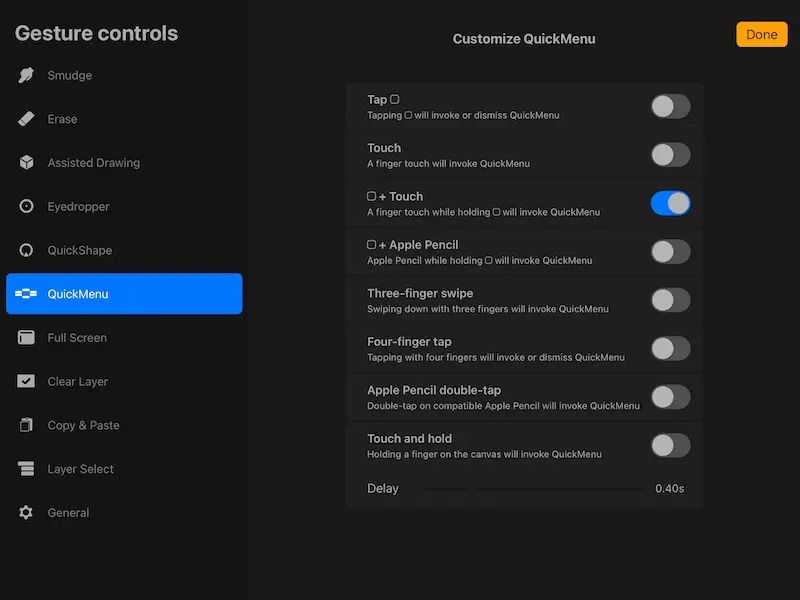
3. Open your QuickMenu and click on the plus sign to create a new folder of actions. Label it Brushes.
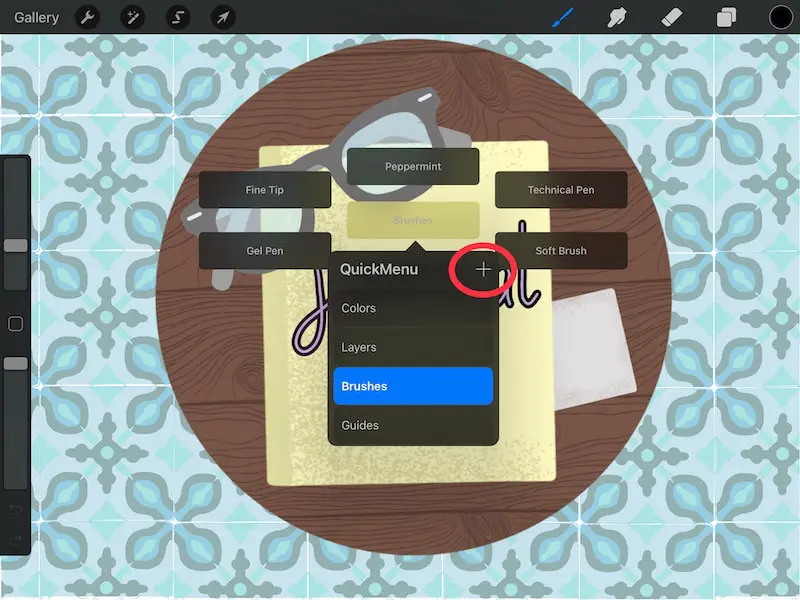
4. You’ll see 6 available slots for you to assign brushes to. Click and hold each slot until you see options appear.
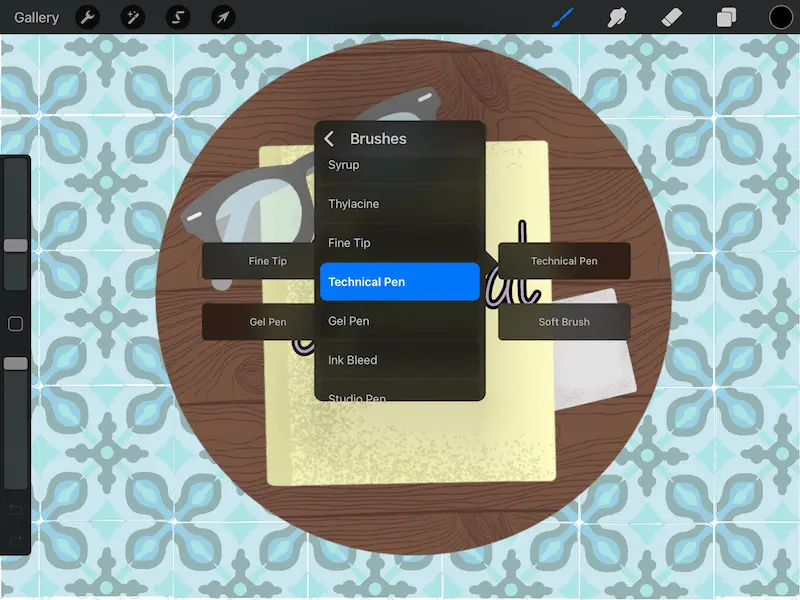
5. Choose a favorite Procreate brush for each slot.
You’re all set! Whenever you need to access your favorite Procreate brushes, open your QuickMenu. There, you’ll find all of them grouped in one spot.
What if you have more than 6 favorite brushes?
Simply create another QuickMenu brush folder. Just make sure to differentiate the names of these folders so that you can easily tell them apart.
Even though Procreate doesn’t have a direct way to favorite brushes, these two strategies basically do the same thing.
Choose whichever strategy works best for you and makes your Procreate life easier.
Having quick and easy access to groups of your favorite Procreate brushes can ultimately save you a lot of time when you’re creating your art and scrolling through all of your brush options. Even if it isn’t fun to set up initially, your time and effort will pay off in the long term.

Diana has been an artist for over 27 years and has training in drawing, painting, digital drawing and graphic design. Diana’s latest obsession is digitally drawing with Procreate and Procreate Dreams. Diana has experience selling her art across a number of platforms and loves helping other artists learn how to make money from their art as well.

