Creating art in Procreate is great, but it’s even greater when you can share it. Knowing how to export Procreate files is the difference between your art staying on your iPad for only you to see, and getting it printed, sharing it with others, and having fun with it. So, how do you export Procreate files, exactly?
To export Procreate files, click on the wrench to open the Actions panel. Click on the Share tab. Choose whether you want to export your work in the following formats: Procreate file, PSD, PDF, JPEG, PNG, or TIFF. You can also choose to export your work as an animation.
There are reasons why you’d want to export your Procreate artwork as one file type or another. We’re going to talk about that. We’re also going to talk about how to export your Procreate files with transparent backgrounds and how to export them to different types of operating systems.
This info is going to open up a lot of doors for you when sharing your art with the world so, what are we waiting for? Here we go.
1. Double Check that Your Image is Finished
Before you start the process of exporting your artwork, double check that it’s finished and all of your layers are visible. I know this sounds silly, but you’ll surprise yourself with how many times you’ll realize that you’ve missed something. Well, at least I do.
To be safe, double check that your art is finished. You’ll also want to look at your Layers panel to make sure that all of the layers you need are checked and visible.
It’s also good to double check that your art is the right size. You don’t want to export it and find out that it’s way too big or small.
Ok, now that we’re done with that, let’s start exporting your artwork.
2. Click the Wrench to Open the Actions Panel
Look at your top toolbar in Procreate and click on the wrench on the far left side. This will open the Actions panel.
3. Click the Share Tab
Once you’ve opened the Actions panel, click on the Share tab. It’s the one with the icon of the square and the arrow.
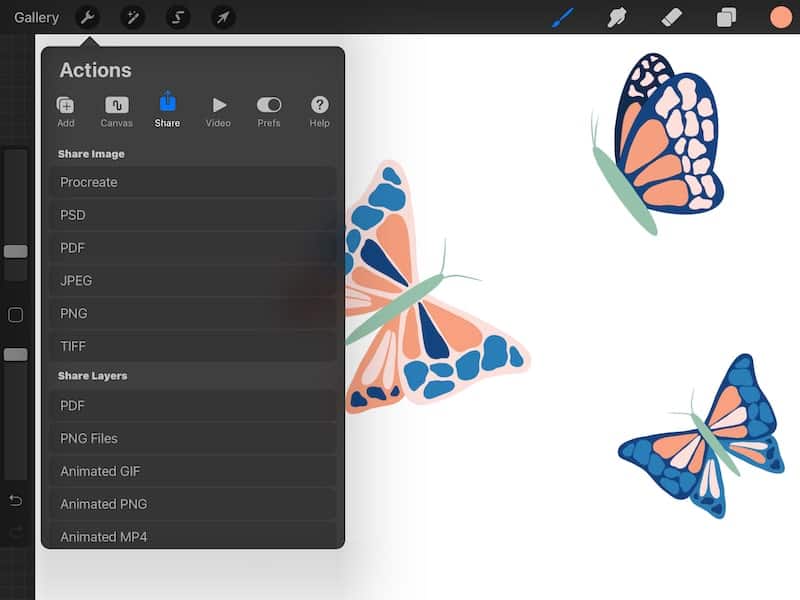

4. Choose Your Desired File Format
From here, choose your desired file format. We’ll talk about which ones are best for specific purposes in the next section.
Here’s a run down of the different file formats and why you might want to choose each of them:

Procreate – Procreate files will maintain your design as it exists in Procreate. That means, if you were to upload a Procreate file into Procreate, it would look like any of your other projects, with all of your layers maintained.
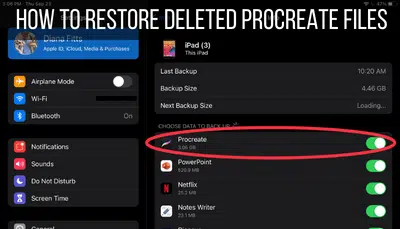
I REALLY suggest backing up your art as their original Procreate files in case something ever goes wrong with your iPad. I have an article about saving your Procreate work where I go into this in more detail.
PSD – PSD files are Photoshop files. If you’re working with a client that needs to work with your art in Photoshop, or if you need to yourself, this is the file type you should choose.
PDF – I like to export my Procreate art as PDF files when I’m going to print on my home computer. Worksheets, cards, templates, ect. My printer is old and I like how I don’t have to fuss around with sizing PDFs. You get what you get.
Remember that in step 1 we double checked that our art was sized correctly 🙂
JPEG – JPEGs are your run of the mill image files. They’re great if you need to be conscious of your files sizes and mainly plan to post your art on the web. Keep in mind though that they are not your highest quality option on this list. If image quality really matters to you, choose our next option, the PNG.
PNG – PNG files are high quality image files. While they tend to have larger file sizes than JPEGs, they also tend to be more crisp and clear (source). Personally, PNG files are my go-to export choice for my Procreate art.
TIFF – TIFF files are used to maintain the quality of raster-based images, which is great since Procreate is a raster-based program. These files are often used by photographers and graphic designers given how high quality they are. If you use this option, make sure that wherever you’re exporting your TIFF file to supports this file type.
Layer options – You can export your work as individual layers. You can choose PDF or PNG. You also will have to choose this option if you’ve made an animation.
5. Choose Where You Want to Export Your Artwork To
Your new Procreate file needs somewhere to go! There are SO many options to choose from.
Firstly, you’ll see a list of apps from your iPad. If you scroll all the way to the end of the list, you’ll see a “More” button. Click on this button to see all of the apps that you can export your Procreate files to.
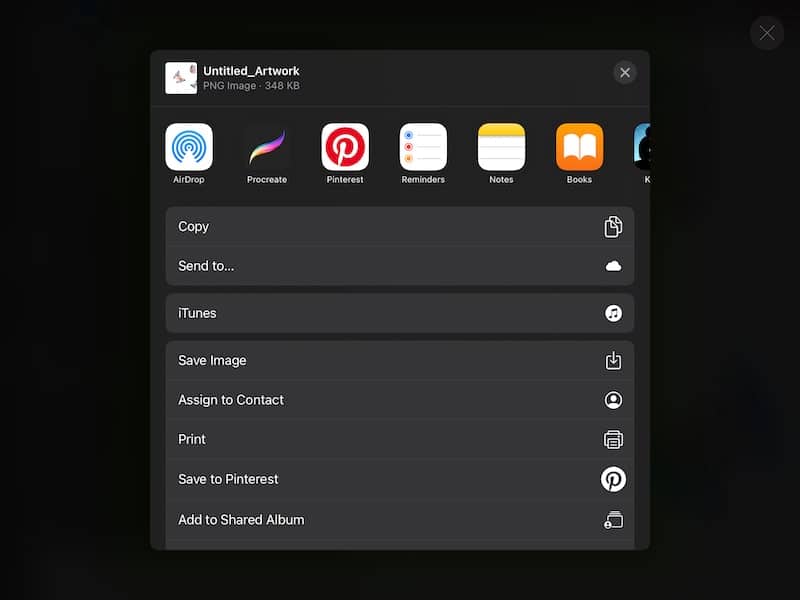
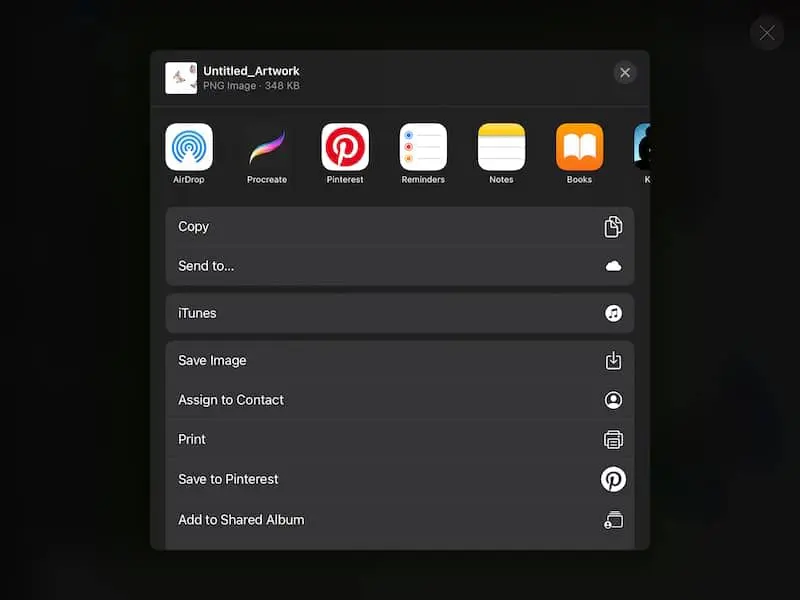
You can also copy your file, send it to the cloud, send it to iTunes, save your artwork as an image to your iPad, assign it as the profile picture for one of your contacts, print your artwork, save it to Pinterest, or share it to a shared album, save it to your files.
Phew! That’s a lot of choices. Click on your desired export choice, wait for it to process, and you’re done!
Before we finish though, there are some important things about exporting that you’ll want to keep in mind.
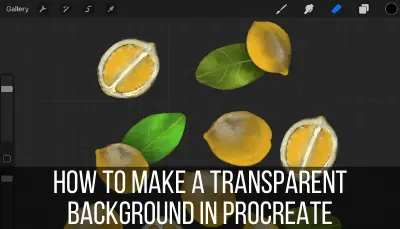
How to Export Procreate Files with Transparent Backgrounds
Export Procreate files with transparent backgrounds by opening the Layers panel and scrolling down to the first layer that contains your background. Click the checkmark next to that background layer to hide it. Now when you export your art, your background won’t be included.
Having a transparent background is important if you plan to sell your Procreate art on t-shirts, mugs, or any other types of products. It’s also important if you plan to use your Procreate art as a part of another design project on Canva or other graphic design program.

How to Export Procreate Files from an iPad to a Mac
The easiest way to export Procreate files to a Mac is to Airdrop them. Simply click on the Airdrop button and wait for your Mac to pop up on the Airdrop list. Click on the icon of your Mac and, once you hear a beeping sound, your file will have arrived on your computer.
When you use Airdrop, you eliminate any annoying middle steps. For example, no need to send the files to your email, open your email, scan through your unread emails to find the right email, and then drag your Procreate files from your email to your desktop. Should I say email one more time?
When working with Procreate, Airdrop is a life saver. It’s personally my #1 way of transferring my Procreate files onto my computer.
But, what if you don’t have a Mac? How can you transfer your Procreate files to a PC?
How to Export Procreate Files from an iPad to a PC
Unfortunately, Airdrop won’t work with a PC, so you’ll have to take an additional step when transferring your Procreate files to your PC. Export your Procreate files to your email or cloud storage. Open your email or cloud storage on your PC and drag your Procreate files onto your desktop.
Part of the reason why Apple does such a good job of keeping people within their ecosystem is because their products work so well together. The seamless syncing and transferring is why we all have iPhones, iPads, and Macbooks.
If you’ve managed to stay out of the Apple world by having a PC, you’ll just need to take an additional step to transfer your Procreate art to your computer. While it isn’t as smooth or quick as Airdrop, the extra step isn’t a huge deal.
Also, there’s a perk. When you take the middle step of transferring your Procreate files to your email or cloud storage, you’re getting a win-win by backing up your files as well. If something goes wrong with your iPad, you have your art stored in your email or the cloud.
Exporting your Procreate art isn’t the most sexy or exciting thing about using Procreate. That said, it’s an important component of making sure that your art can be shared with the world. Figure out your go-to export choices and it will start to come naturally in no time.
Have fun with Procreate!


Diana has been an artist for over 27 years and has training in drawing, painting, digital drawing and graphic design. Diana’s latest obsession is digitally drawing with Procreate and Procreate Dreams. Diana has experience selling her art across a number of platforms and loves helping other artists learn how to make money from their art as well.