Clip Studio Paint’s liquify tool lets you push, pull, warp, and shape your art. It’s such a fun feature that lets you more easily create effects that would be tricky to create by hand.
To use the liquify tool in Clip Studio Paint, begin by clicking on it in the tool panel. Within the tool property settings, choose the type of liquify effect you’d like to use within the mode settings. Adjust the size, strength, hardness or your liquify brush, as well as if you’d like it to only refer to the editing area.
Personally, I have SO much fun with the liquify tool! I find it to be so relaxing to put down some splotches of paint and create neat patterns with the liquify tool. It’s also great for making adjustments to my art that would take me forever to do by hand.
I adore the liquify tool in Procreate, so I was so pleased to find the liquify tool in Clip Studio Paint!
We’re going to dive into how to use the liquify tool in Clip Studio Paint so you can get started having fun with it in your art!
To begin with, let’s talk about where to find the liquify tool and how to adjust the general settings. Then, we’ll dive into each of the liquify modes you can use, one-by-one.
Liquify Tool General Settings
Activate the liquify tool in your tool panel in Clip Studio Paint. Within the liquify tool property menu, you can adjust the size, strength, and hardness of your liquify brush. You can also choose the mode you want to use, as well as whether you want the liquify effect to apply only to your selection or not.
To begin with, we need to find the liquify tool in the first place. Scan through your tool menu until you see an icon that looks like a warped grid. Don’t confuse this with your frame border tool, which also has a grid icon.
Once you’ve found the liquify tool and activated it, open the liquify tool property menu. This is the icon with the liquify and gear icon.
In the tool property menu, you can find a variety of options for customizing your liquify brush. We’re going to talk about each of the liquify modes, one-by-one, so we’re going to skip those for now and focus on the rest of the settings.
Keep in mind that these settings work together to create the liquify effects you see appear on your canvas. Even though we’re going to talk about them, one-by-one, don’t think of them as isolated from each other. Play around with them together to find the balance between them that you’re looking for.
–Brush Size: the brush size slider will let you adjust how big or small you want your liquify brush to be. You see, the liquify tool is used in a similar way to a brush. Similar to other brushes, you’ll drag it across your canvas where you want the liquify effect to be.
If you click on the little icon next to the brush size number, you can make additional adjustments to customize your brush size dynamics.


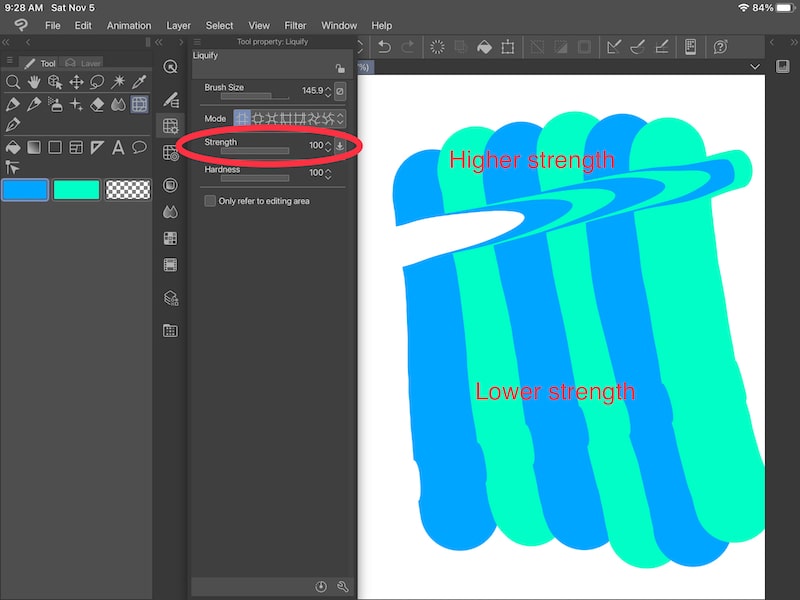
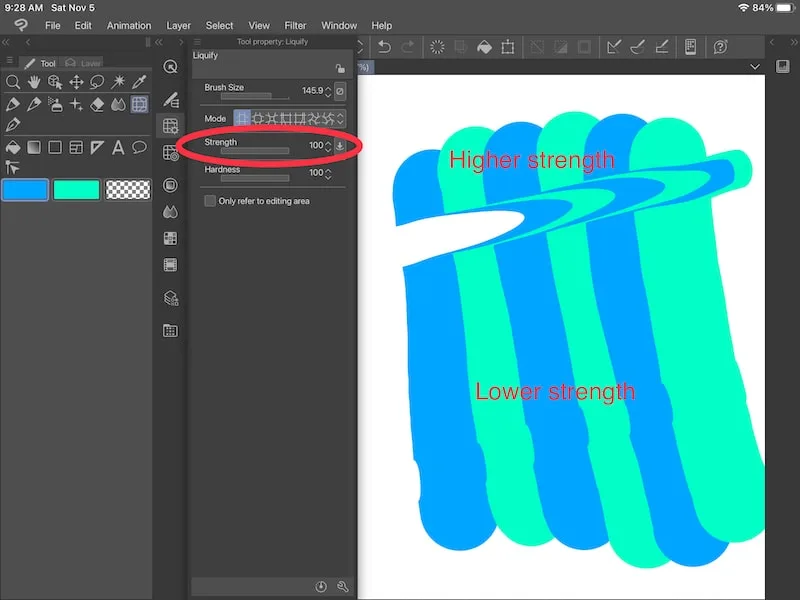
–Strength: the strength slider will let you adjust how powerful you want the liquify effect to be. This will make each of your liquify strokes more dramatic and noticeable.
If you click on the little icon next to the strength number, you can make additional adjustments to customize your strength dynamics.
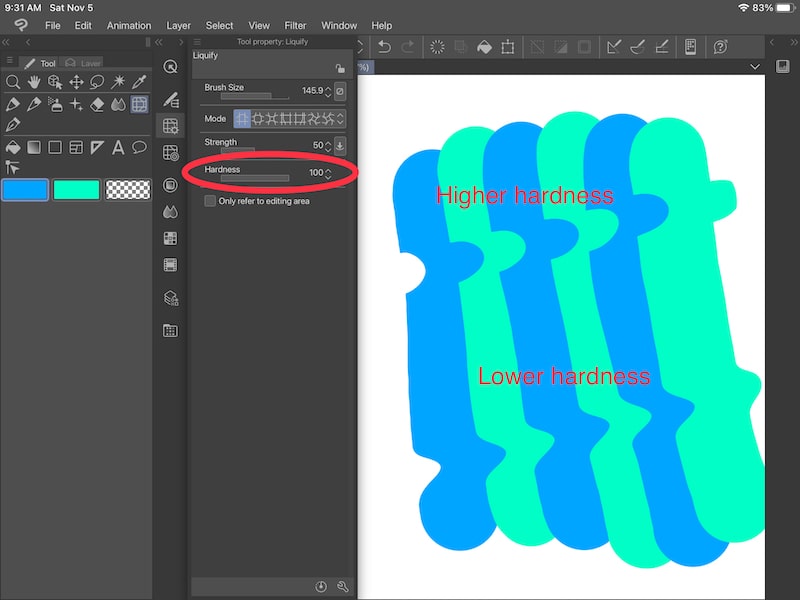
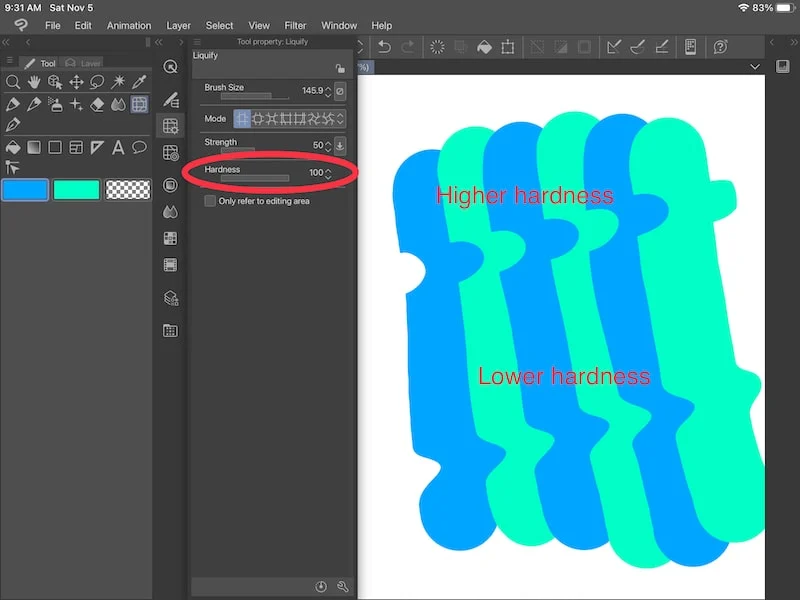
–Hardness: the hardness slider will let you adjust the style of your liquify effect. For example, if your hardness is high, you’ll get a rounder and more defined look than if the hardness is low.
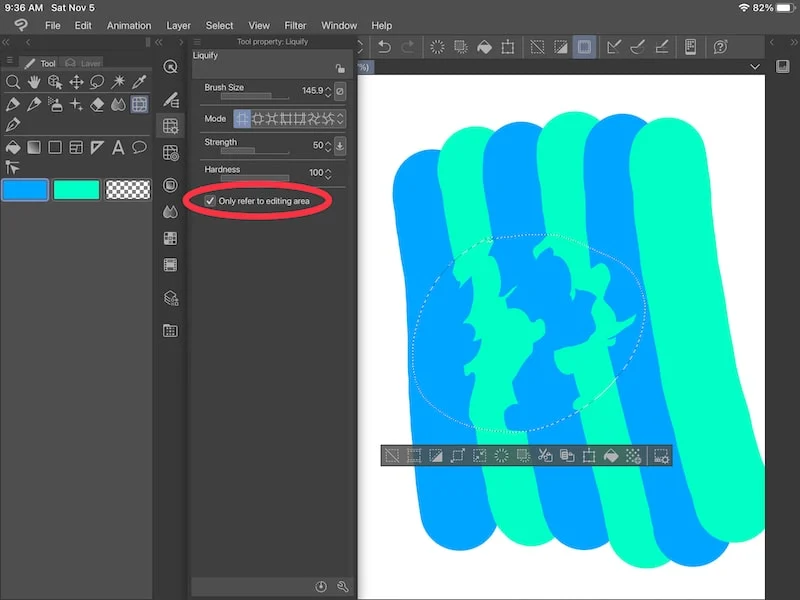
–Only refer to editing area: if you turn this option on, your liquify effect will only be applied to the area you’ve selected. So, if I make a selection with the selection tool, my liquify brush will only have an impact within that space.

Alright, now that we’ve talked about the general settings for the liquify tool, lets talk about each of the liquify modes. This is the fun part where you can choose what type of liquify effect you want!

Liquify Tool Modes
The liquify tool has various modes you can use to customize the type of liquify effect you can use with your art – Push, Expand, Pinch, Push Left, Push Right, Twirl Clockwise, Twirl Anti-Clockwise.
The name of each liquify mode is fairly self-explanatory, but let’s see each of them in action! Let’s say that you’ve made a shape in Clip Studio Paint. Here’s what the Liquify tool can do with it.
–Push liquify mode: the push mode will make it look like you’ve dragged your art across your canvas with your cursor.
It’s similar to running your finger through finger paint that’s been spread out on a piece of paper. It will bunch up and swirl as you move your finger through it, creating a unique pattern. That’s what the push liquify mode is like!

–Expand liquify mode: the expand mode will make it look like your art is blooming from the center of your cursor.
It’s similar to pushing your hand straight down in the middle of the finger paint, albeit less dramatic. The hand, or your cursor, is the center point from which everything spreads out from.
Similarly, the expand mode will have your art balloon out front the center of your cursor.

–Pinch liquify mode: the pinch mode will make your art bunch up around your cursor. It gives it the appearance of being pinched!
While the expand mode caused our art to balloon out and away from the cursor, the pinch mode causes our art to move inwards and towards the cursor.
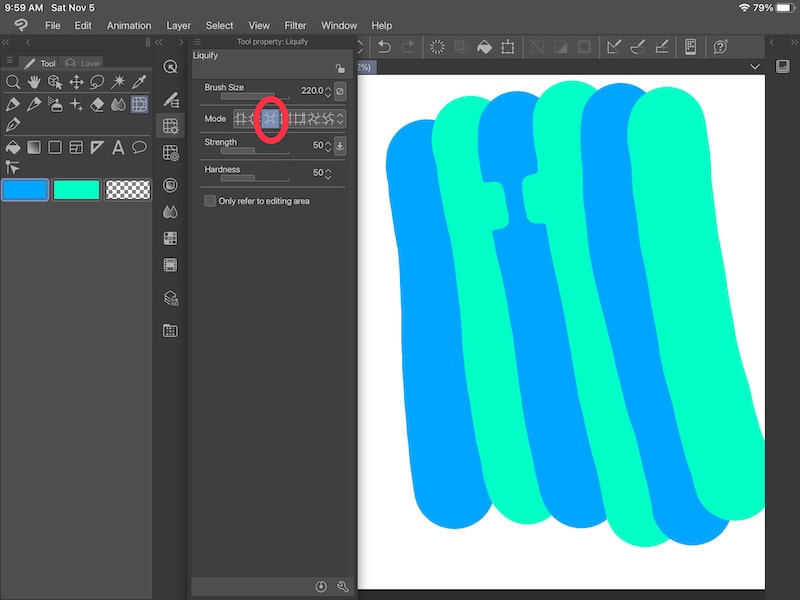

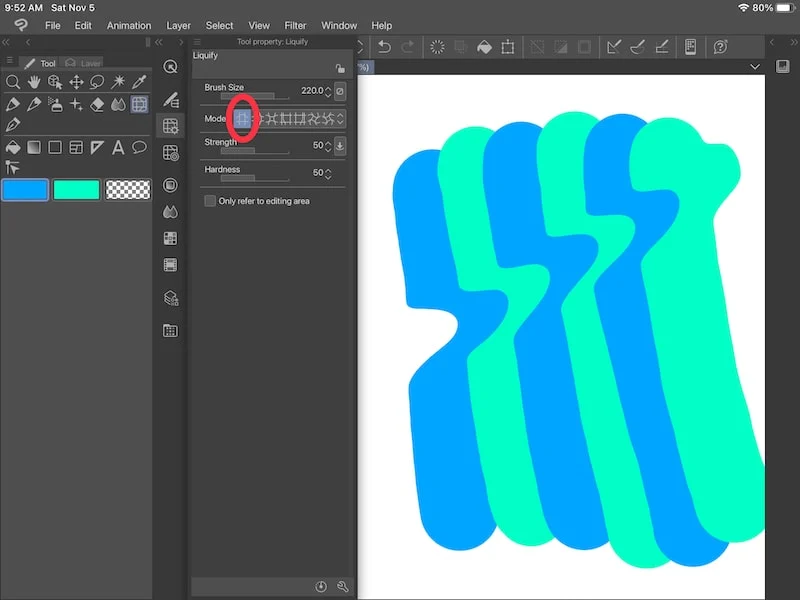
–Push left liquify mode: the push left mode will direct your art towards the left of your cursor. In my example below, this is most easily seen when moving my cursor up or down my stripes. As I move my cursor up through my stripes, you can see that the blue stripe is being pushed to the left and crossing into the green stripe more than it was before.


It’s important to realize that the right and left side of your cursor will change depending on the direction that your cursor is moving. For example, the example above was moving my cursor UP through my stripes. That said, if I move my cursor DOWN through my stripes, it has the opposite effect.
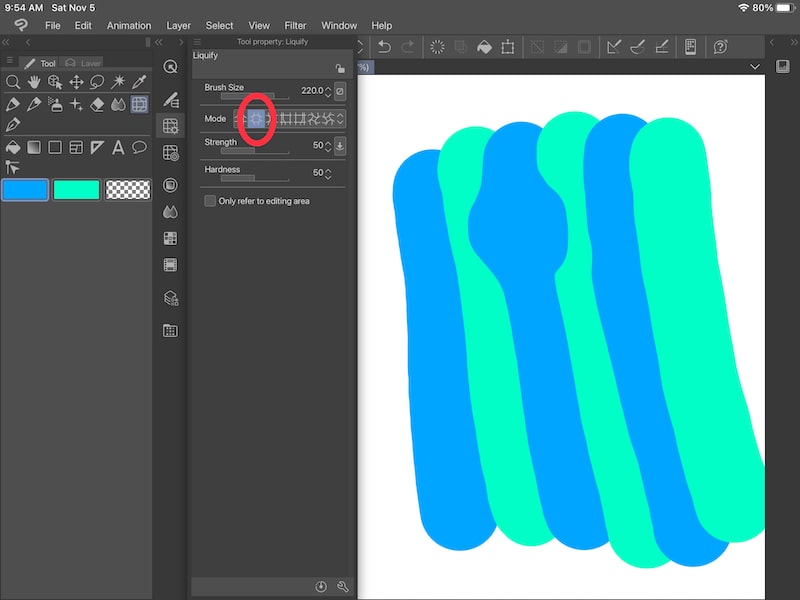
–Push right liquify mode: the push right mode will direct your art towards the right of your cursor. In my example below, this is most easily seen when moving my cursor up or down my stripes. As I move my cursor up through my stripes, you can see that the green stripe is being pushed to the right and crossing into the blue stripe more than it was before.
As with the push left effect, the right and left side of your cursor will change depending on the direction that your cursor is moving, so keep that in mind as you’re working.


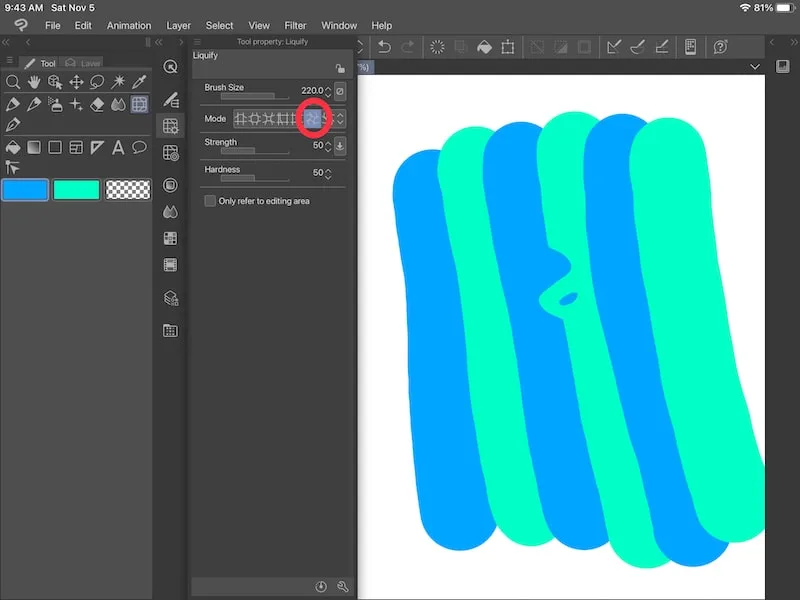
–Twirl clockwise liquify mode: the twirl clockwise mode will push your art into a swirl in a clockwise direction. In my example below, I’ve increased the strength, hardness, and size of my brush and held it down on my work.
As you can see, the stripes start to swirl in a clockwise direction. The swirl continues until you lift up your brush.

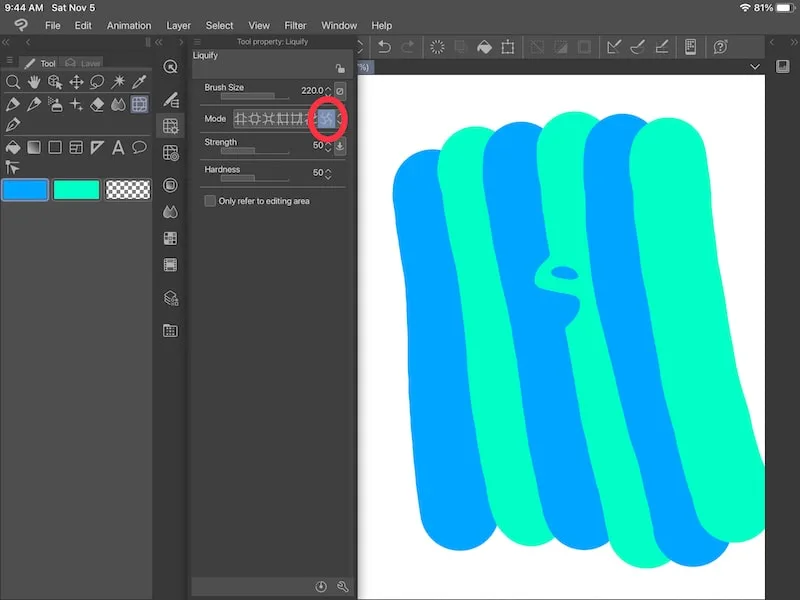
–Twirl anti-clockwise liquify mode: the twirl anti-clockwise mode does the same thing as the twirl clockwise mode, except in the opposite direction.

There you have it! Now that we’ve covered the ins and outs of the liquify tool, go have fun and experiment with it.


Diana has been an artist for over 27 years and has training in drawing, painting, digital drawing and graphic design. Diana’s latest obsession is digitally drawing with Procreate and Procreate Dreams. Diana has experience selling her art across a number of platforms and loves helping other artists learn how to make money from their art as well.