As digital artists, we all know that quality is important. Pixelated, fuzzy, or blurry drawings can be a bummer. That’s why we need to be careful when resizing our work in Clip Studio Paint.
When resizing raster-based work in Clip Studio Paint, quality loss happens because the pixels are stretching or shrinking to accommodate the new size. To limit quality loss, carefully choose your interpolation settings. It’s also best to use larger canvases than you think you need that are at least 300 DPI.
In Clip Studio Paint, there are things you can do to limit quality loss in your work when you’re resizing it.
That said, we need to start off with some bad news.
If you’re resizing raster-based work, you’ll always lose some amount of quality. That’s just how raster-based images work.
Raster-based work is created with pixels. As you’re creating your work, you’re laying down pixels that become your lines, shapes, and piece of art. When you resize your work, those pixels need to shrink or stretch to accommodate the new size you’ve chosen (source).
Especially when making your art larger, this can leave you with unexpected results. Sometimes it’s just a little fuzz on the outside of your outlines, while other times, the pixelation is more obvious.
Now, it’s important to be aware that the number of times you resize something matters too.
Every time you resize something, the pixels need to reposition themselves, which means that the more times you resize something, the more quality loss you’re likely to experience.
That’s why it’s important to limit the amount of times you resize your raster-based work.
This is true for raster-based work in any program you use, whether it be Clip Studio Paint, Procreate, or otherwise.
So, the best thing to do is to not resize your raster-based work at all. That’s not always practical though.
If you need to resize your work, try to avoid doing it multiple times. Carefully plan your resizing so that you aren’t resizing things over and over again for no reason. Also, be intentional about the settings you use when resizing. What are those settings? Well, let’s dive into them!
While you can’t prevent quality loss altogether when resizing your raster-based work, we’ll talk about some things you can do in Clip Studio Paint to limit it.
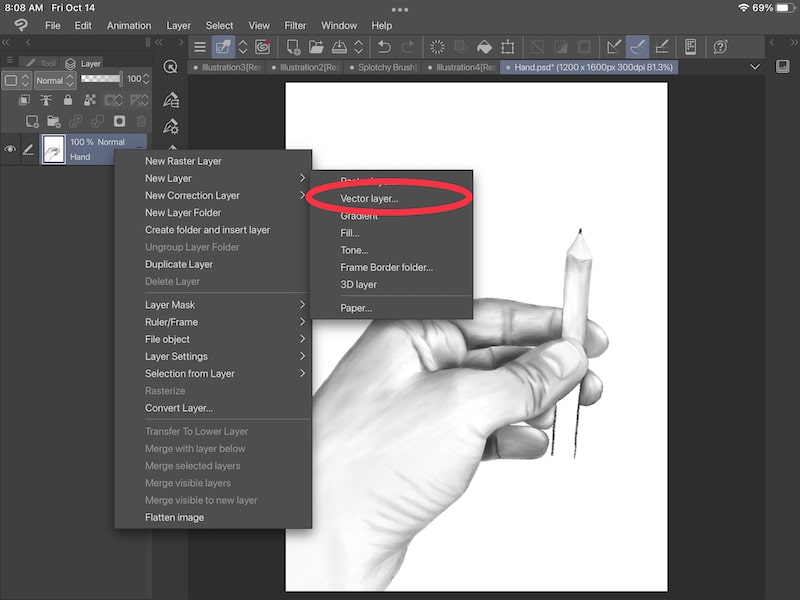
Draw with Vector Layers Instead of Raster Layers in Clip Studio Paint
To limit quality loss when resizing your work in Clip Studio Paint, use vector layers instead of raster layers. Given that vectors don’t use pixels, this will allow you to scale your work up and down without your work becoming fuzzy or pixelated.
Clip Studio Paint has the option to use vector layers. These work very differently than raster layers, which becomes important when resizing your work.
Vector images are not made out of pixels, so they don’t have a set amount of pixels they need to cater to. Instead, their lines are built and controlled by mathematical formulas. This means that they can be scaled over and over again without losing quality (source).

You may not want to use vector layers for any number of reasons. For the sake of resizing without losing quality though, vectors are a great choice.
If you don’t want to dive into vectors and would prefer to stick with the raster realm, here’s something you’ll want to consider.
Consider Your Interpolation Setting When Resizing Raster-Based Work
When resizing your raster-based work in Clip Studio Paint, think about the interpolation setting you want to use. While your choice will depend on your preferences and your art, it’s best to avoid the Nearest Neighbor setting to limit quality loss.
Before we dive into what interpolation is, here’s how to find the Interpolation settings you need in Clip Studio Paint.
Finding the Interpolation Settings When Resizing an Object
If you’re resizing a specific object in your Clip Studio Paint, here’s where to find the interpolation settings before you get started with scaling and resizing.
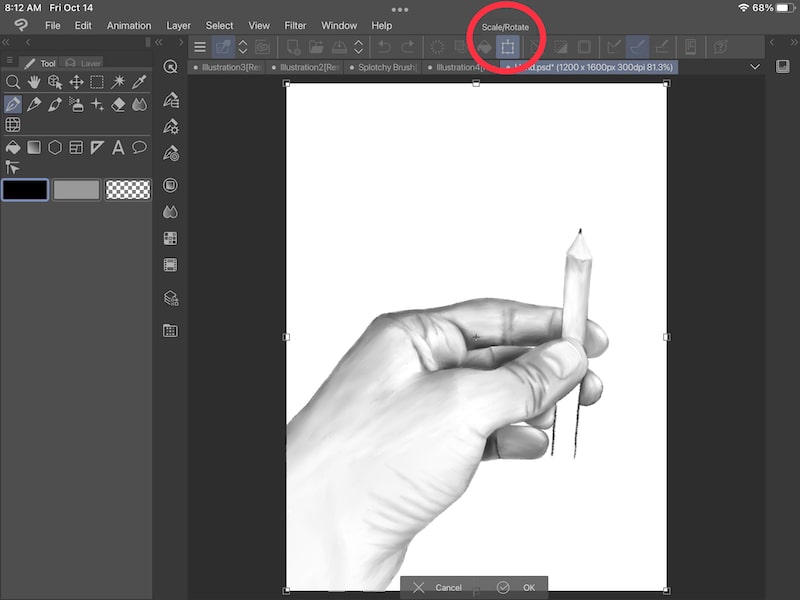
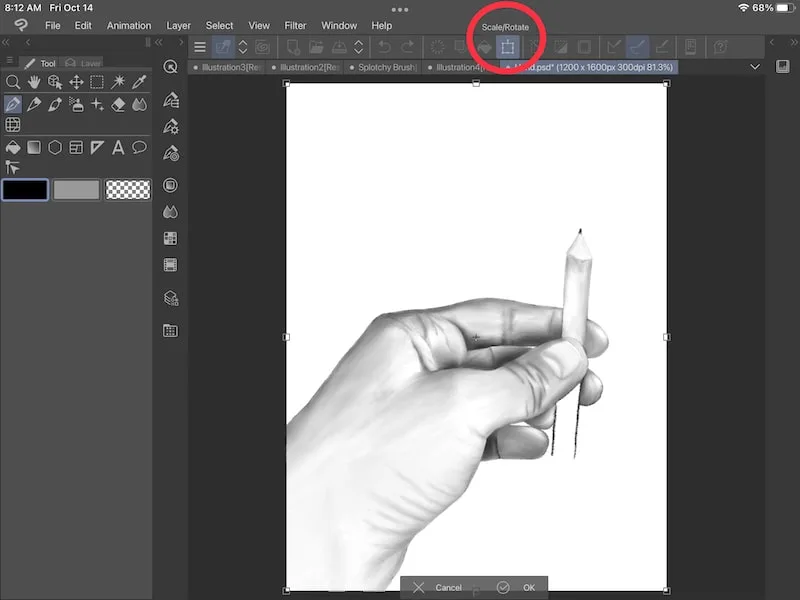
1. Click on the “Scale/Rotate” button in your top toolbar
The “Scale/Rotate” button can be found in the top toolbar with the square icon. You can also access it by going to the “Edit” menu, clicking on “Transform”, and choosing the “Scale/Rotate” button.
I have a full guide on resizing in Clip Studio Paint if you want to learn more!
2. Click on the “Tool Property” menu
The “Tool Property” menu can be found by clicking on the icon that has the tool you’re using and a gear.
When you have the “Scale/Rotate” tool enabled, the “Tool Property” menu will actually show settings for the transformation tool. Hooray!
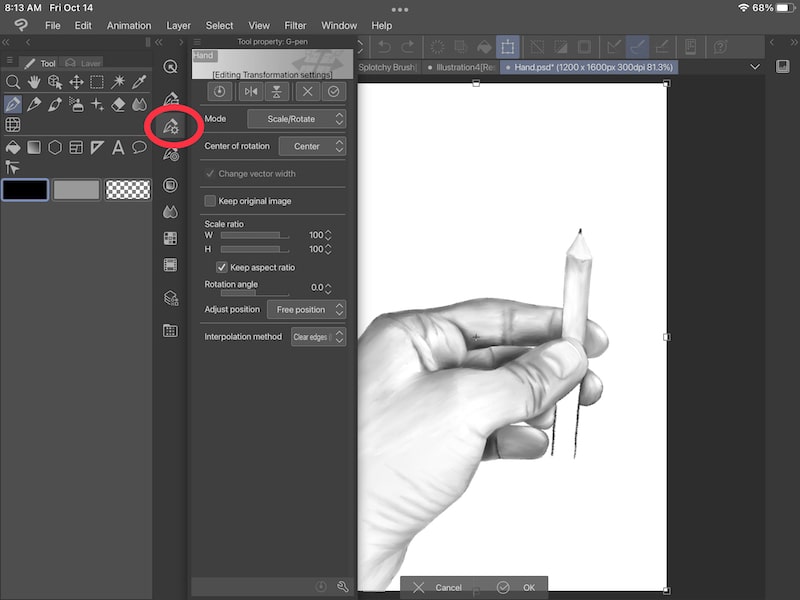
3. Find the interpolation drop down
Within the “Tool Property” menu, you’ll see options for flipping, scaling, and much more. You’ll also see a drop down to indicate your chosen interpolation method. We’ll talk about what all of these interpolation settings mean soon.


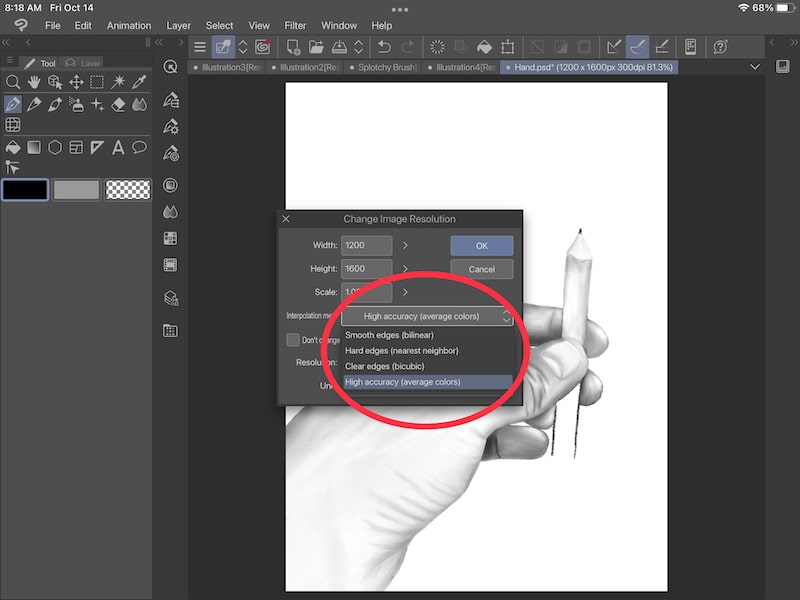
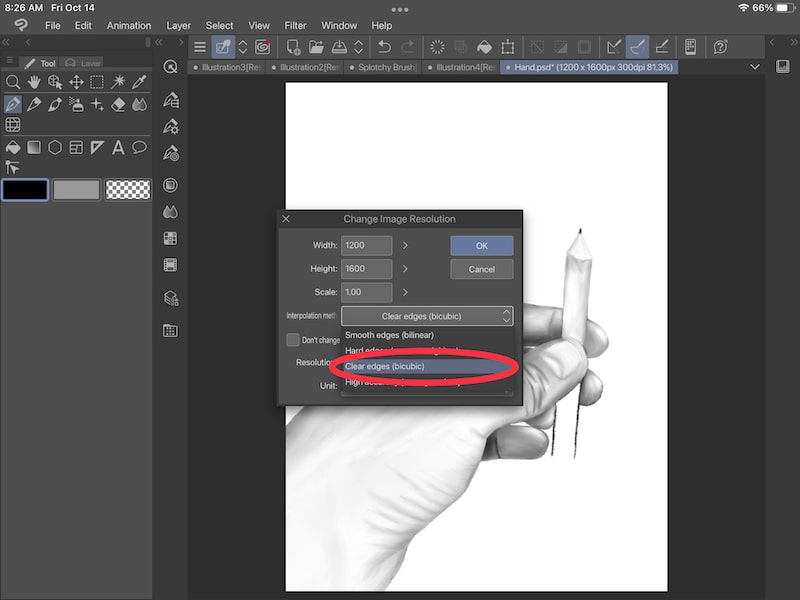
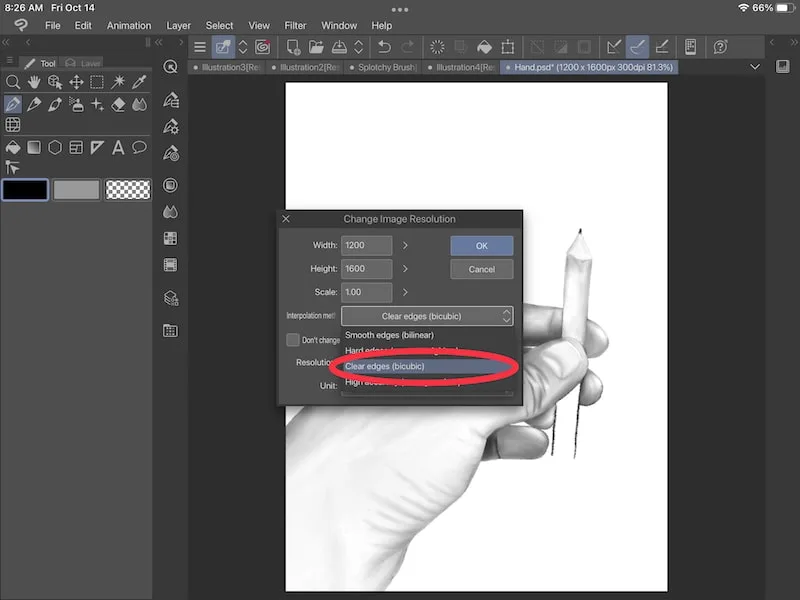
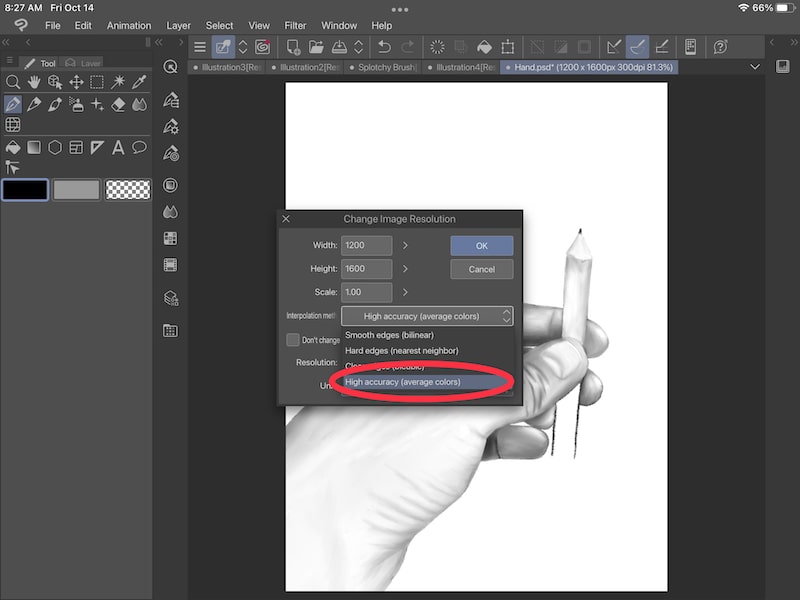
Finding the Interpolation Settings When Resizing Your Canvas
If you’re resizing your entire canvas in Clip Studio Paint, here’s where to find the interpolation settings before you get started with resizing.
1. Open the “Edit” menu and click on the “Change Image Resolution” button.
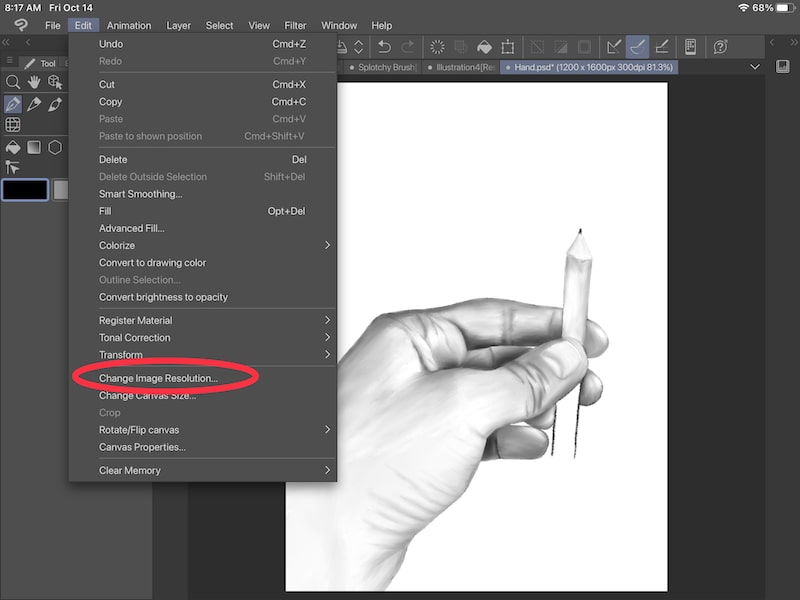

2. Find the interpolation drop down
Within the image resolution settings, you’ll be able to change the size and resolution of your canvas. While doing so, you can choose an interpolation method from the drop down.

Alright, now that we’ve talked about how to access the interpolation settings, let’s talk about what the heck interpolation actually is.
In the digital art world, interpolation is a method for adjusting pixels as an image is resized, (source). Basically, as you resize your raster-based work, interpolation allows for the pixels to make the best approximation of what’s needed to accommodate the new size of your object.
Not only do the pixels rearrange themselves, but it also needs to be determined if any pixels need to be added or removed. It’s then a process to determine where those new pixels should be placed, or where the extra pixels should be removed from. This is all an approximation based on the surrounding pixels that currently exist (source).
Of course, the way that your pixels rearrange themselves is going to impact how your resized object looks.
Important note: remember that interpolation happens every single time you resize an object. Every time you resize it, you will lose a little bit of quality, so it’s good to limit the amount of times you resize your objects, if possible. This quality loss is a natural part of interpolation, but there are ways to minimize it.
That’s where the different interpolation settings come in. Let’s dive into each of them.
Important note: the way that these interpolation settings impact your work depend on your specific piece of art. There isn’t a one-size-fits all approach to this because everyone’s artwork is unique and different. That’s why you need to choose the options that work the best for you and your art specifically.
Hard Edges (Nearest Neighbor)
When you use Nearest Neighbor, it will determine your final result by only considering 1 pixel on each side of your edge. This is the simplest and fastest interpolation method, but it can leave you with a pixelated effect.
That’s why Nearest Neighbor is NOT ideal and you might experience pixelation or quality loss when resizing your objects with it on.


Smooth Edges (Bilinear)
When you use Bilinear, it will look at a 2×2 area (4 total) of pixels around the edge, and take an average of them when determining what your final result will look like.
If you use the Bilinear setting when resizing your object, you’ll generally have smoother edges than you would with Nearest Neighbor.


Clear Edges (Bicubic)
When you use Bicubic, it will look at 16 pixels around your edge to determine what your final result will look like.
Given how many pixels this interpolation method uses, it will generally give you cleaner lines than Nearest Neighbor or Bilinear.
High Accuracy (Average Colors)
When you use the High Accuracy interpolation setting, the pixels are used to calculate the average colors of them. Ultimately, the image is generally more clear when it’s enlarged and more blurry when it’s made smaller.

Again, it’s important to consider your own, unique piece of art when choosing an interpolation setting. While there are general principles around interpolation, you have to decide what’s best for your own art.
Start with a Larger Canvas
To limit quality loss when resizing your canvas in Clip Studio Paint, it’s best to start with a larger canvas that’s at least 300 DPI. Generally, it’s better to scale down your work instead of scaling it up to preserve quality.
Ideally, every single one of our designs would be the right size every single time with no need to ever resize them. Ideally, resize your art as little as possible.
That’s not real life though. There are SO many times when we need to resize our art.
If you do need to resize your art, it’s always better to scale down instead of up. This means that, from the get-go, you want to design your canvases on the larger side.
That way, you can scale your art down to the size you need without worrying too much about losing quality.
It’s also a good idea to set your DPI to 300. This is EXTREMELY important if you plan to print your work.
To create a canvas at 300 DPI, click on the “New” button in the “File” menu. Within the new canvas settings, look at the DPI section and make sure it’s at 300. This is in the resolution section.


While you want to avoid resizing your work to begin with, starting off with a larger, high resolution canvas will help to mitigate the effects.
As artists, we want to focus on our art! It can be annoying to suddenly have to worry about resolution, pixelation, blurry edges, etc. when resizing your work. Hopefully these tips have taken away the stress of resizing your work in Clip Studio Paint so you can get back to what you love – creating your art!


Diana has been an artist for over 27 years and has training in drawing, painting, digital drawing and graphic design. Diana’s latest obsession is digitally drawing with Procreate and Procreate Dreams. Diana has experience selling her art across a number of platforms and loves helping other artists learn how to make money from their art as well.