There are a lot of brush settings in Procreate, with the taper settings, arguably, being the most confusing. Learning how to adjust the Procreate taper settings can help you have more control over your brushes, but it’s important to learn what they do.
The taper settings for Procreate brushes let you adjust the thickness and gradient of the beginning and end of your lines. They also let you control how much your brush taper is impacted by pressure and whether the taper is applied while you’re drawing, or after you lift your stylus.
Let’s dive into each of the taper settings so that you can have more creative control of all of your Procreate brushes.
Important note: make sure to read until the end of this post to understand how settings that are NOT taper settings can actually impact the taper on your Procreate brushes.
It would be premature to talk about this before diving into the Procreate taper settings themselves, but it’s important to read until the end to find out how to have the most impact on your brush tapers.
Ok, let’s dive into the taper settings. To access them, click on a brush to open its settings.
Another important note: I highly suggest making a copy of your brush before you mess around with it. That way, if you make a mistake while you’re adjusting its settings, you’ll still have the original to fall back on.

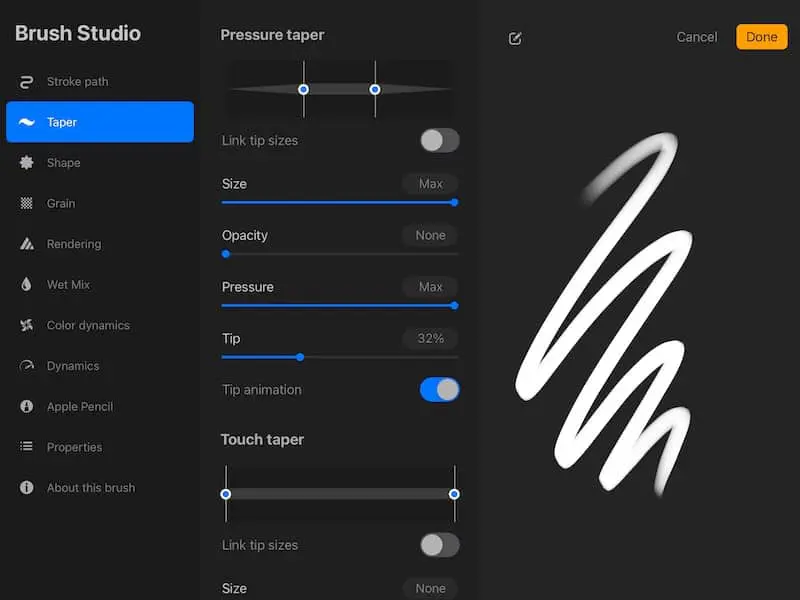
Once you’ve opened the brush settings, click on the second option down, which is labeled “Taper.”

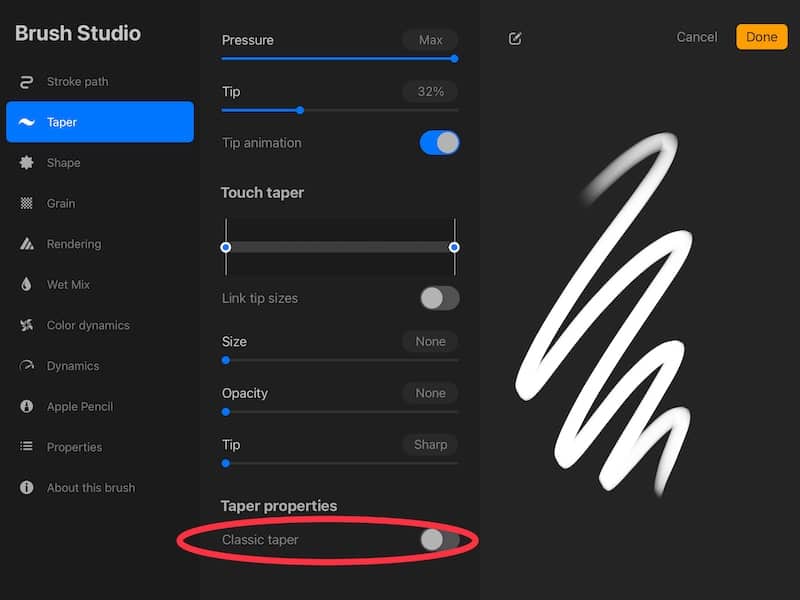
The first thing you need to do when you open the taper settings: scroll down to the bottom and use the button to disable the “Classic Taper.” If you leave this on, it will override the changes you make to the taper settings. Instead, it implements the taper settings from older versions of Procreate. Turn this off for the most taper control.

Now, you’re ready to mess around with the taper settings.
There are two sets of taper settings – pressure taper settings and touch taper settings. You will only need to adjust one set of them depending on what you’re drawing with.
Pressure Taper vs. Touch Taper
Pressure taper is what you need to adjust if you are using an Apple Pencil or other stylus. The touch taper is what you need to adjust if you are drawing with your finger. Just remember that touch=finger.
Also, don’t confuse taper with pressure sensitivity. I have a full guide on turning pressure sensitivity on and off that digs into this.
1. Taper Amount
The taper amount is controlled by the little diagram of the two-sided pencil at the top of the taper settings panel. The slider on the left side of the pencil diagram controls the amount of taper at the beginning of your stroke, while the one on the right controls the amount of taper at the end of your stroke.

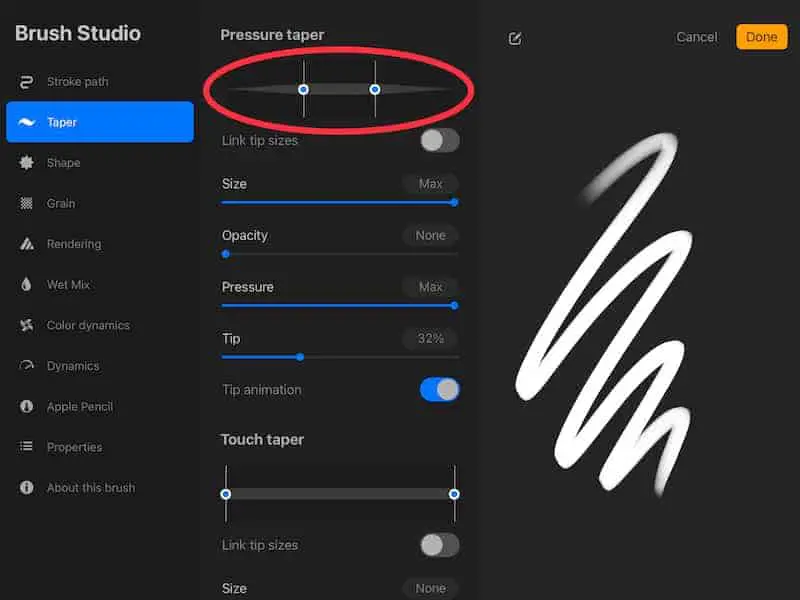
If you want a dramatic taper, either at the beginning or end of your stroke, move the slider(s) closer to the middle of the pencil diagram. If you want a subtle taper, or no taper at all, move the slider(s) closer to the ends of the pencil diagram.
If you want the taper to be the same size at the beginning and the end of your strokes, use the button underneath the pencil diagram to enable the “Link tip sizes” option.
2. Taper Size
The taper size slider will impact the size of your brush as you complete the taper in your brush stroke. If you want a small taper, move the slider to the left to a low percentage. If you want a bigger taper, move the slider to the right to a higher percentage.
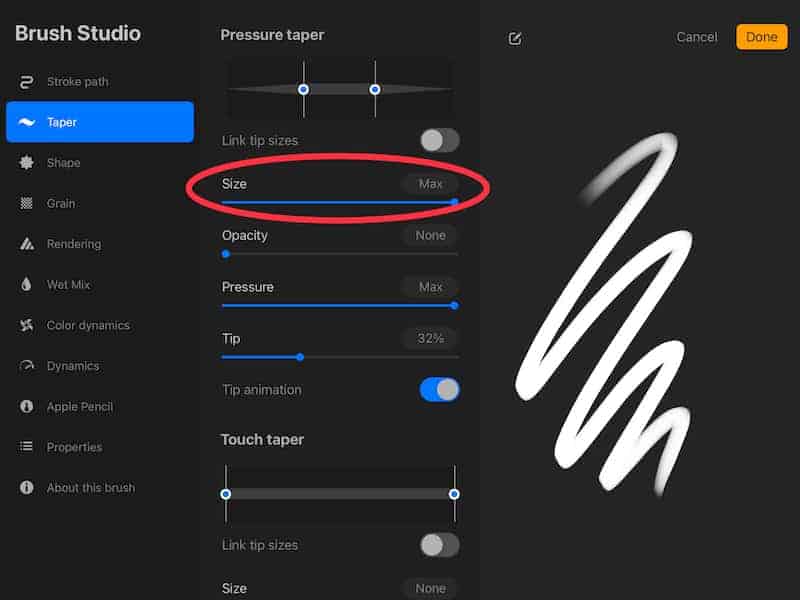
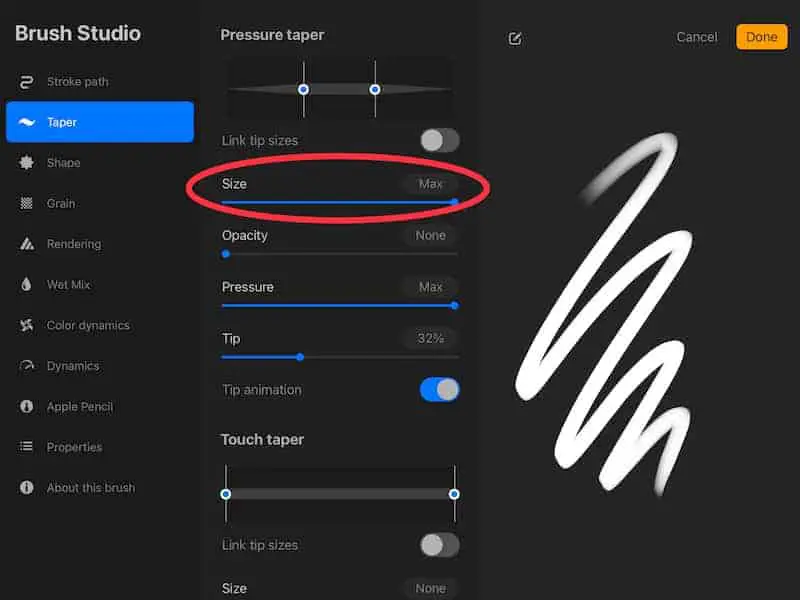
The more dramatic of an effect you want, the larger you should make the size of your brush taper.
3. Taper Opacity
The opacity slider will impact how opaque your taper is. If you want a lot of opacity, move the slider to the left to a lower percentage. If you want less opacity, move the slider to the right to a higher percentage.
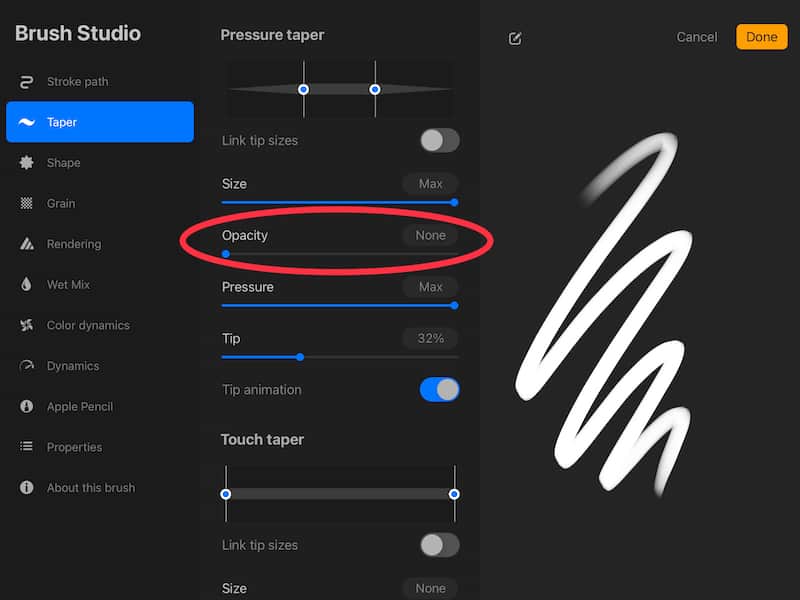

The more dramatic of an effect you want, the larger you should make the size of your brush taper.
4. Taper Pressure
The pressure slider will impact how dramatic your taper is in relation to the pressure you’re applying with your stylus. If you want less taper in relation to the pressure you apply, move the slider to the left to a low percentage. If you want a stronger taper in relation to the pressure you apply, move the slider to the right to a higher percentage.
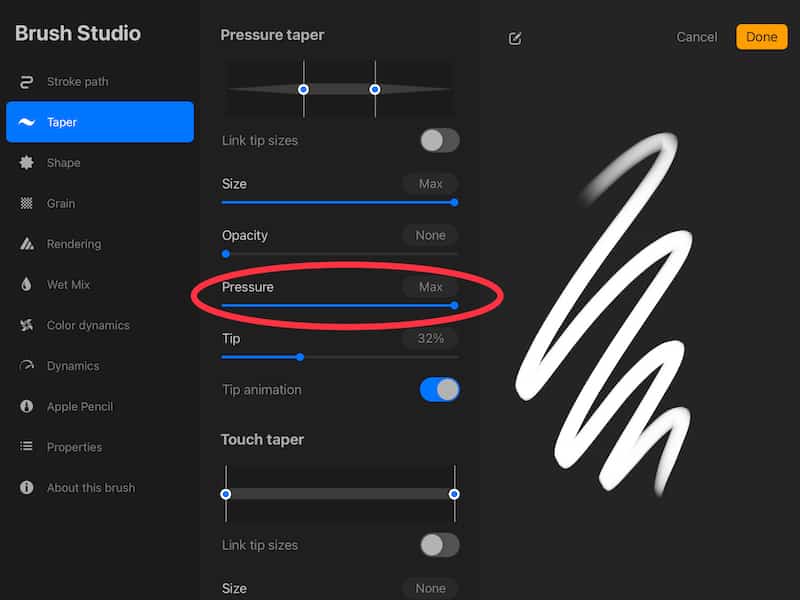
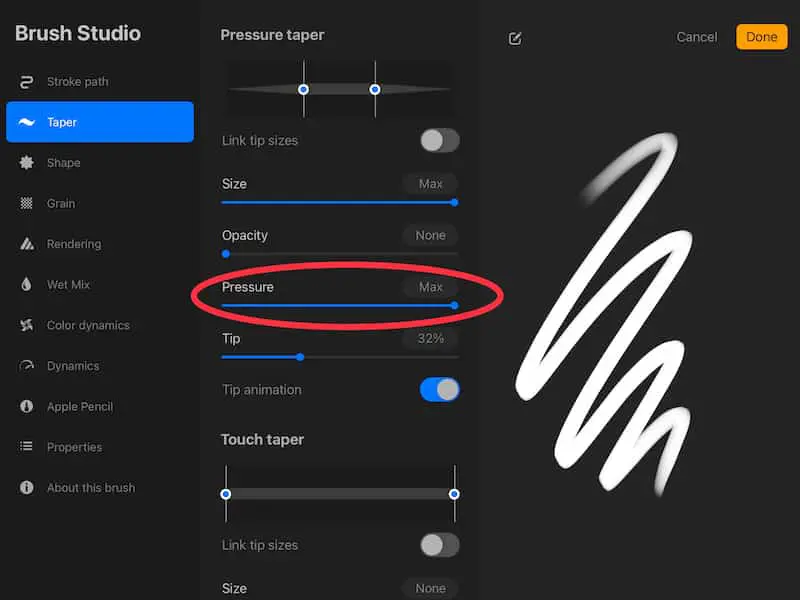
For the most dramatic impact, set the pressure to max.
5. Taper Tip
The tip slider will impact how sharp or blunt your tapered stroke tips are. If you want a sharper tip, move the slider to the left to a lower percentage. If you want a blunter tip, move the slider to the right to a higher percentage.

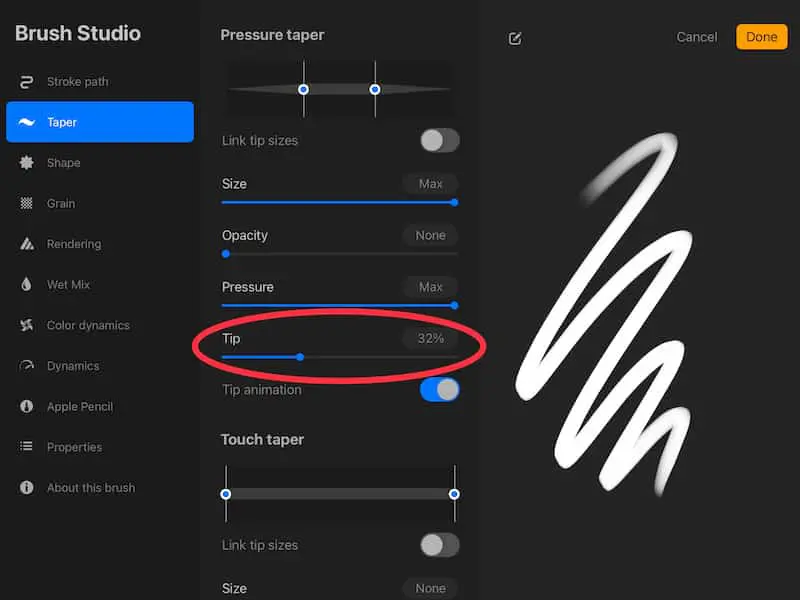
For a more dramatic taper, you’ll want a sharper tip.
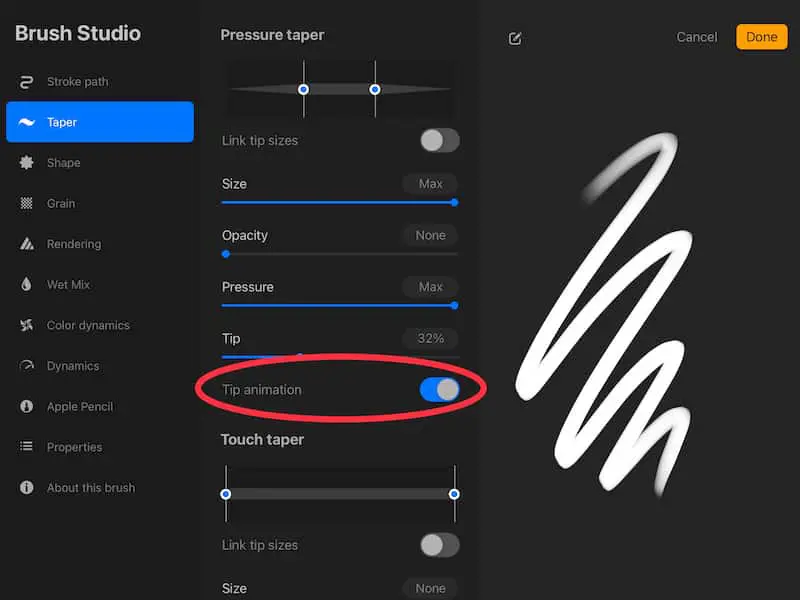
6. Tip Animation
The tip animation button controls when your taper is applied to your brush strokes. If you want your taper to be applied when you lift your stylus off of the screen, turn the tip animation setting off. If you want your taper to be applied as you draw, turn the tip animation setting on.

Ok, so those are all of the taper settings you can mess with in a Procreate brush. Remember that you’ll only need to adjust one set of taper settings depending on whether you’re using a stylus or your finger.
Like I mentioned at the beginning of this post, there are additional settings that can impact your taper, but aren’t located within the taper settings. Let’s talk about those.
Adjust the Apple Pencil Settings in the Brush Settings Panel
Near the bottom of the list in the brush panel options, you’ll see a section for “Apple Pencil.” Click on that to open your Apple Pencil settings for that particular brush.
Play around with the different sliders that you see in this panel, including the Size, Opacity, Flow, Bleed, and Smoothing. As you adjust them, you’ll see the brush example on the right side of your screen change.

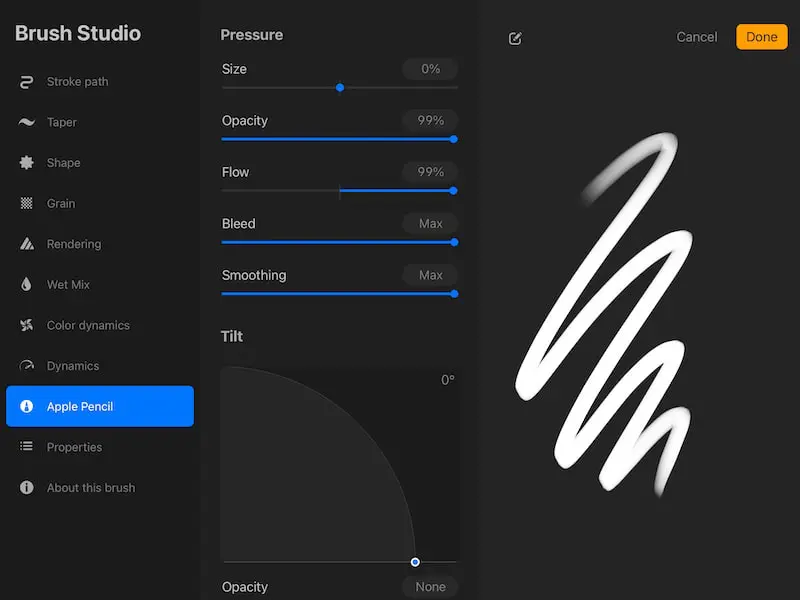
In my experience with most brushes, these sliders have the biggest impact on the taper of the brush line.
If the regular taper settings aren’t giving you the tapers you’re looking for in your brush strokes, try adjusting the sliders in the Apple Pencil settings for that brush and see if you can achieve the effect you’re looking for.
The settings at the bottom of the Apple Pencil menu impact your strokes as you tilt your Apple Pencil. These settings could impact your taper depending on how much you tilt your Pencil at the beginning or end of your strokes…which brings up an important point.
If You Aren’t Getting the Taper You Want, Adjust More Brush Settings
Sometimes, you won’t get the tapering you’re looking for by adjusting the taper settings within your brush. If this is happening to you, it’s time to think outside of the box of your traditional taper settings and explore how other brush settings indirectly impact your taper.
All of the settings within your brush will impact how it looks. These settings are how you get your unique brushes to begin with! So, if you aren’t seeing the results you’re looking for, mess around with the settings until you find what you’re looking for.
It may be an obscure setting that you would have never thought of otherwise that ends up being the secret ingredient to the perfect tapered line.
If you mess around with all of the brush settings and you’re STILL not finding what you’re looking for, you might be messing around with the wrong brush.
Taper Settings Have Different Effects on Different Brushes
If you can’t seem to achieve the taper settings you’re looking for, it could be that you’re working with a brush that wasn’t built to have a dramatic taper, no matter what you do to the settings. In this case, it’s best to move on and try a new brush.
Of course, brush settings ARE your brushes. It’s the nuances in these settings that create the brushes in the first place. But, short of starting over and building your brush from scratch, it’s probably better to try a new brush where the taper settings show more of an impact.
Try a flowy calligraphy brush instead of a fine tip pencil; grab a paintbrush instead of a technical pen. Be strategic about the brushes you choose if you’re trying to impact the taper to a large degree.
Procreate’s taper settings can be confusing, but with enough experimentation, you can learn to master them and make a big, creative impact on your brushes.
Check out more great posts about Procreate brushes:
How to Use Procreate’s Stabilization Brush Settings
How to Reset Procreate Brushes
How to Export Procreate Brushes the Easy Way
How to Stop Procreate Brush Opacity Buildup
How to Make a Stamp Brush in Procreate the Easy Way


Diana has been an artist for over 27 years and has training in drawing, painting, digital drawing and graphic design. Diana’s latest obsession is digitally drawing with Procreate and Procreate Dreams. Diana has experience selling her art across a number of platforms and loves helping other artists learn how to make money from their art as well.