Time lapse videos are a great feature of Procreate. They give you quick and easy access for saving and sharing your work process. Video files can be tricky to work with though. Maybe you want the highest quality video possible, no matter how big it is. Or, maybe you want a video of decent quality that is the smallest file size possible. No matter what you need, you can customize your Procreate time lapse videos to accommodate it.
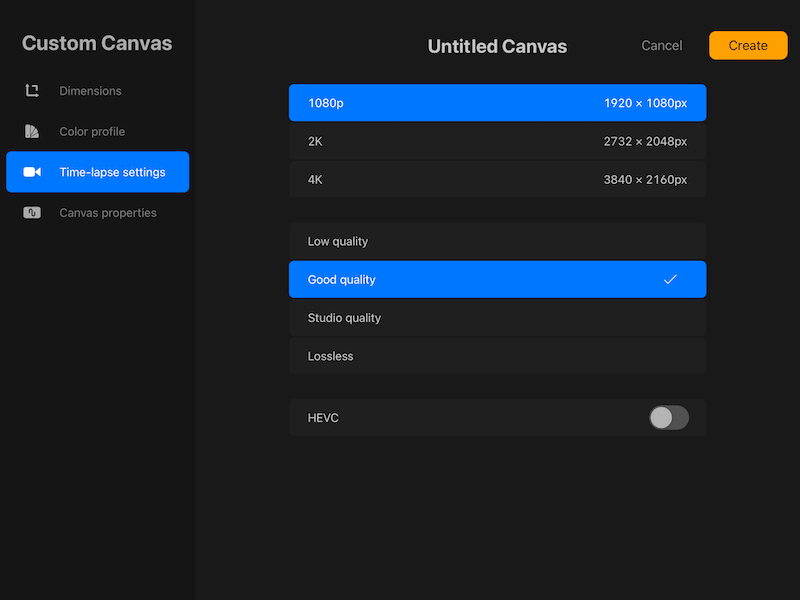
To change the video quality of your Procreate time lapse videos, create a custom canvas from your Gallery. Within the Custom Canvas settings, click on the Time-Lapse settings in the toolbar on the left hand side. From there, choose your resolution, quality, and whether you want to use HEVC.
Being able to customize the resolution and quality of your time lapse videos gives you so much more freedom to choose what you eventually want to do with your videos. Let’s dive into how Procreate’s time lapse video settings work.
How to Customize the Resolution and Quality of Procreate Time Lapse Videos
The resolution and quality of Procreate’s time lapse videos must be adjusted and determined before getting started with a piece of art within the custom canvas settings. These settings cannot be changed after a canvas is already created.
Here’s how to do it, step-by-step:
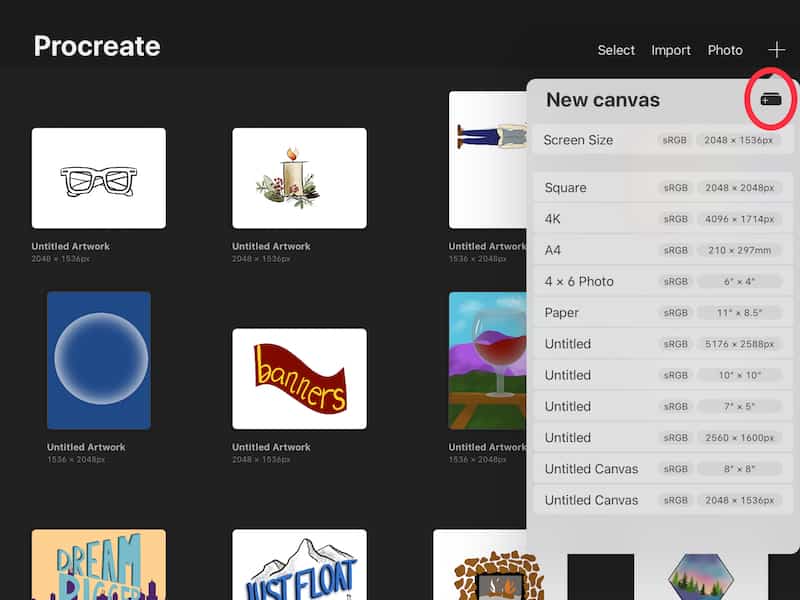
1. Navigate to your Procreate Gallery
2. Click on the plus button to create a new canvas
3. Click on the square with the plus in it to create a custom canvas

4. Determine all of your needed canvas qualities (dimensions, DPI, color profile, etc)
5. Click on the Time Lapse Settings and adjust them as needed

6. Create your canvas and you’re all set!
Even though the steps for adjusting the settings of time lapse videos is straight forward, there are actually a couple of things that could trip you up, plus a couple of things you’ll want to keep in mind.
Make Sure Time Lapse Videos are Enabled by Default
To use time lapse video settings, time lapse videos have to be automatically enabled for all of your Procreate art. To double check this, click on your general iPad settings and scroll down to your list of apps. Click on Procreate and make sure that the option for Disable Time-Lapse is not enabled.
By default, Procreate makes a time lapse video of all of your art. That means, if you haven’t consciously made the choice to disable time lapse videos within your iPad settings, you won’t have to worry about this. Time lapse videos are already enabled.
Personally, I disable my Procreate time lapse videos and only turn them on when needed. Time lapse videos can take up a lot of storage, so I only record them when I know I will need them. Check out my full blog post on Procreate and iPad storage to learn more.
So, again, you only need to worry about this if you have disabled Procreate’s ability to automatically record time lapse videos in the past.
You can only use customized time lapse videos settings if you haven’t disabled Procreate’s ability to automatically record them. The reason for this is because you need to determine your time lapse video setting while you are creating your canvas.
You can’t do it after the fact when you have already started your piece of art.
So, if your time lapse videos are disabled when you create your canvas, you’ll be out of luck. In Procreate’s eyes, you won’t be creating a time lapse video, so you don’t need time lapse video settings.
Even if you decide to switch your time lapse video on later, you can’t adjust its settings. You’ll have to deal with the default settings.
If your time lapse video settings are disabled, you’ll see that all of the video settings are bright blue when you navigate to them. This is a sign that you need to turn your time lapse videos back on.

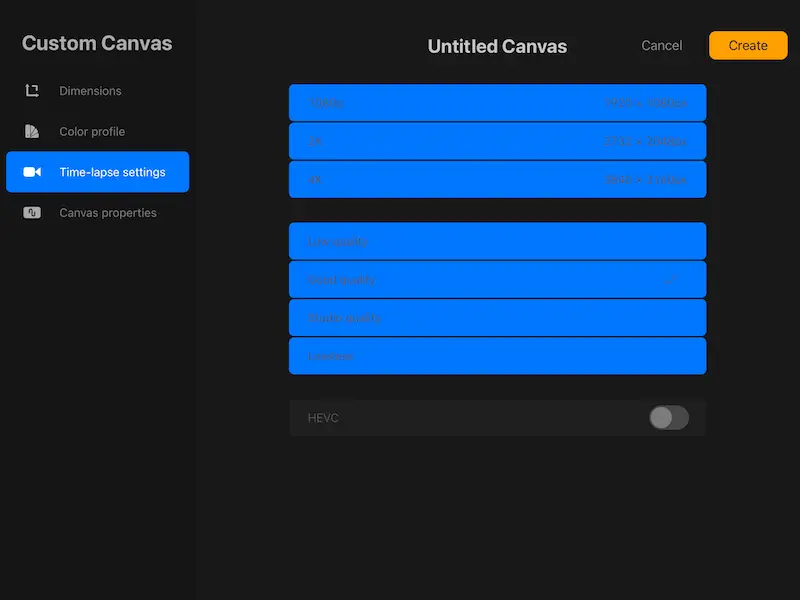
To re-enable Procreate’s automatic time lapse recording settings, navigate to your general iPad settings. Yes, your iPad settings, not your Procreate settings.
Scroll down through your iPad settings until you see your list of apps. Click on Procreate.


Make sure that the Disable Time Lapse setting isn’t toggled on.
Once you enable time lapse videos again, you’ll see that you’ll be able to go into Procreate and create a custom canvas with specialized time lapse video settings. Hooray!
You Can’t Change the Time Lapse Video Settings for a Canvas
Once a canvas is created in Procreate, you cannot change its time lapse video settings. It’s important to establish your needed video settings while you’re creating your canvas to ensure that you can record the video that you need.
We touched on this in the last section, but it’s important enough to merit its own section…in bold.
YOU CAN’T CHANGE TIME LAPSE VIDEO SETTINGS ONCE YOUR CANVAS IS CREATED
It’s a bummer to realize this mid-project, so it was worth screaming in bold font about.
Make it a part of your canvas creation routine to check your video settings. Check your dimensions, your DPI, your video settings, etc. You don’t want to forget and then regret it later.
Something that’s a bummer about the inability to change your time lapse settings is that you can’t go back to your old art and start a new time lapse video with different settings. You’ll either be stuck with the default settings, or whatever settings you had originally established when you created your canvas.

Be Mindful of Your Procreate Time Lapse Videos and Your iPad Storage
Currently, the highest quality time lapse videos that Procreate can record are 4K and lossless. These are high quality files, but they’re also large. It’s important to be mindful of the amount of storage space on your iPad if you plan to record high quality time lapse videos on Procreate.
Procreate’s lowest quality time lapse video option is 1080p, while their highest is 4K. A 1 minute video at 1080p would cost you about 130 MB, but a 1 minute video at 4K would cost you something closer to 375 MB (source).
That’s a big difference, especially if you record a long video.
At the time of this writing, Procreate’s highest quality video setting is 4K, but that could change in the future. If they introduce even higher quality videos someday, really be mindful of storage size.
When it comes to video files, bigger isn’t always better. If you plan to make a lot of 4K time lapse videos, have a plan for storing them aside from your iPad. This is a great time to pick up an external hard drive to store your videos, or to be stingy about how many 4K videos you make.
Being able to change the quality of your Procreate time lapse videos is a great opportunity. If you keep the tips we’ve talked about in mind, you’ll be well on your way to many great videos of your art in the future.


Diana has been an artist for over 27 years and has training in drawing, painting, digital drawing and graphic design. Diana’s latest obsession is digitally drawing with Procreate and Procreate Dreams. Diana has experience selling her art across a number of platforms and loves helping other artists learn how to make money from their art as well.