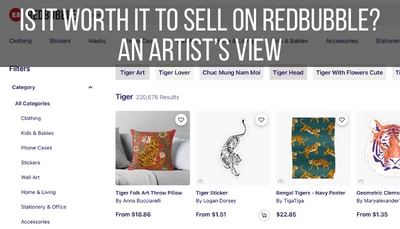
Redbubble is my favorite platform for selling stickers. It’s easy, high quality, and a great money maker. So, how do you sell stickers on Redbubble? What do you need to know to make Redbubble stickers that your customers will love? The answers to these questions could put money in your pocket as an artist.
To sell stickers on Redbubble, upload your design as a high quality PNG file with a transparent background that’s around 2800×2800 pixels in size. Once your design is uploaded, make sure that your pricing is adjusted so that you receive the correct profit margin whenever you make a sale.
Selling stickers on Redbubble is an amazing opportunity for artists who want to make money from their work. Anyone can sell on Redbubble, which makes it quick and easy to get started. We’re diving into what you need to know to be successful on this platform.
How to Make Redbubble Stickers
For stickers, Redbubble recommends uploading a high resolution png file that is around 2800×2800 pixels to ensure that designs look good on even their biggest sticker sizes. Whenever possible, upload a design with a transparent background to make the most of Redbubble’s kiss-cut technique.
Let’s talk about the sticker basics that are fundamental to Redbubble, no matter what software you use to create them.
Make Sure Your Design is Big Enough
For the best results, you want to make sure that your stickers designs (well, all of your Redbubble designs) are high resolution.
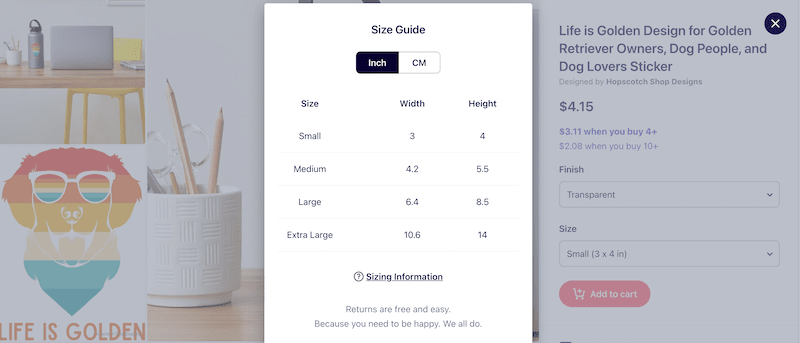
First, let’s talk about sizing. Redbubble suggests that your stickers be around 2800×2800 pixels so that they can be used on all of their stickers sizes. Redbubble sticker sizes include:
-Small: about 3×4 inches
-Medium: about 4×5.5 inches
-Large: about 6.5×8.5 inches
-Extra Large: about 10.5×14 inches
The reason I say “about” is because Redbuddle uses a kiss-cut technique. This means that they cut your designs around the edges, which will make the size of each sticker different from design to design.

In order to increase your sales potential, make sure that your designs are big enough to be eligible for all 4 of Redbubble’s sticker sizes. If your design is too small, Redbubble will only offer as many sticker sizes as possible, while still maintaining a good print quality.
Sellers can miss out on the Extra Large option because their designs are too small. So, make sure your designs are big enough!
And, you can’t simply set your digital canvas to 2800×2800 pixels and assume you’re good to go. As we’ll talk about soon, it’s important to download your designs with a transparent background before uploading them to Redbubble. This means that, even if your canvas is 2800×2800 pixels, your actual design might not be.
Make sure that your actual design, with the background removed, is large enough to satisfy Redbubble’s Extra Large sticker requirements.
Make Sure Your Design is a High DPI PNG File
In addition to size, you also want to make sure that you download the highest quality file type that you can then upload to Redbubble.
For print work, you’ll want to aim for 300 DPI.
If you’re using Procreate, Adobe, or any other design programs that let you manually adjust the DPI, set it to 300. Be sure to read my complete post on this topic if you want to read more about why 300 DPI images matter so much for print work.
When you’re done with your design, you want to make sure to download it as a PNG file. Not only is PNG a high quality file type, it’s also the only file type that’s Redbubble compatible that will let you download your design with a transparent background.

Make Sure Your Design Has a Transparent Background
As I mentioned above, Redbubble uses a kiss-cut technique that hugs the edges of your design. They also add a ⅛ inch border for style and easy peeling.
This is why you need a transparent background. If you upload a design without a transparent background, it will print your sticker as a square. Redbubble will see your background as a part of your design, so it won’t exclude it in the cutting process.
This is true for any background color, even white, so it’s crucial to remember to download your designs with transparent backgrounds.
Of course, there are certain designs that require backgrounds. That’s ok. But, if your design doesn’t require a background, make sure to download it as a transparent PNG.
Make a Dark Version of Your Design
Personally, I like to have lighter designs that I use on darker products (a design with white text on a black shirt, for example). This doesn’t work for stickers though.
At the time of this writing, stickers only print on white backgrounds, which means that your lighter designs won’t work.
Even though Redbubble will apply your design to all of their product options, you can manually swap out any of your designs for any of your products. This allows you to adjust for sizing differences, and yes, for color.
If you are using a lighter design for your other Redbubble product offerings, make a darker one that you can upload for your sticker offering.

Simply scroll down to where your sticker is listed and click on it. Click on Replace Image and upload your darker design. You’re all set!
Once you’ve created your own stickers, you can buy them directly from Redbubble! Read my guide on buying your own print on demand products to learn more.
How to Make Redbubble Sticker Packs
Instead of selling individual stickers, you can sell an entire sheet of stickers in a Redbubble sticker pack. Sticker packs are a great way to increase your earnings because your customers will likely buy them at the Extra Large size, which will give you a larger commission.
Depending on how you price your stickers (which we’ll talk about later), you could make as much as $10 off of a sheet of stickers, while you would have only made $1 off of a small, individual sticker. As you can see, making sticker packs is a great way to increase your potential earnings.
The same principles apply to sticker packs as they do to individual stickers. You want to have a “sheet” that’s around 2800×2800 pixels that you download with a transparent background as a high quality PNG.
The difference with sticker packs is that you’ll need to put multiple designs onto a single digital canvas.

When doing so, make sure they are spaced out enough. When a customer buys your sticker pack, Redbubble’s kiss-cut technology will give each design a ⅛ inch border and then cut them around the edges. Your customer will then receive a pile of your stickers, all individually cut, but originating from one design file.
That means that you need to be careful that each design on your sticker sheet isn’t too close together. If they are, they may end up stuck together, as the machine won’t be able to tell that they are two separate designs.
It’s also REALLY important to download your design with a transparent background. If you don’t, your customer will receive one huge sticker with images on it, not individually cut stickers. Remember that Redbubble views any background color as part of your design, even white. So, make sure that you eliminate any unnecessary pigment by downloading your design with a transparent background.
The Pros and Cons of Sticker Packs
Sticker packs are a great opportunity but, as with every opportunity, there are some upsides and downsides.
Pros
Sticker packs encourage customers to buy your Large or Extra Large sticker options. This means higher commissions for you. Depending on how you price your stickers, you could make $10+ more from selling your larger stickers than your smaller ones.
Cons
Designs that you create for sticker packs don’t lend themselves very well to other products. One of the great things about Redbubble is that you can quickly apply the same design to multiple products with just a few clicks.
Sticker packs may work for notebooks, buttons, bags, and all over products if you design them properly.

My Solution
If I have enough individual designs that are related, I will throw them together as a sticker pack. The designs are already created, so I’m not spending more time to create new designs. In fact, I’m making the most out of my designs by repurposing them for other uses.
Another great strategy is to design your sticker “sheets” in a cohesive way. Arrange them so they form a pattern that would look neat on your all over products. That way, you can still apply your sticker pack designs to other products in a way that is stylish and natural.
Once you’ve created your sticker designs, it’s time to upload them.
How to Upload Your Redbubble Stickers
To upload your stickers to Redbubble, create a new design and drag and drop your design into the uploader. Your design will be automatically applied to all of the designs that Redbubble offers. Before you publish, make sure that your stickers, and other products offerings, are positioned correctly.
Luckily, out of all of Redbubble’s product options, the stickers are the ones that I never have to worry about. While all of the other products require a little repositioning or resizing, the stickers are painless. Once you upload them, they’re good to go! Simply double check them to make sure that everything looks ok.
Like we talked about before, make sure you’ve replaced your sticker image with a darker design, if needed.
Ok, now let’s get to the fun part: making money!
Does Redbubble Make the Stickers for You?
Redbubble is a print on demand company, which means they will print and ship all of your stickers to your customers when orders come in. With Redbubble, you don’t need to worry about printing, packaging, shipping, or delivering your own products, as they will handle this for you.
One of the biggest perks of print on demand companies is how much of the process they take off of an artist’s hands. As artists, we want to be creating art, right? Not printing and shipping.
Print on demand companies will make sure that you never need to worry about printing your own work.
This comes at a price though. Profit margins tend to be lower when working with print on demand companies because they are taking on so much of the burden themselves. I’m totally ok with it, as it relieves me of a lot of stress and headache.
To make the most money possible, you’ll want to get your pricing strategy right.
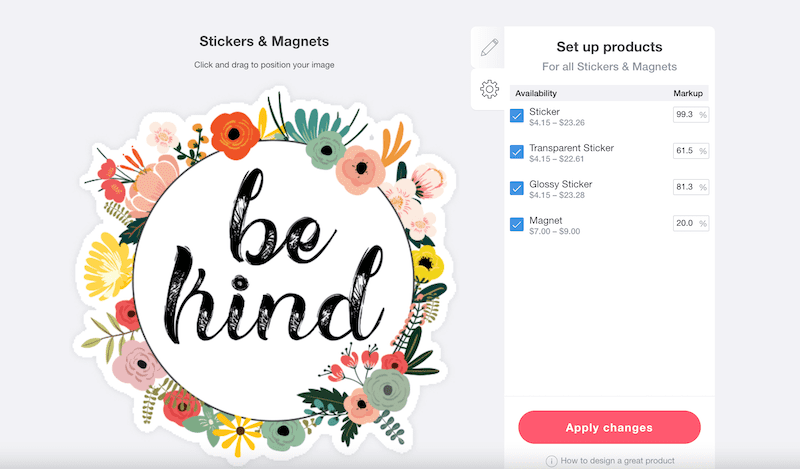
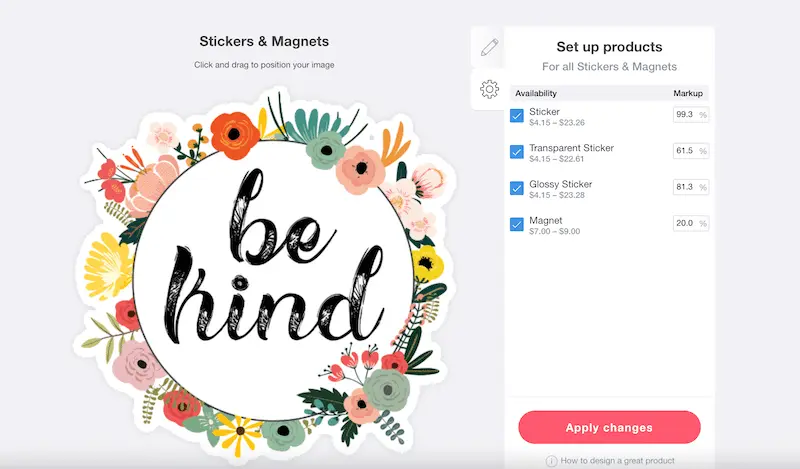
How to Price Your Redbubble Stickers
Redbubble lets you decide on your own product pricing by adjusting your product margin percentage. Your product margin percentage will be your profit. By default, Redbubble sets all of your product margins to 20%, but you can adjust them however you would like.
Don’t worry; you don’t have to work out all of your percentages on your own. Go to your Redbubble Dashboard and click on Product Pricing on the left hand side. You can also adjust your product pricing in each individual upload page, but it’s more efficient to do it via the Product Pricing page.
On the Product Pricing page, you’ll see all of the products that Redbubble offers. Go through every single product option and edit your product prices to determine the price and resulting profit that you want.
You want to find a balance with your product pricing. While you need to make a profit, you also don’t want your products to be so exorbitantly expensive that your customers won’t buy them.
Experimentation and research is key. Browse through other Redbubble stores and see how they are pricing their stickers and other products. Try to find pricing clues from stores that are already successful and established. What can you glean from them?
It’s also good to do your own experimentation. Try to find the sweet spot for your product pricing that will make both you and your customers happy.
As you’ll notice, the way that Redbubble has you do markups via percentages can leave you with weird prices. $21.82 for a shirt? $3.74 for a sticker? Pull out those pennies and get ready for some weird change.
Luckily, if you really don’t want your prices to look strange, you can avoid it by playing around with your percentages. Redbubble’s percentage boxes accept fractions of a percent. So, if you don’t want your sticker to be offered at $3.74 at an 80% markup, enter a makeup percentage of 80.2% to round it up to $3.75.
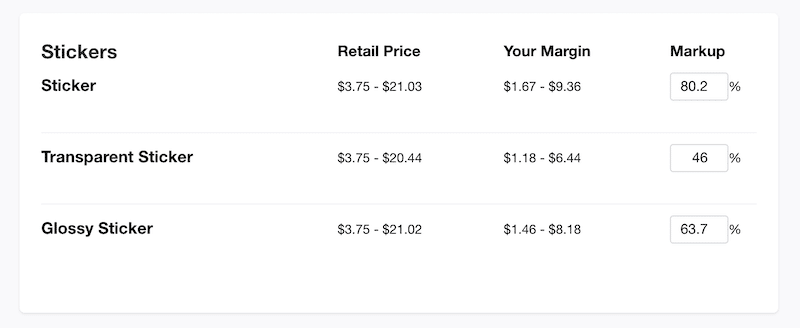
80.2%?! Yes, you will end up marking up some of your products A LOT, especially stickers. A markup of that size will win you about $1 or $2 on a small sticker. I know it isn’t a lot, but hey, you only had to upload the design once. If that design sells hundreds, if not thousands of times, those $1 bills add up.
I personally make most of my Redbubble profits from the sale of stickers. They’re small, but mighty.
Ok, so why did I say $1 or $2? Shouldn’t it be a set amount? Not exactly.
Redbubble’s manufacturing fee depends on where your customer is located. So, don’t worry if your profit fluctuates a little but when selling to customers all over the world (yes, Redbubble tends to have a very global customer base, which is really fun!).
You also need to take sales into account. Remember that you’ve assigned a markup percentage to your product, which will be impacted by a drop in your product’s price.
For example, a 90% markup is more for a $4 sticker than a $2 one. If Redbubble has a sale on stickers, you’re looking at less profit. You might end up selling more stickers due to the sale, so it might even out, but it’s still something to be aware of if you notice your profits dropping.
Redbubble also gives discounts for bulk sales, so be prepared for your profit to be lower if your customer ordered multiple stickers from you.
I’ve been talking about my stickers being around $4. Believe it or not, my stickers are pricey in comparison to other sellers. When I browse through Redbubble’s stickers, I see a lot of stickers being sold for about $2.
Yet, I’m happy with my sticker sales, so I’m content to keep them at that price.
Again, figure out the profit margin and retail price feels right for you, and experiment from there.
Now that your stickers are uploaded and priced, let’s get them in front of your customers!
How to Market Your Redbubble Stickers
Redbubble is a great platform for artists who don’t want to worry about marketing, as they do a good job of driving organic traffic to listings. That said, if you want to increase your selling potential, marketing your Redbubble stickers through Pinterest is a great idea.
Something I love about Redbubble is that they do a great job of putting your products in front of your potential customers. I know we all hate it when you click on something, and then an ad for it seems to appear on every webpage you visit for the next week.
Well, it’s effective. It’s also a strategy that Redbubble is great at, which is awesome if you’re an artist who is trying to make a Redbubble sale.
Redbubble listings also tend to rank well on Google, which means that you want to make sure that your titles, descriptions, and tags are dialed in.
Personally, I rely heavily on Redbubble organic traffic and make a decent profit from it.
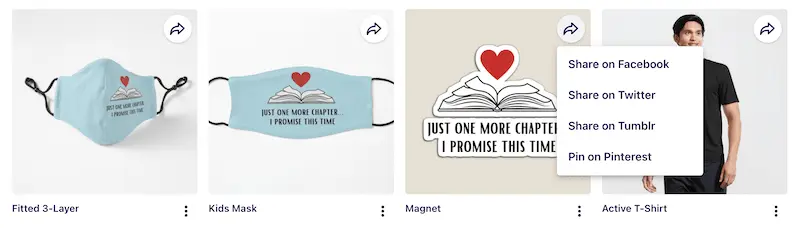
That said, doing a little bit of marketing can bring in some extra sales. Luckily, Redbubble makes it really easy. Whenever you finish creating a product, it will direct you to the Promote Products page. You can also find this page after the fact in the menu on the left hand side.
From there, you can instantly share your products to Facebook, Twitter, Tumblr, and Pinterest. Once you have your accounts setup, it only takes a few clicks.

Having social media accounts for your art and your art products is a great way to raise awareness of your work. Being able to share your Redbubble products so quickly and easily to these platforms is a big perk!
Making stickers to sell on Redbubble is an amazon opportunity for making money as an artist. I hope these tips have set you on the right path towards selling success!


Diana has been an artist for over 27 years and has training in drawing, painting, digital drawing and graphic design. Diana’s latest obsession is digitally drawing with Procreate and Procreate Dreams. Diana has experience selling her art across a number of platforms and loves helping other artists learn how to make money from their art as well.