The symmetry features in Procreate make it so easy to achieve perfect mirroring and cohesiveness in your art. No more worrying about trying to draw one eye that looks like the other. Simply turn on the symmetry feature and you’re all set.
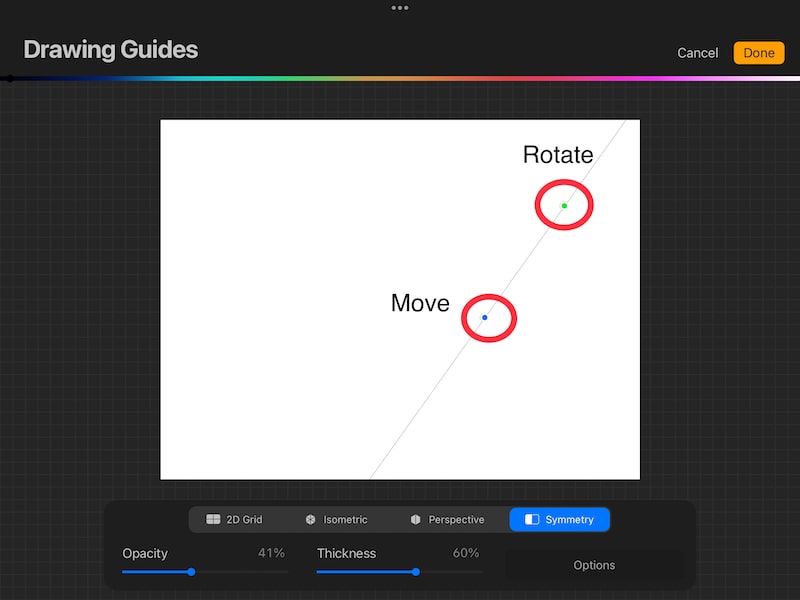
To use symmetry in Procreate, turn on the drawing guide and click the tab to edit it. Click on the symmetry option and choose whether you want vertical, horizontal, quadrant, or radial symmetry. Use the blue dot to move the symmetry line around your canvas, and the green dot to rotate it.
There are a number of different ways to do symmetry in Procreate, so it’s important to look at all of the options. Let’s walk through all of them, so that you’ll be well on your way to mirrored drawing and symmetrical mastery.

How to Turn on the Symmetry Feature in Procreate
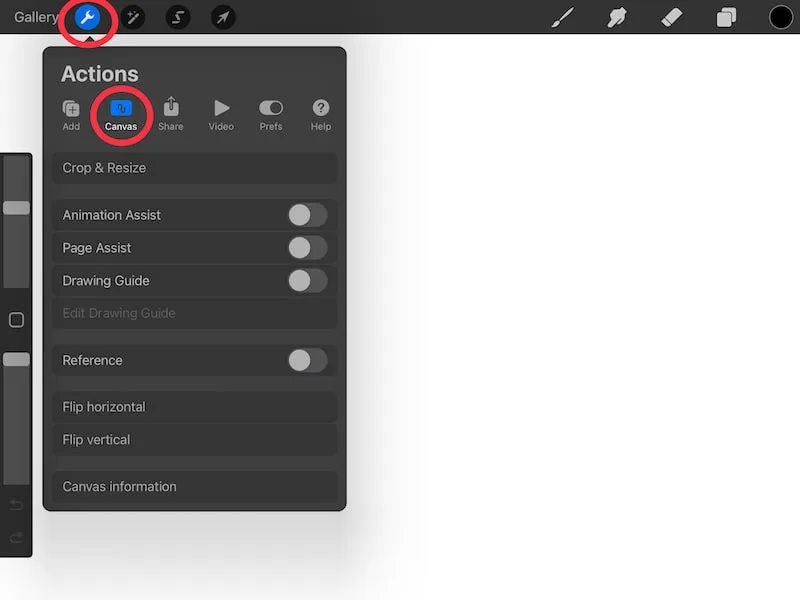
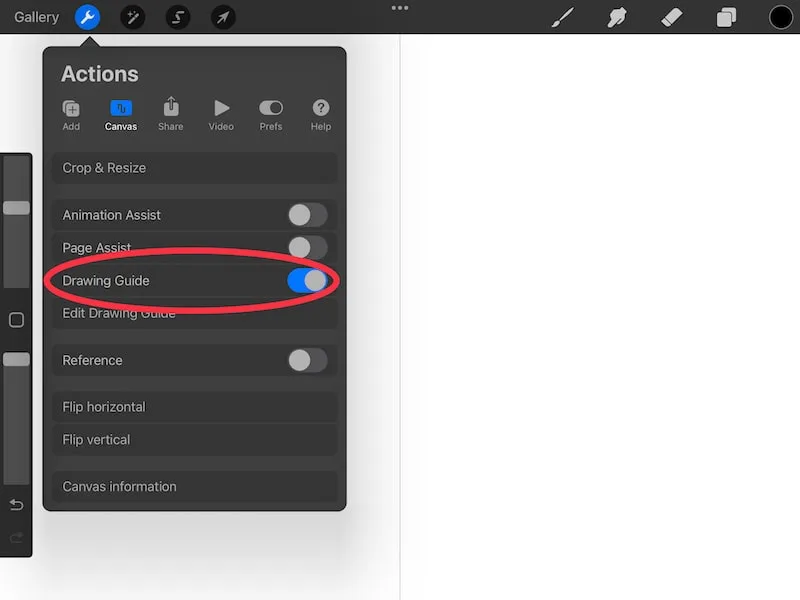
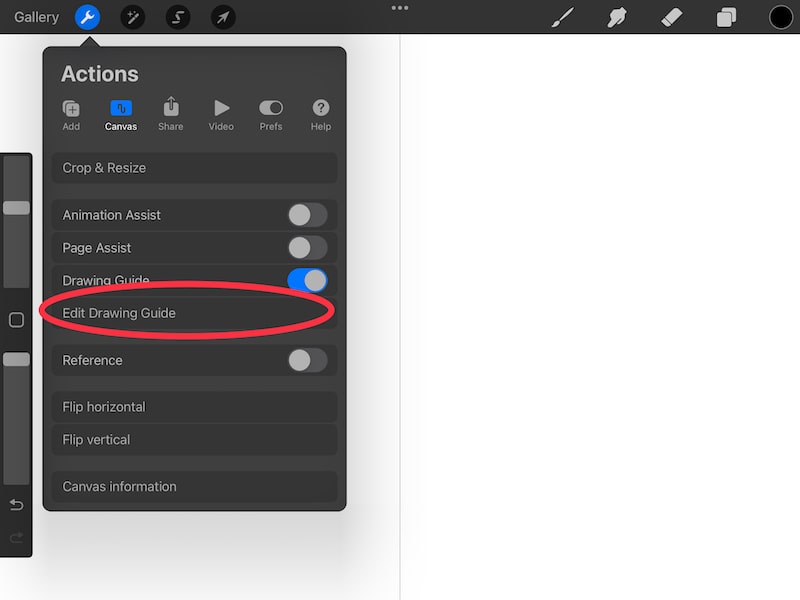
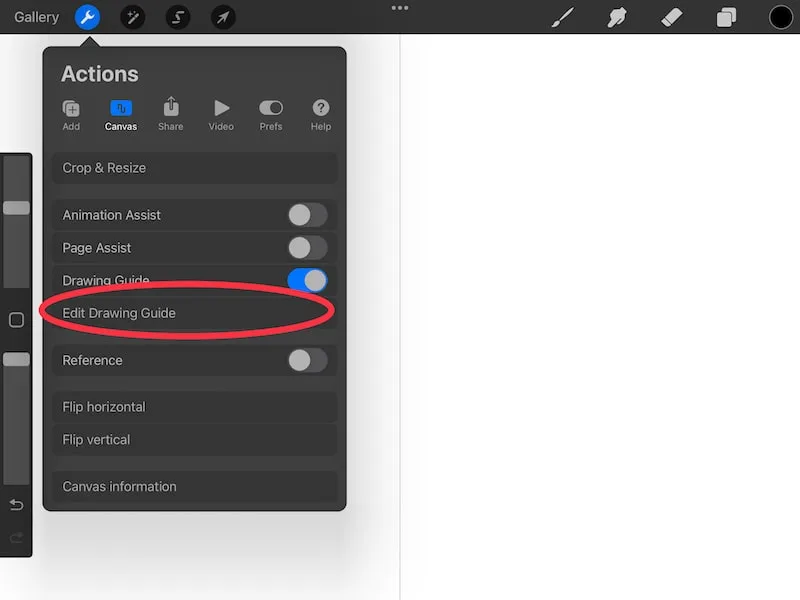
Procreate’s symmetry tools are part of the Drawing Guide. Open the Actions tab and click on Canvas. Toggled the Drawing Guide on, then click on the Edit Drawing Guide button. Select the Symmetry option on the far right, and choose between vertical, horizontal, quadrant, or radial symmetry.
Let’s walk through that step-by-step:
1. Tap on the wrench to open the Actions tab and the Canvas option

2. Toggle the Drawing Guide on

3. Click on the Edit Drawing Guide button
I have a full guide on using Procreate’s drawing guides if you want to learn more about Procreate’s other awesome drawing guides!
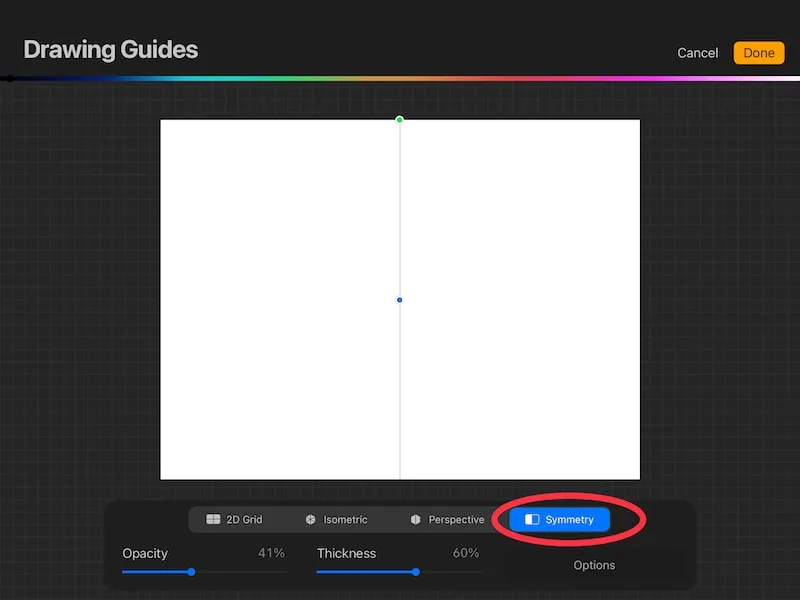
4. In the Drawing Guide settings, click on the Symmetry button on the far right

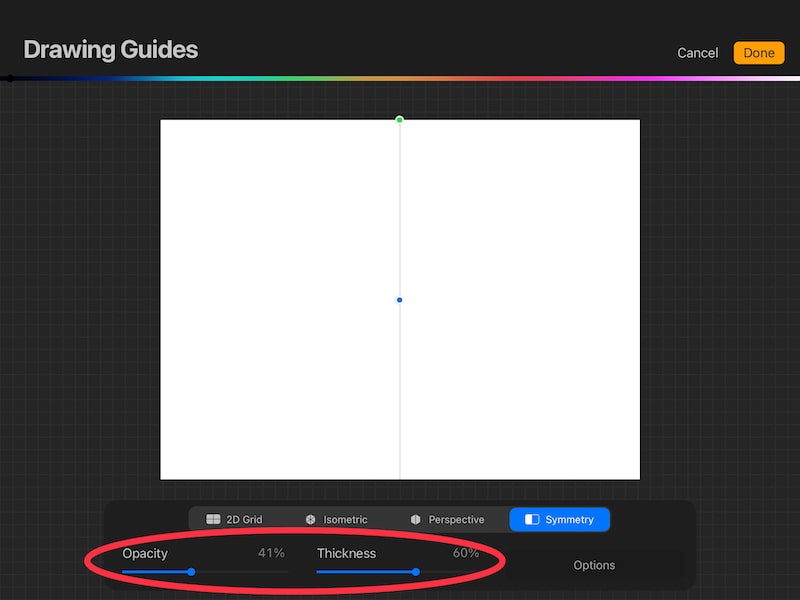
5. Use the sliders to adjust the opacity and thickness of your symmetry line

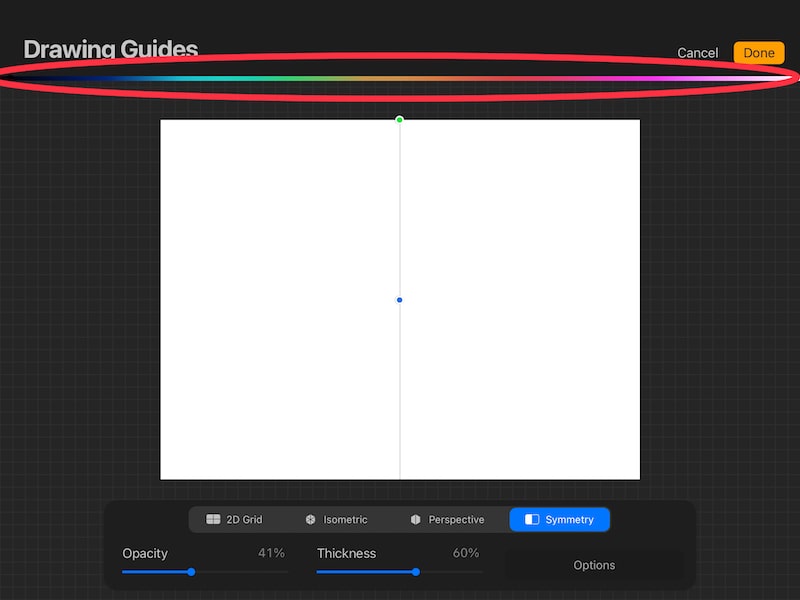
6. Use the color slider at the top to adjust the color of your symmetry line
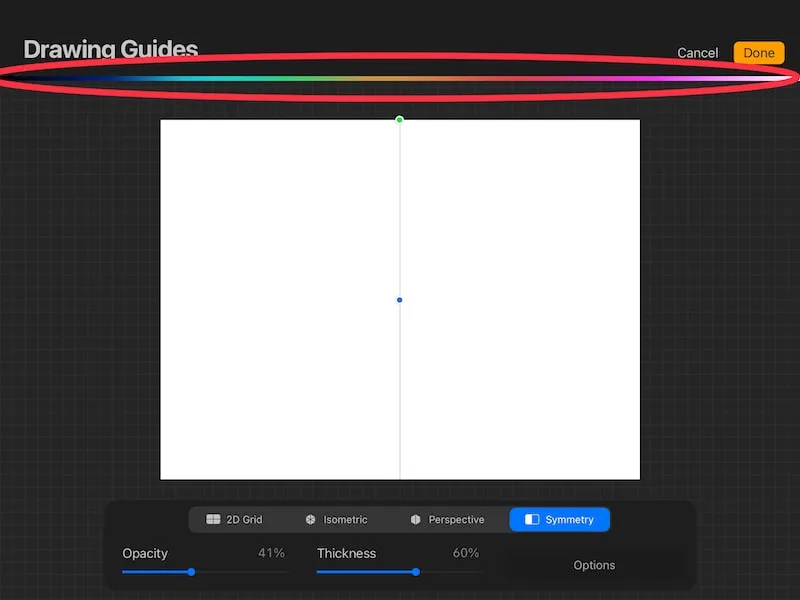
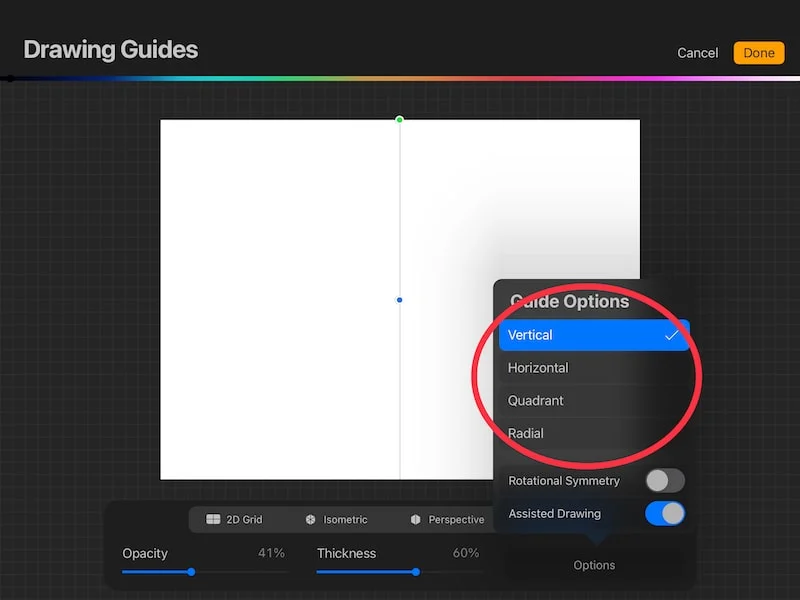
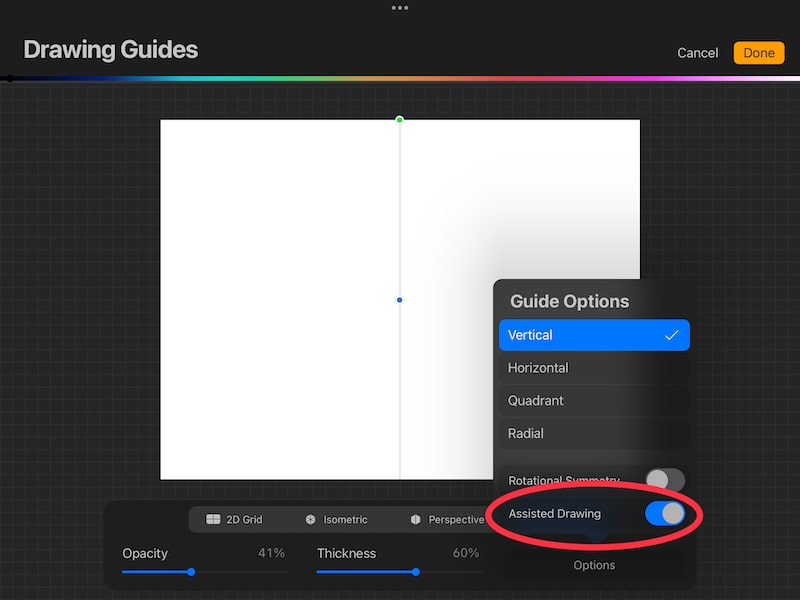
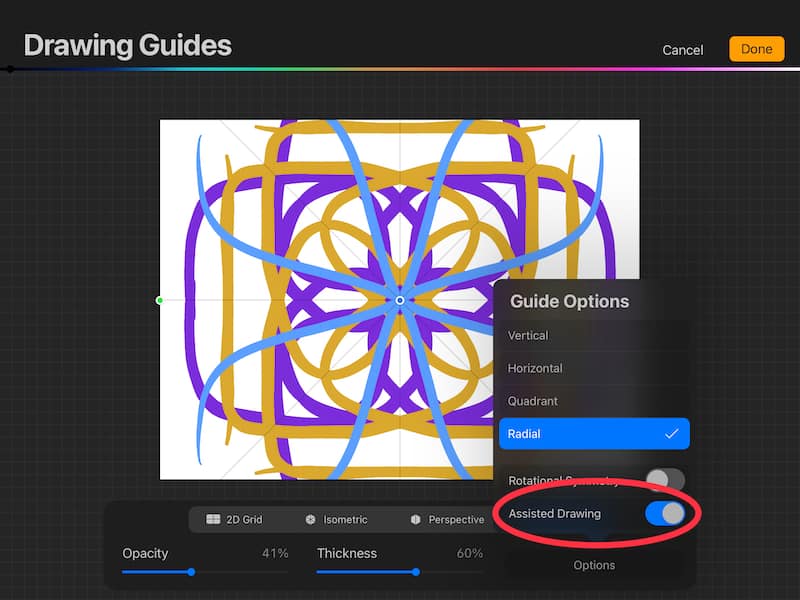
7. Click on Options on the far left and choose between Vertical, Horizontal, Quadrant, and Radial (we’ll walk through each of these down below)

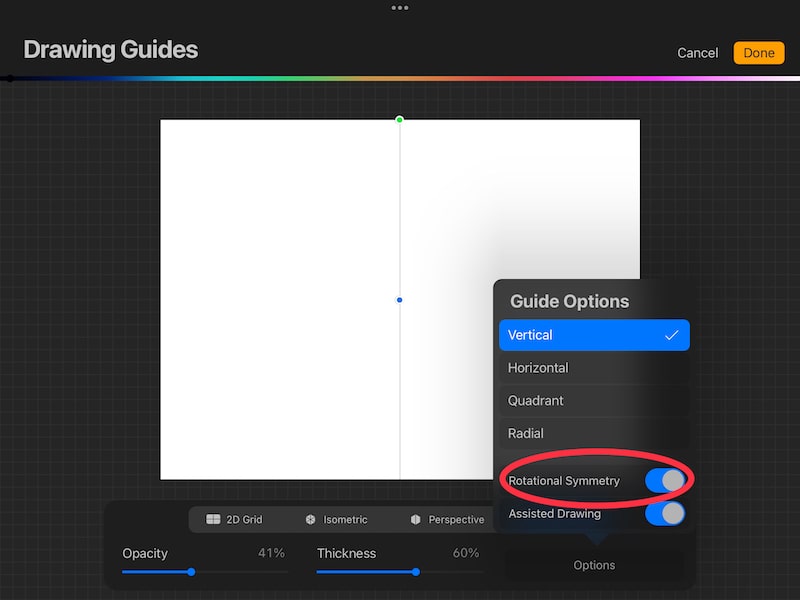
8. Decide if you want to use Rotational Symmetry (again, we’ll talk about this later on)
9. Toggle on Assisted Drawing

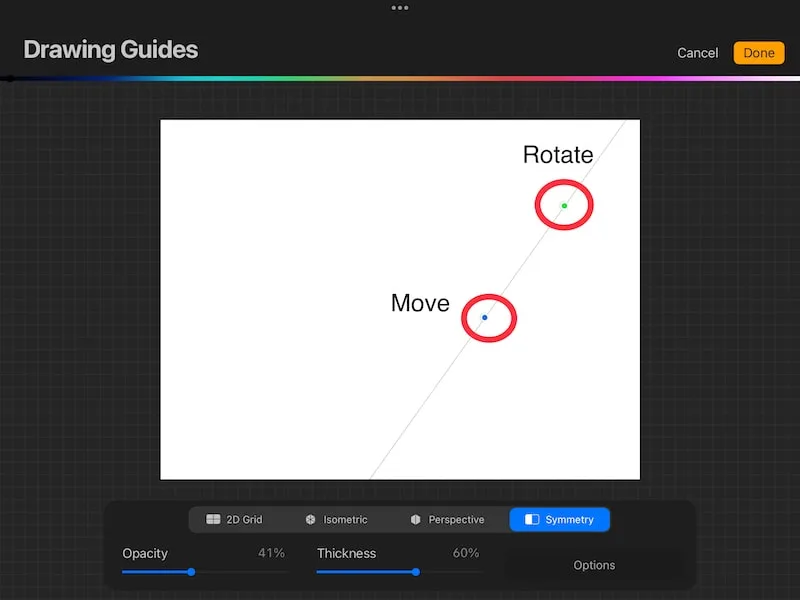
10. Adjust the positioning of your symmetry line, if needed. The green dot rotates it, while the blue dot moves it across your canvas
11. Click Done and start drawing
Now that we’ve gone through the basics of doing symmetry with Procreate, let’s dive into each of the symmetry options so that you can have the most control over it.
How to Adjust the Color, Thickness, and Opacity of your Procreate Symmetry Line
The thickness and opacity of your Procreate symmetry line can be adjusted with the sliders that appear at the bottom of your screen once you click on the Symmetry option. To adjust the color of your symmetry line, use the color slider that appears at the top of your screen once you click on the Symmetry option.
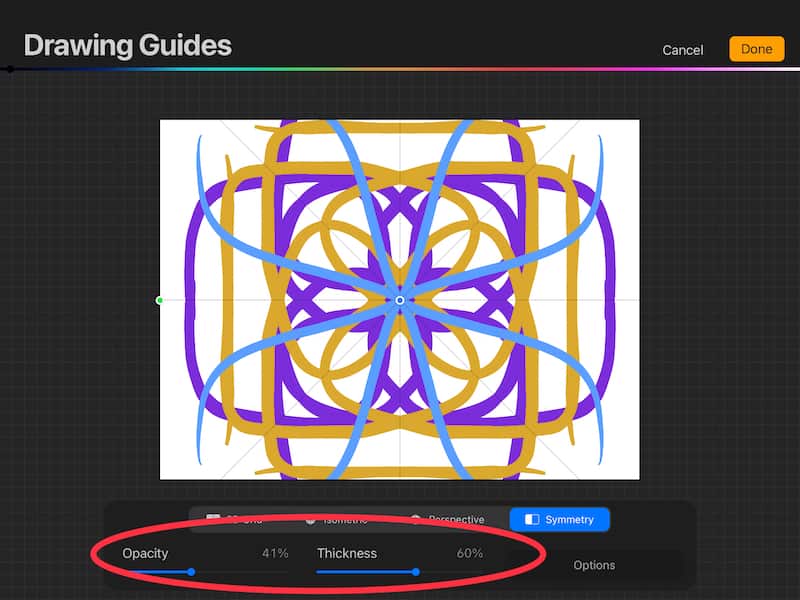
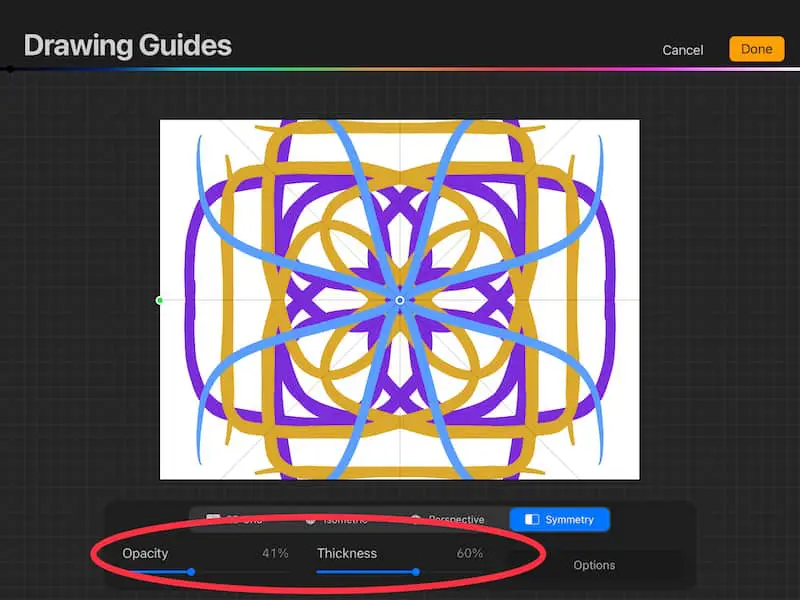
All of these options will impact how prominent your symmetry line will be.
You want to find a balance between having a line that you can barely see, and one that distracts you from your work. This will depend on how detailed your work is and what color you’ve chosen for a background.
Personally, I like my symmetry line to be prominent so that I can see it clearly. I usually ramp up the thickness and opacity, and make it a contrasting color to my background.
The Importance of Procreate’s Symmetry Assisted Drawing Setting
Within the Procreate Symmetry settings, make sure to click on Options and toggle on the Assisted Drawing. If you don’t, the symmetry feature won’t work. You can also turn on the Assisted Drawing by opening up the layers tab, clicking on your desired layer, and choosing Assisted Drawing from the dropdown.
This is really important!
It can be easy to accidentally turn the Assisted Drawing off, and wonder why the symmetry feature isn’t working.
When you’re initially setting up the symmetry settings, simply make sure it’s toggled on under the Options tab.
Once you’re working on your piece of art, use the Layers tab to switch it off and on as needed. Simply open up all of your layers, and click on the layer that you want. From the dropdown menu, simply toggle the Assisted Drawing option on or off.
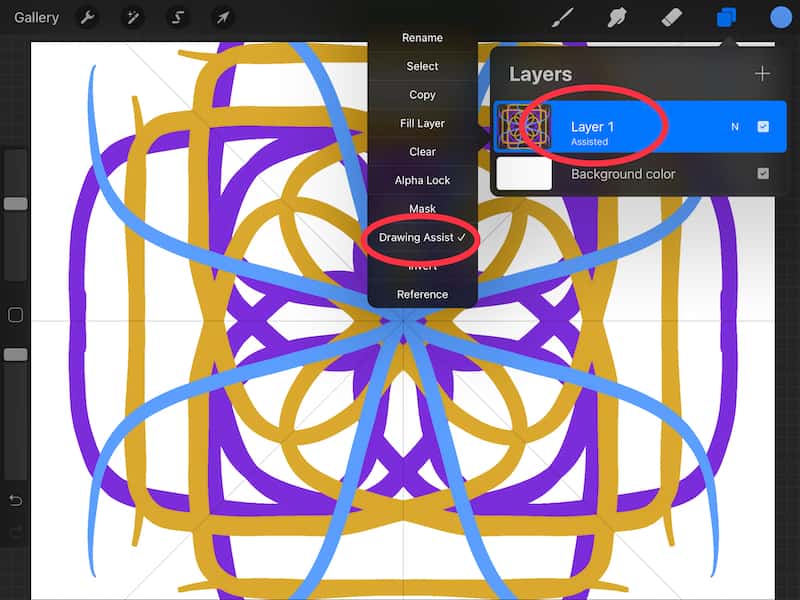
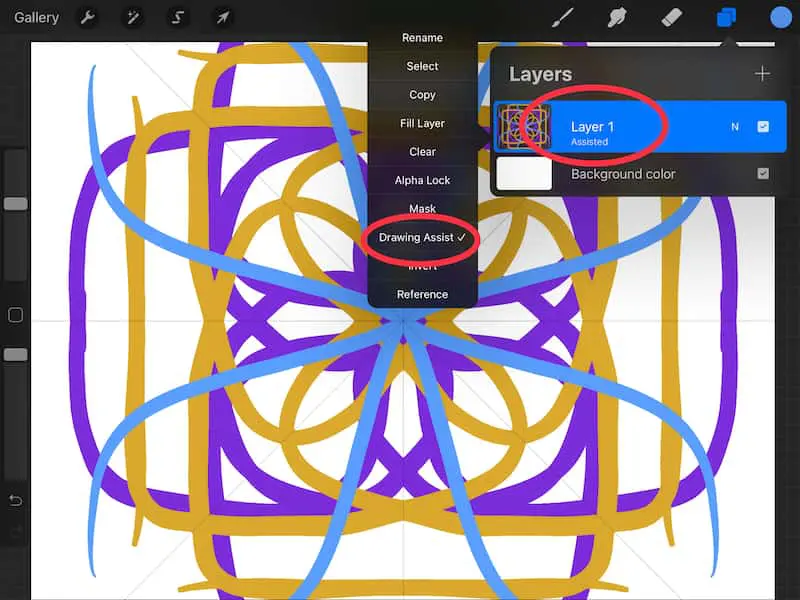
You’ll be able to tell which layers have Assisted Drawing enabled by looking at the thumbnails of your layers. If Assisted Drawing is turned on, you’ll see a little label underneath it that says “Assisted.”
The fact that you can turn the symmetry on and off via the Assisted Drawing feature is actually really awesome. This means that your layer isn’t always tied to the symmetry tool.
You can turn it on when you need to use symmetry, or turn it off when you don’t. This gives you a lot more control and flexibility.
How to Move Your Symmetry Line in Procreate
Even though Procreate has default positions for the symmetry line, you can customize it depending on the positioning you need for your specific piece of art. Use the green dot at the end of the symmetry line to rotate it, and use the blue dot in the middle of the symmetry line to move it.
Later on, we’ll discuss the different symmetry line options (vertical, horizontal, quadrant, and radial). These will determine where Procreate will place your symmetry line, by default. That said, you can easily move the symmetry line depending on your needs.
The great thing about moving your symmetry line around is that you can undo it! If you make a move that you don’t want anymore, simply tap with two fingers on your screen to undo it. If you click on the Done button, the undo history will be erased, so make sure you like the positioning of your line before you finalize it.
How to Use Create Mirrored Drawing in Procreate
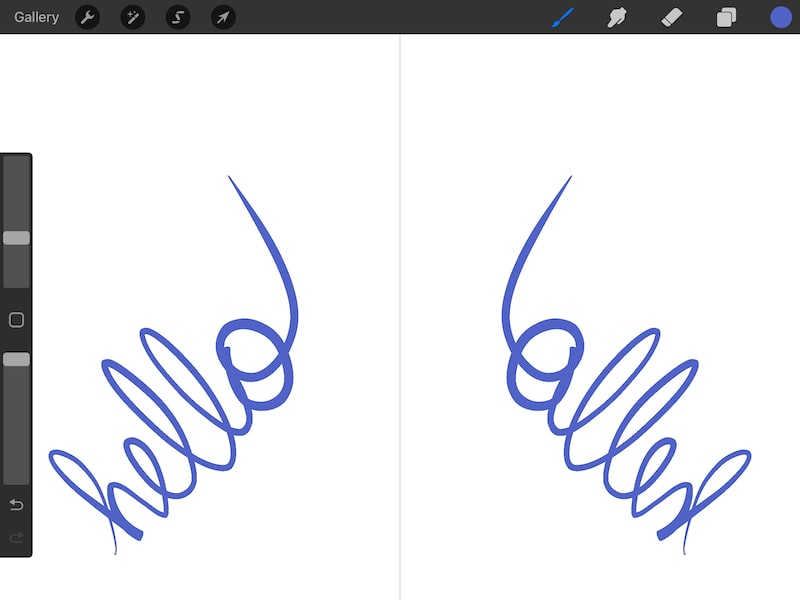
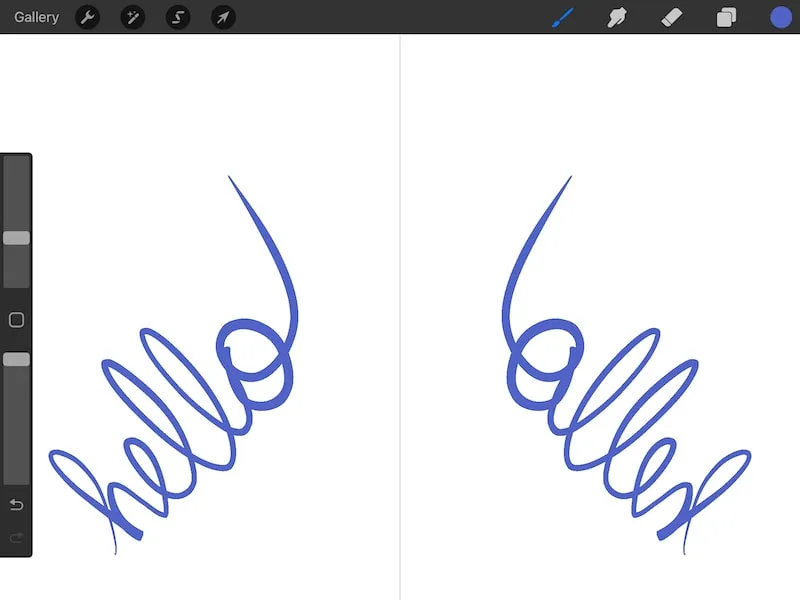
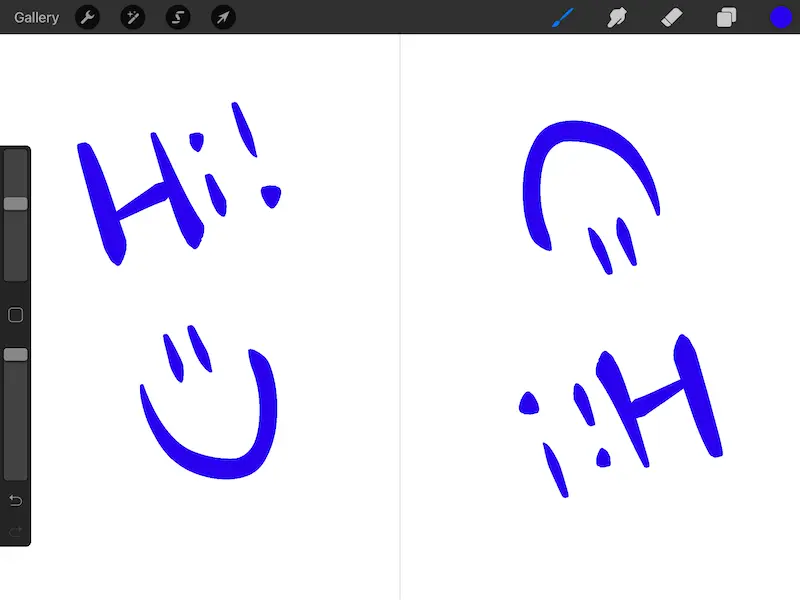
By default, Procreate’s symmetry tools use mirror symmetry, which means that your drawing will be mirrored across your canvas. Using Procreate’s vertical or horizontal symmetry options will give you a result that looks most traditionally mirrored.
If you want to create a mirrored drawing in Procreate, you’re in luck. All you have to do is turn on Procreate’s symmetry feature. By default, Procreate uses mirroring for it’s symmetry, so you can quickly create mirrored drawings just by turning on the symmetry tool.
Resist the urge to toggle on the Rotational Symmetry option, which we’ll talk about next, and you’ll be good to go!
How to Use Procreate’s Rotational Symmetry
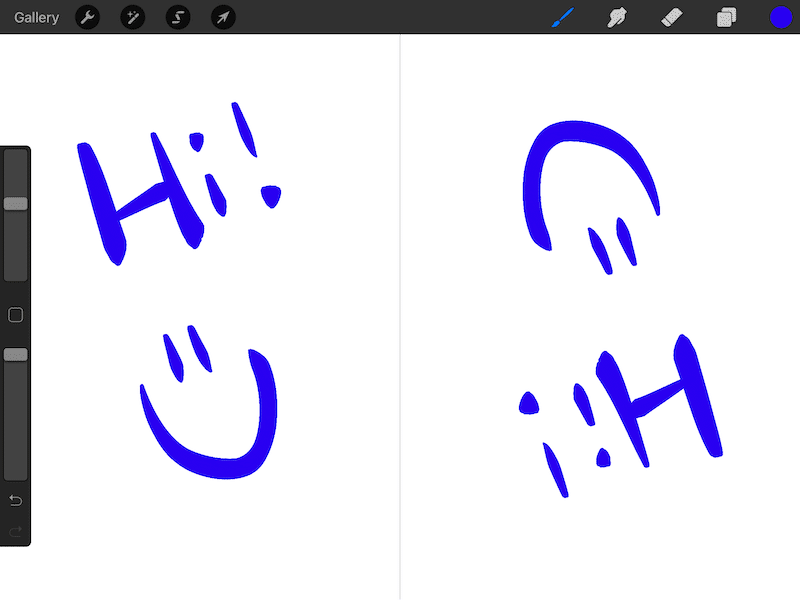
Within the Procreate Symmetry settings, click on the Options tab, and toggle on Rotational Symmetry. With this option turned on, instead of simply mirroring them, Rotational Symmetry rotates them.
Procreate’s default symmetry settings utilize mirroring. This means that whatever is drawn on one side of your symmetry line will be mirrored on the other.
When you turn on Rotational Symmetry, Procreate does some additional gymnastics with your drawings. Instead of simply mirroring them, they will rotate them.
With 1 symmetry line, it makes your drawings look like they’re backwards and upside down.
Due to the horizontal reflection and rotation, your drawings turn out backwards.
If you have multiple symmetry lines, your drawing will look like it’s being rotated around your canvas in each space.
Rotational Symmetry can be really fun to play around with, depending on the effects you’re going for.
Those are all of the general Symmetry settings that you’ll want to keep in mind. Now, let’s dive into the differences between the vertical, horizontal, quadrant, and radial symmetry options.
But first, let’s take a really important detour to talk about Skillshare. When I opened Procreate for the very first time, the next thing I did was turn on a Skillshare class. Skillshare has been my tried and true guide from the beginning of my Procreate journey, and it’s still something I rely on today.
How to Use Vertical Symmetry within Procreate
Procreate’s Vertical Symmetry option will place a symmetry line down the middle of your canvas in a vertical position. Anything you draw on the left hand side of it will be reflected on the right, and vice versa. Enable this option by clicking on the Options tab within the Symmetry settings.

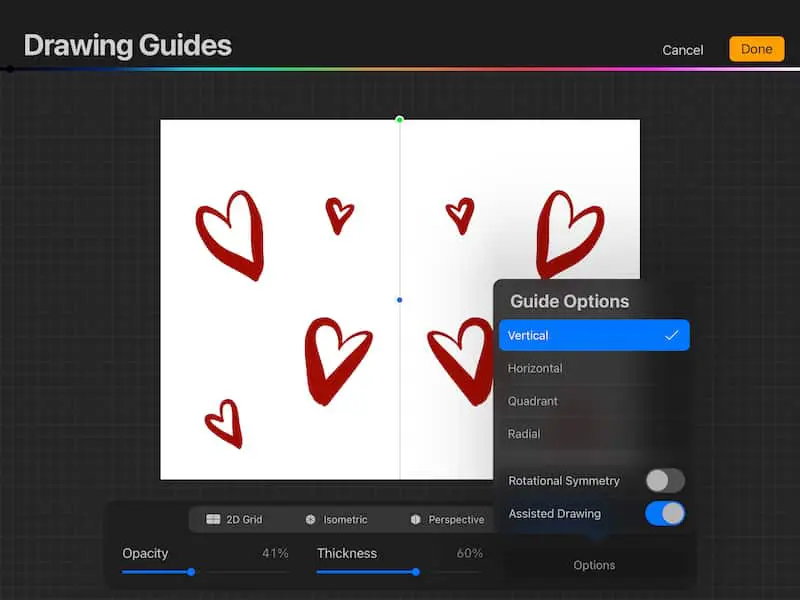
Vertical symmetry is great for drawing faces, houses, or anything that looks the same on both sides. Instead of drawing one side at a time, turn on your vertical symmetry in order to draw both sides at the same time.
Not only will this ensure that both sides of your drawing match, it will also speed up your drawing time. No more wasting time trying to manually make both sides of your drawings match. Just think – both eyes will be the same! It’s like a miracle, isn’t it? I swear, making both eyes of a face match has always been my Achilles heel.
It can also be neat to use for drawing mandalas.
Pro tip: if you move your symmetry line (rotate it with the green dot or reposition it with the blue dot), don’t worry about trying to put it back to how it originally was. Simply click on one of the other symmetry options (horizontal, quadrant, and radial), and then click on vertical again. This will reposition your line back to the default, vertical position. Remember that it responds to the undo feature as well.
How to Use Horizontal Symmetry within Procreate
Procreate’s Horizontal Symmetry option will place a symmetry line across the middle of your canvas in a horizontal position. Anything you draw on the bottom side of it will be mirrored on the top, and vice versa. Enable this option by clicking on the Options tab within the Symmetry settings.

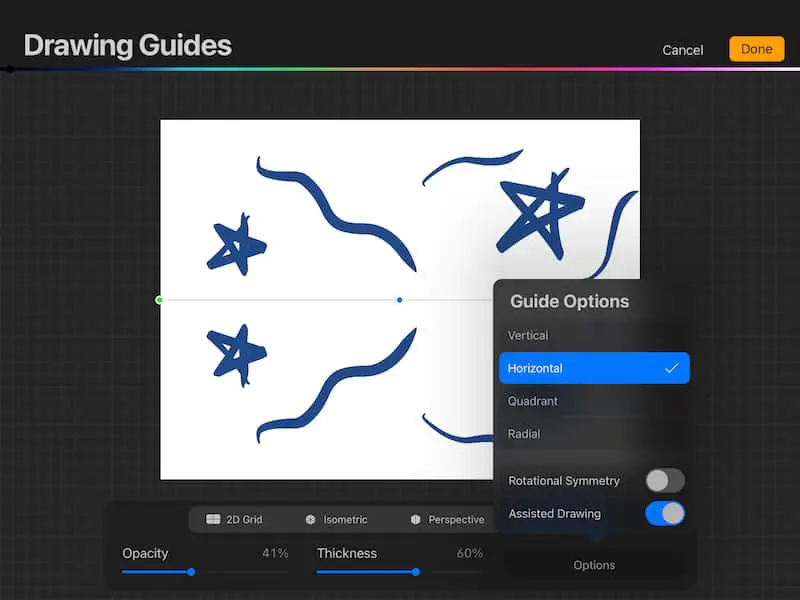
The horizontal symmetry option is the same as the vertical…just horizontal. They function in the same way though. Use this option if you want a perfectly horizontal line that perfectly divides your canvas into equal sections on the top and bottom.
How to Use Quadrant Symmetry within Procreate
Procreate’s Quadrant Symmetry option will place two symmetry lines on your canvas, one vertical and one horizontal. Anything you draw in any one of the quadrants will be reflected in the other three quadrants. Enable this option by clicking on the Options tab within the Symmetry settings.
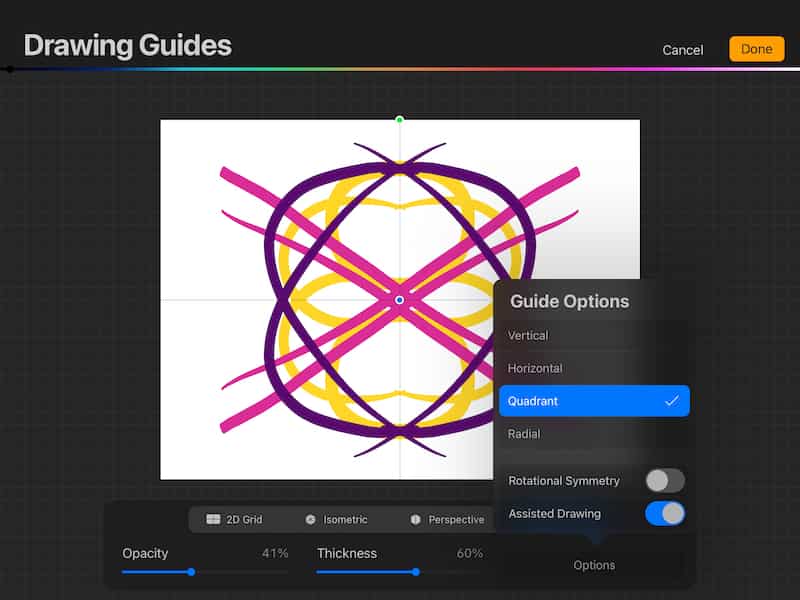

Personally, I like to use quadrant symmetry to make fun and unique patterns. It’s an interesting way to bring symmetry into your work, but not in an overly obvious way. The result is usually something that looks intricate, but was actually simple to create.
You can use the green dot to rotate the quadrants, and the blue dot to move them across their screen. You CAN’T add additional symmetry lines, or space them differently. They will always be equally spaced.
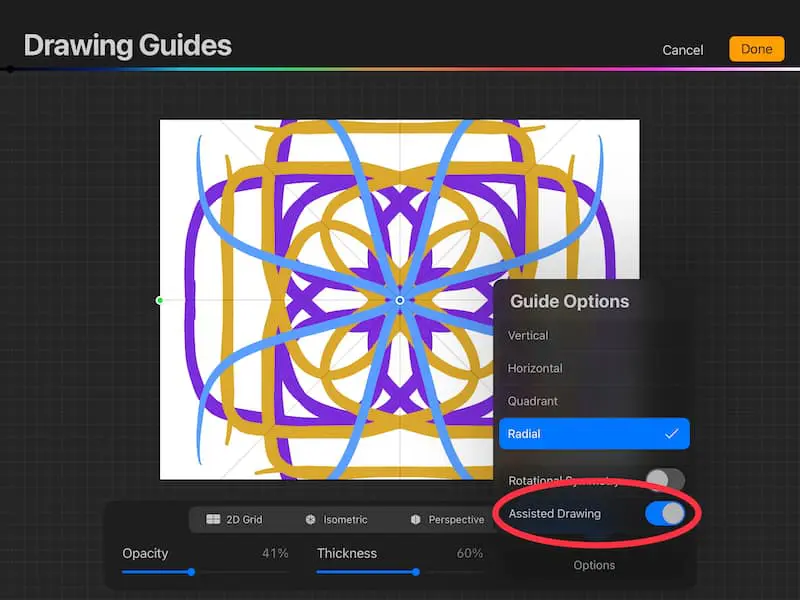
How to Use Radial Symmetry within Procreate
Procreate’s Radial Symmetry option will place four symmetry lines on your canvas, one vertical, one horizontal, and two diagonal. Anything you draw in any of the segments will be mirrored in the other seven quadrants. Enable this option by clicking on the Options tab within the Symmetry settings.
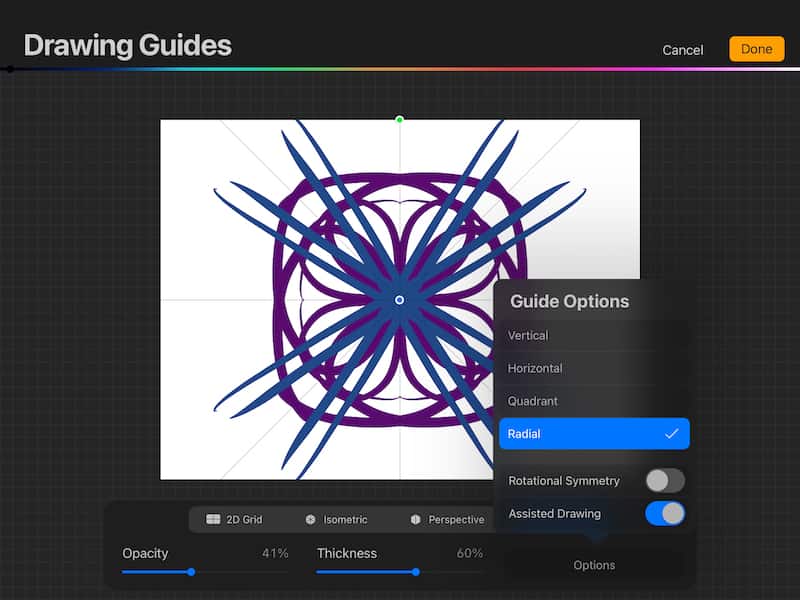
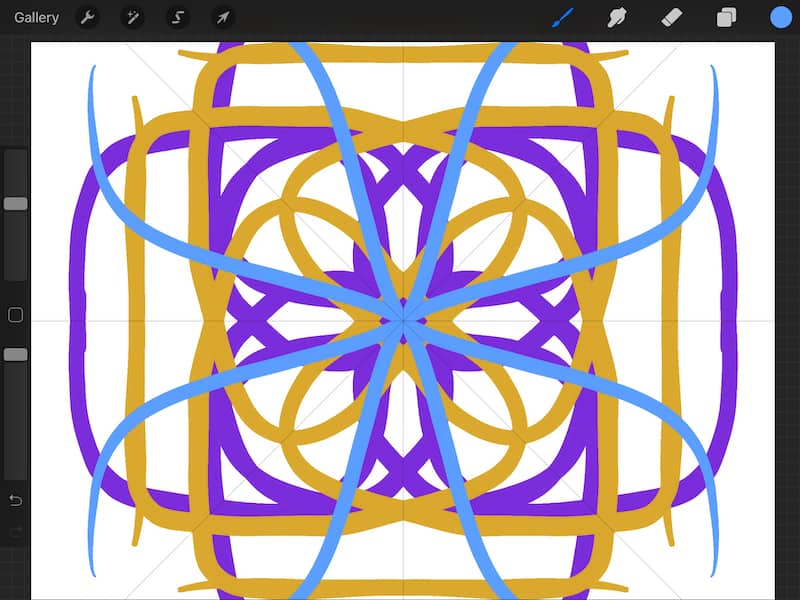
If you liked making patterns with the quadrant symmetry, you’ll REALLY love making patterns with the radial symmetry.
When you use radial symmetry, you’ll have eight different quadrants on your screen. That means that anything you draw in one segment will be mirrored seven different times across your canvas.
That’s awesome.
Talk about a really simple way to make a drawing that looks really complicated.
It’s also really relaxing. Sometimes, I’ll turn on the radial symmetry just to do some stress-free drawing. Give it a try and see what types of patterns you can come up with.
The radial symmetry option is also a really great way to make a quick kaleidoscope or mandala in Procreate. If you get creative, there are SO many things you can do with this neat symmetry feature.
You can use the green dot to rotate the eight segments, and the blue dot to move them across their screen. But, similar to the quadrant symmetry, you CAN’T change the number of symmetry lines available, or how they are spaced. They will always be equally spaced.
How to Turn Off Symmetry in Procreate
To turn off the symmetry settings in Procreate, click on the wrench to open the Actions tab, and then click on Canvas. Turn off the toggle for the Drawing Guide. Next, open the Layers panel and click on the layer in question. In the dropdown, make sure that Assisted Drawing is turned off.
It’s really easy to accidentally keep the symmetry settings on without realizing it.
And, the symmetry settings are different from all of the other Drawing Guides. Unlike the others, you can’t turn it off just by disabling the Drawing Guides within the Actions menu. To turn off symmetry, it’s a two-step process.
This can be confusing and frustrating because, when you toggle off the Drawing Guide, the symmetry line will disappear. But, anything you draw will still be using the symmetry feature. This can make it seem like the Procreate symmetry tool won’t turn off.
That’s because the Assisted Drawing feature is still being applied to your layer.
In addition to toggling off the Drawing Guides, make sure to turn Assisted Drawing off in your Layers panel as well. If you don’t, the symmetry feature will still happen.


The same applies vice versa. If you toggle ON your Drawing Guide, but the symmetry feature isn’t working, make sure that Assisted Drawing is enabled on your layer. If it isn’t, you won’t be able to draw in symmetry.
Procreate Symmetry Options Aren’t Fully Customizable
If you’re wondering if you missed additional customization settings within Procreate’s symmetry options, you didn’t. At the moment, you can’t add additional symmetry lines aside from those included in their pre-set options. You also can’t position them individually either.
Like we talked about in the quadrant and radial symmetry options, you can’t add additional lines, or change the spacing of them. You can move them and rotate them, but you can’t change how many lines there are or how they are spaced.
In addition, within the vertical and horizontal settings, you can’t move or rotate your symmetry line to a specific angle or spot. You need to eyeball it. The only thing you can know for sure is that the vertical option is perfectly vertical and the horizontal option is perfectly horizontal. Both will split your canvas into equal pieces.
Once you adjust those symmetry lines manually, you won’t be able to know what angles or positions you’ve achieved.
This can be frustrating to Procreate users who want some more customizable options within the symmetry settings. Hopefully this will change in the future but, for now, we have to work with the symmetry options that are available.
Despite being able to fully customize the settings, Procreate’s symmetry tool is pretty darn impressive. It can give you a great way to add complexity to your drawings, increase your precision, and decrease the time you spend laboring over each stroke.
If you’re not sure how to dive in and get started, just have fun experimenting. Procreate’s symmetry tool is definitely a learn-by-doing type of feature. Play around with everything that it has to offer and see what you can create.


Diana has been an artist for over 27 years and has training in drawing, painting, digital drawing and graphic design. Diana’s latest obsession is digitally drawing with Procreate and Procreate Dreams. Diana has experience selling her art across a number of platforms and loves helping other artists learn how to make money from their art as well.