Transparent overlays can add a lot of style and class to a design. They can be customized to match a brand’s color scheme, can tone down images so that words or elements pop, and let designers have more control over the colors that their designs highlight.
In Canva, you can make a transparent overlay by selecting the square element and dragging it over your design. Set the desired color and use the opacity slider to achieve the right transparency level. Lastly, add any text or elements that should go on top of the transparent overlay.
Canva makes it very easy to make elegant designs with transparent overlays. Let’s dive into the steps you need to take to use this great feature.
What is a Transparent Overlay?
A transparent overlay is a colored layer that covers your entire design. You may decide to have some elements on top of it or under it depending on the effect you’re trying to achieve. Whatever is underneath will be muted and whatever is on top will be emphasized.
But, as the word “overlay” implies, it’s supposed to “lay over” your background image or collage of images. When you put text or other elements on top of your overlay, they will stand out and pop more than if they were simply on the image alone.
The overlay is said to be “transparent” because it can be seen through. The intensity of the transparency can be customized depending on the design, all the way from a solid color to full transparency.
Basically, a transparent overlay can be seen as a tint that’s added to a design. It serves to unify the design around a certain color and either tone done or emphasize various elements.


VS.


Make a Transparent Overlay From the Start of Your Design
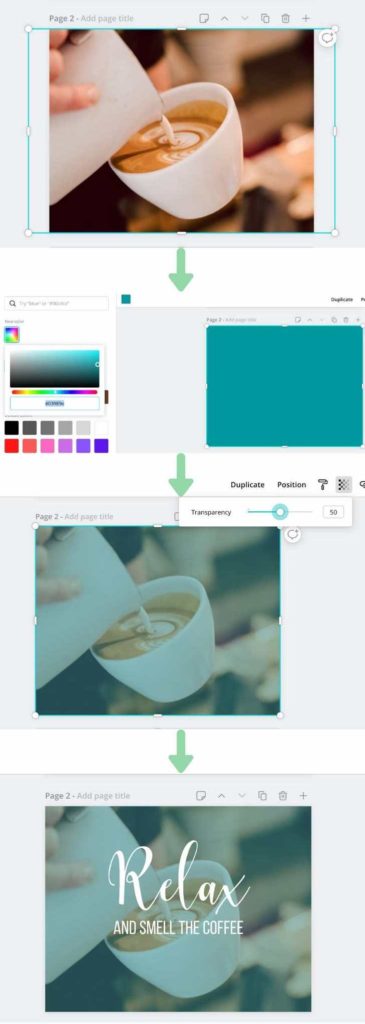
- Start off with your background image and stretch it across your entire design.
- Choose the square from the elements tab
- Stretch the square over your entire design
- Choose a color for your new overlay
- Click on the checkerboard, which is your opacity bar and choose a transparency level for your overlay
- Start adding elements on top of your new, transparent overlay

If I know that I’m going to incorporate a transparent overlay in my design, I add it from the get-go. Even if I do a 180 on the color and change it from blue to red halfway through, I like to see how all of the elements are coming together given the overall tint and tone I’m working with.
Make a Transparent Overlay After Your Design is Finished
Sometimes you don’t realize that you want a transparent overlay until you’re done. Maybe it’s the missing piece that has been keeping the design from feeling just right and complete. It’s totally doable to add a transparent overlay at the very end of your design if you’re ok with making a few adjustments.
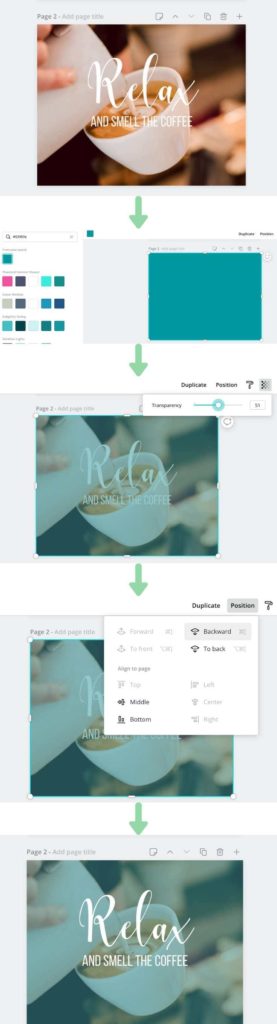
- Choose the square from the elements tab
- Stretch the square over your entire design
- Choose a color for your new overlay
- Click on the checkerboard, which is your opacity bar and choose a transparency level for your overlay
- With your transparent overlay selected, click the position button and move the transparent overlay backwards until all of the necessary elements are sitting on top of your overlay

You may have to play around with the colors of your elements and overlay so that they are compatible. Since you didn’t start off with the overlay and the color of it impacts the design SO much, you may have to toy around with all of the colors for a while until you find a combination that works.
Making a Transparent Overlay that Covers Only Part of Your Design
No, a transparent overlay doesn’t have to cover all of your design. I often use partial transparent overlays to add text to an image heavy design. This lets me add lines of text without them getting lost in the busyness of the images, while also not having to mute the entire image with the overlay.
I often put my overlays at the top, bottom, or middle of my design, and then center the text within them. In order to do this, you would create the overlay just as described above, but instead of stretching your overlay across your entire image, you would simply stretch it as much as you need to hold your desired text.
Partial transparent overlays can be a great way to keep your images colorful and vibrant, while also giving yourself a strategy for making your text pop as well.
Here’s an example, including another great post to check out!


Diana has been an artist for over 27 years and has training in drawing, painting, digital drawing and graphic design. Diana’s latest obsession is digitally drawing with Procreate and Procreate Dreams. Diana has experience selling her art across a number of platforms and loves helping other artists learn how to make money from their art as well.