There’s nothing worse than slaving over a design just to realize it’s low resolution and won’t print very well. Or, even worse, sell it to someone and have them send you a nasty message about how pixelated and blurry the printed version of your design ended up. What went wrong? Most likely, it was the DPI of the image. Ensuring you have a high resolution image at 300 DPI is essential for creating crisp and clean designs that print well every time.
300 DPI images and designs are considered the standard for high resolution images. DPI stands for dots per inch, which means that a 300 DPI image has 300 dots of color per inch of the design. As long as your canvas size is correct, images that are at least 300 DPI will print clean and crisp instead of pixelated and blurry.
Having a 300 DPI image is important, but it can be easy to forget to set up our designs and images this way. To make matters worse, programs like Canva (which I love otherwise) actually make it really hard to create 300 DPI images.
And, with Canva, you actually can’t create 300 DPI images if you want to have a transparent background. That’s ok though, and I’ll explain why.
Let’s talk more about why 300 DPI images matter so much and how you can make clean and crisp 300 DPI images every single time.
This post may contain affiliate links, which means I may earn a commission if you decide to purchase through my links.
Why Does 300 DPI Matter?
DPI stands for dots per inch, which basically means that an image’s DPI tells us how many dots of color are packed into 1 inch of an image.
If the DPI for your image is 92, you’ll only have 92 dots of color per inch of your image. It might look ok when it’s a few inches big on your computer screen, but as soon as you blow that image up to your 11×17 printing size, those 92 dots spread out and become a lot more noticeable. Think about how much more dense your color is if you have 300 drops of it as opposed to 92.
Suddenly, 92 isn’t enough and your image looks blurry and choppy.
DPI = dots per inch. A good tip to remember when creating/exporting images!
— IAmSciComm | Mary McMillan (@iamscicomm) February 10, 2018
Web = 72 dpi (fast upload, just enough quality) 🌎
Presentation = 150 dpi (balance of quality + PPT not crashing…) 👩🏽🏫
Print = 300+ dpi (good enough that human eye can’t discern dots) 📚
#scicomm pic.twitter.com/3fIhnab5Tx
On the other hand, let’s say that you make your image 300 DPI. This means that you’ll have 300 dots of color per inch. When you’re finished and go to print your image at a large size, there are enough dots of color that can spread out evenly to cover the entirety of your print space.
300 dots of color within 1 inch is a lot.
300 isn’t the highest level of DPI you can reach, but you won’t notice much improvement in image quality beyond 300, so 300 DPI is what most people focus on (source). If you aim for 300 DPI, you’ll be achieving the industry standard for high quality images and designs. There’s no need to be an overachiever and try for anything higher than that.
It’s Important to Know the Difference Between DPI and PPI
Depending on the software you use, you might have stumbled upon the term “PPI.” PPI stands for pixels per inch. This is what’s used to describe your image before it’s printed and you’re still viewing it on your computer.
Similar to DPI, PPI describes how many pixels are within 1 inch of your design. If your PPI is too low, your image or design will be pixelated. There just aren’t enough pixels per inch to cover the entirety of your design.
DPI and PPI are often used interchangeably, which is incorrect. DPI refers specifically to ink, which means that it can only describe an image or design when it is printed. PPI refers specifically to pixels, which means that it can only describe an image on the computer.
That said, they’re often used interchangeably because you’re rarely going to have a DPI and PPI that are out of sync with each other. It’s important that both your PPI and DPI are high in order to have a high resolution image. More often than not, if one of them is high, the other is as well, so there’s really no need to think about them separately. But, if you’re into specifics, it’s good to know that PPI and DPI are two separate concepts.
Should You Ever Go Above 300 DPI?
As we talked about, you’re not going to notice a lot of improvement when you go above 300 DPI. But, should you ever go higher?
If you’re printing something that’s going to be really large, you may consider 600 DPI. This will give you a little more security that your image will be crisp and clear. In general, 300 DPI will be just fine, but higher DPIs aren’t impossible. In fact, a lot of printers can print up to 1200 DPI just fine. Some even reach 2400.
Important note: your 600 DPI file will be a lot larger and possibly harder to work with than one at 300 DPI.
If you’re printing your documents yourself, it’s important to realize that higher DPIs will require more ink than lower DPIs. Remember that DPI stands for ink drop per inch. If you have 1200 drops per inch, that’s a lot more than 300 dots per inch.
But, if your image is going to be so large that you feel the need to print above 300 DPI, you likely aren’t using your home printer. Talk to the print shop you’re planning to work with and see what they recommend. What’s the DPI capacity of their printers? Given the size you’re looking for, what DPI level do they think is appropriate? Your printing company will be very familiar with, well, printing, so it’s good to ask for their advice before you finalize your design.
How to Design 300 DPI Images
Ok, so here’s where you’ll start to see how often PPI and DPI are used interchangeably. In many programs, including Photoshop, you’ll set the DPI by setting the PPI. Don’t freak out if you don’t see an option for each of them. In many programs, PPI and DPI are used interchangeably and you’re good to go as long as you set one of them.
Here’s what you should do:
- In your design program, look for the “Image Size” options panel. This is normally where you would go to change the dimensions of your design, but it’s also where you can change it’s resolution.
- Look for the box that has any one of the following labels next to it: DPI, PPI, pixels/inch, dots/inch.
- Type “300” into the box, click save, and you’re good to go.

The most important step of this process is to remember doing it in the first place. I’m often guilty of forgetting to do it myself and then wind up with an unpleasant surprise when my designs are blurry. It’s crazy how easy it is to forget…or maybe that’s just me.
For most of the design programs, this is all you have to do. If you’re using Canva though, life is a little bit harder.
How to Design 300 DPI Images in Canva
I LOVE Canva. It somehow manages to be a powerhouse of a design program, while also being really simple and easy to use. I use Canva for almost everything I do when it comes to graphic design and rarely have any hiccups. I personally use the Pro version, which I HIGHLY recommend.
That said, Canva has one huge drawback. Well, it’s a drawback until you know it exists. The problem is that many people don’t realize that this drawback exists until they learn the hard way via a blurry print job. So, what’s the drawback?
Canva can only produce 300 DPI PDF documents, not photos.
This means if you download a jpg or a png, it probably won’t be 300 DPI. Take a look at the png I downloaded. Yep, it clocks in at a whopping 96 pixels/inch. That’s pretty far from 300.


Luckily, there is a way to work around this.
Important note: if you are reading this article wondering how to create 300 DPI designs with transparent backgrounds for t-shirts, mugs, or other products, read the next section.
This section applies if you don’t need a transparent background.
It’s not ideal, but if you love Canva like I do, it’s worth the extra effort to create a print worthy, 300 DPI image. I’d rather spend a few extra minutes adjusting the DPI of my images than have to ditch the program altogether and learn a new program that has the DPI settings figured out from the beginning. Just my preference. Don’t worry, the workaround isn’t very hard. Here’s how to do it:
- Design your image in Canva
- When you’re ready to download it, choose the PDF Print option. In Canva, the PDF Print option will always download a high resolution file.
- Convert the PDF Print into a jpg or png, depending on what you need. Make sure to enter 300 into the DPI box.
These are my go-to conversion tools:
PDF to jpg: https://www.pdfconvertonline.com/pdf-to-jpeg-online.html#
PDF to png: https://image.online-convert.com/convert/pdf-to-png
HUGE NOTE: this hack isn’t 100% perfect. Depending on the complexity and size of your image or design, there are times when you’ll get wonky results. Make sure to print your jpg or png file to make sure that everything looks good.
There you have it! When you convert your PDF Print to a jpg or png, it will keep the 300 DPI level.
How to Use Canva to Make High DPI Images with Transparent Backgrounds
Like I said, the section above applies to any Canva artwork that doesn’t require a transparent background. Prints, cards, posters, etc. If you do need a transparent background, the conversation process we just talked about won’t work.
If you’re working with transparent PNG files, forget everything we just talked about and do this instead.
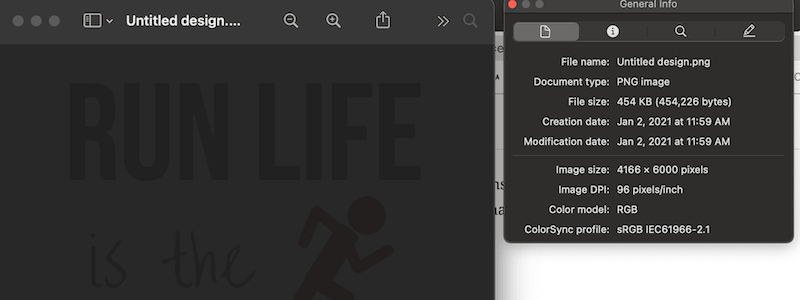
- Create a canvas in Canva at their maximum size. Currently, the biggest you can get is 4166×6000 px. It doesn’t have to be this exact size. Go with something similar that works best for your design.
Side note: I create my designs with Mech by Amazon dimensions (4500×5400 px) so that I can upload them to multiple platforms without having to resize them. I’ve never had issue at that size. - Download it as a transparent PNG file
Looking at the image on your computer, you’ll see that it’s 96 DPI.
But, look what happens when we upload it to a print on demand platform like Printful.
…it still says 96 DPI. That’s because it is still the same size.
Instead, try putting it on a product, like a shirt. Now, the DPI is 375. That’s way over the 300 that we need. Yay!

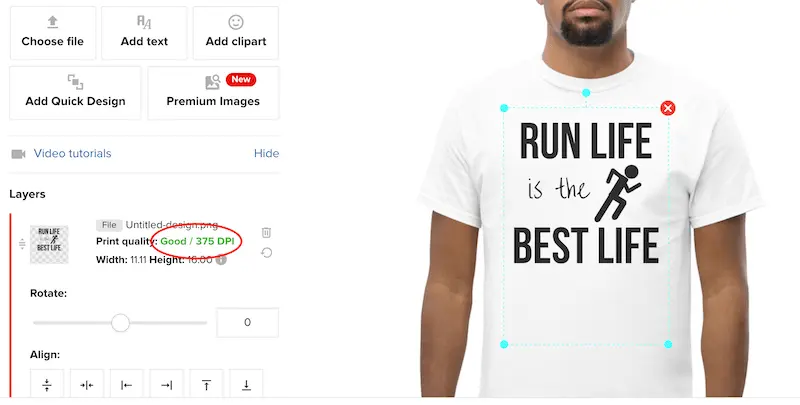
The reason why this works is because we’ve created our design on a canvas that is a lot larger than this needed for printing on products. Once they’re scaled down to the right size, the DPI adjusts and ends up being at a level we need.
I have used Canva to create every single one of my print on demand designs with zero issues. In the all the years that I’ve been selling, I’ve never had even one customer complain of print quality issues.
In fact, I get compliments on the print quality. Shoutout to Printful and their amazing service! If you’re looking for a great print on demand partner, I highly suggest them.
You can sign up for Printful here!
So, if you’re using Canva to create your print on demand designs, make your canvases as large as you can, and you’ll be fine.
Once you understand the basics of DPI and how to make sure that all of your designs are set to at least 300 DPI, you can put the topic aside and get back to designing. There are a lot of complicated ways to think about image resolution, but many of us will never need to enter that territory. Unless you work at a print shop or are taking photos for National Geographic, setting and forgetting your DPI at 300 will be just fine.


Diana has been an artist for over 27 years and has training in drawing, painting, digital drawing and graphic design. Diana’s latest obsession is digitally drawing with Procreate and Procreate Dreams. Diana has experience selling her art across a number of platforms and loves helping other artists learn how to make money from their art as well.