Jumping into drawing can seem like a daunting task. A lot of us get inspired to draw after looking at some amazing pieces of art from artists that have a number of years behind them. We go to grab our pencils and realize that we’re nowhere near that level. Suddenly, we’re really discouraged and want to break our pencil, Hulk style.
It’s totally ok to feel this way. A lot of beginners do. It’s important to start learning the right way so that you can eventually leave the beginner territory and eventually gain those advanced skills you admire.
Beginning artists should draw basic shapes with shading, images with the grid method, half finished drawings, something exciting, and anything that allows for experimentation with different materials.
Even if you’re disappointed that your drawing skills aren’t as advanced as you want them to be, there are a lot of neat things you can do that will also make you a better artist. Sometimes, being a beginner is really fun! It lets you spend a lot of time experimenting, making mistakes, and finding your style.
All of the exercises we’re about to talk about are really enjoyable. They also target some fundamental skills that you need as a beginner to move forward with your drawing skills. What should you draw as a beginner? Let’s find out.
This post may contain affiliate links, which means I may earn a commission if you decide to purchase through my links.
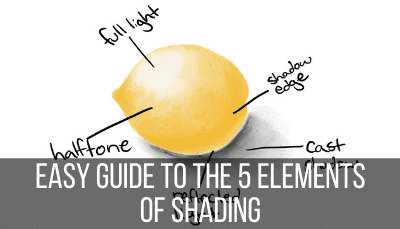
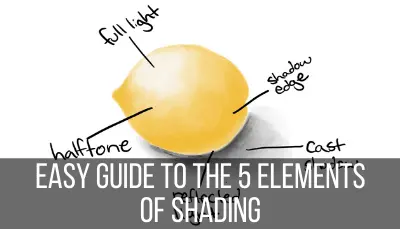
1. Basic Shapes with Shading
Ok, you might be thinking, “I thought we were doing FUN activities.” Alright, this isn’t the most fun choice on this list, but it’s not the worst thing you could do either. It’s also REALLY helpful for securing your fundamental drawing skills.
All of us learned how to draw circles, squares, and triangles in Kindergarten. What we didn’t learn was how to shade them to look realistic. How do you make that circle pop off the page as a sphere? How do you place shadows on that square to make it look like your Saturday morning cereal box? How do you use depth to show the curves on the triangle to turn it into a cone? Not as easy anymore.
If you can nail the concept of shading, you will skyrocket your drawing skills. This ability alone is like an artistic superpower. Shading is the difference between a flat object that rivals those Kindergarten days and realistic art that people gawk at.
Trust me, even if it seems boring at first, you NEED to master shading.
If you’re like me, shading will become one of your favorite things to do. There’s just something so gratifying about using simple shading to bring and object, face, or character to life.
Take a look at some of the pencil drawings you admire and study the shading. Do you see how most of the realism comes from shading? Yes, the shapes and lines matter, but the shading is what makes it come alive.
As tempting as it is to jump ahead to more complex shapes, if you’re a beginner, start with a circle, square, and triangle. It won’t take you long to master, but the knowledge you’ll gain by doing so will benefit you for the rest of your drawing career. Set this strong foundation and don’t skip any steps in the process.
2. An Image With the Grid Method
A big concept in the art world is to draw what you see. This means that you need to let go of all of your preconceived notions of what an elephant or a face looks like and just draw every line as it appears.
This is REALLY hard to do, especially when you’re just getting started.
Our brains have been trained to look at objects and understand what they are. If we see an element, we match it to our memory or previous knowledge of what an elephant looks like.
Our brain then confirms that what we are looking at is, indeed, an elephant. If we weren’t able to do this, we’d be really confused as we moved around the world. We would spend a lot of time staring at objects as we tried to piece together everything we were seeing.
In the real world, the ability to look at objects and instantly understand them is a huge benefit. But, it can be a disadvantage in the art world, which means that we need a way to “disable” it.
Luckily, there is a way to “disable” it and force our brains to see things in bits and pieces instead of as a whole. Enter, GRIDS!
The grid method is most popularly known as a way to scale your drawings. The basic idea is that you place a grid over your image. Then, you recreate that grid on your piece of paper.
If you have a small image, you can easily turn that small image into a large piece of art because the grid helps you keep everything in proportion. It works vice versa. If you have a large image that you want to turn into a small drawing, simply put a grid on it and then recreate that grid on your drawing paper to whatever size you need.
I’ve used the grid method to scale my drawings, but I’ve more often used it to break complicated images into smaller pieces. Here’s the thing. When you put a grid over your image, you can force your brain to look at each grid square individually.
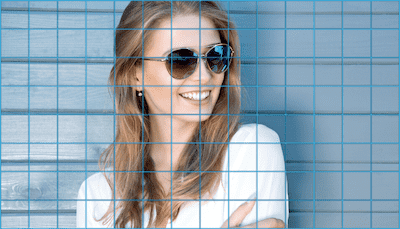
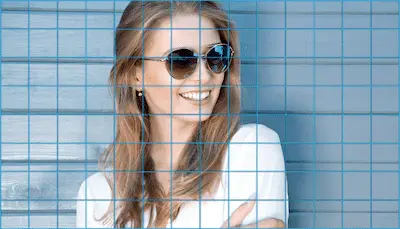
Instead of worrying about how the entire image comes together, you only need to focus on the contents of that one grid square.
This makes it a lot easier to see lines as they actually are. If you’ve been struggling to draw an arm, it suddenly doesn’t look like an arm once you’ve broken it up into 5 different boxes. Now it’s just a series of lines.
If you have a physical drawing, you can draw a grid on top of it by hand.
Pro tip: create a number of different sized grids with tracing paper or overhead transparencies. This will give you a stockpile of grids you can use and save you time creating grids over and over again on top of your images.
If you have a digital image, there’s actually a really neat tool that will create a grid for you in any size that you need.http://www.griddrawingtool.com/
This grid method is amazing when you’re just beginning your drawing journey, but it will be valuable for your whole career. No matter how skilled you are, there are times when your brain will get in the way. Whenever you’re stuck, grab a grid and see if it unlocks the artistic mental block you’re having.

3. Finishing Half of a Drawing
Drawing symmetrical mirror images is a really important part of learning how to draw. It’s also really challenging. If you even ask advanced artists, a lot of them will say that one of the more challenging parts of drawing is getting two sides of a drawing to match. Getting two eyes to look the same, for example.
This is a great skill to get a jumpstart on. If you’re hoping to draw faces or bodies someday, you’ll need to know this skill. Heck, there are few things that exist in the world that don’t have matching halves. Trees, vases, animals, buildings, flowers, they all have matching sides. If you can’t draw one side to be symmetrical with the other, you’re going to get frustrated really quickly.
A great way to work on this skill is to finish half of an already finished drawing. Here’s how to do it:
- Grab a drawing that you like and print it out.
- Fold it in half
- Lay it across your drawing paper and tape it down with masking tape or painter’s tape
- Draw the unfinished half of the drawing on your blank piece of paper
- If you want more practice, and a complete drawing, flip over your printout and use it to cover the drawing you just made. Now you’ll have another blank half to work on. I’d suggest leaving a tiny bit of your previously finished half exposed so that you can match your lines.
In addition to learning how to draw symmetrically, there’s a benefit to mentally “flipping” images. Like grid drawing, this forces your brain to think about things in different ways. In the real world, it’s rare that we look at an object and think of it as two separate halves. It would be weird to say, “that’s two halves of an elephant” instead of, “that’s an elephant.”
Again, we think of things as wholes instead of parts. Drawing half of a drawing will help you see your image differently, which will benefit your ability to draw it.
4. Something You’re Excited About
This might seem silly, but it’s REALLY important to stay excited about drawing. Especially in the beginning phases, it can be really easy to get discouraged and give up. At times, it can feel like there’s such a big gap between our current skills and the skills we want to achieve that we might as well be satisfied with looking at art instead of actually doing it ourselves.
I’ve been there.
Make sure that you balance your time advancing your skills with doing things that you enjoy. Sometimes, these are one and the same, especially as your skills progress. Maybe you need to work on your shading and you actually really enjoy shading. Great! But, if you’re struggling to advance a drawing skill, take a break from it and draw something that comes naturally to you and makes you excited.
Burnout can happen with any activity, including drawing. Even if drawing is a fun hobby for you, you can get burnt out if you stress out about it too much and take it seriously 100% of the time. It’s important to reconnect with the joy that inspired you to start drawing in the first place.
Be sure to work on drawing projects that excite you. If these projects don’t align with the skills you’re hoping to progress, that’s ok. By doing art that excites you, you’ll spend more time doing art, which is always a good thing.
Overtime, you’ll figure out your creative niche, which is usually a combination of something you enjoy doing and something you’re good at. In general, we enjoy doing things that we’re good at, so as you improve your skills, you’ll start enjoying your drawing more and more.
It’s a great cycle — the more you improve your skills, the more you will enjoy drawing, which will make you want to draw more, which will continue to improve your skills.
In the beginning, this enjoyment factor may not be there. It may be what inspired you to pick up your pencil in the first place, but once you’re in the thick of things, the initial enjoyment might wear off and be replaced with frustration. It can be really frustrating to be a beginner. Do something you enjoy every week so that you keep the joy in your art alive and don’t get burnt out.
5. Anything as an Excuse to Experiment with Materials
When you’re just beginning, it can take a while to understand your tools. I mean, a lot of us start with a yellow Ticonderoga and then suddenly realize that there are specific pencils made just for art and drawing. Even if you’ll always have a soft spot in your heart for your Ticonderoga, it’s time to cast it aside. When you’re drawing at least.
Just because a pencil is a drawing pencil doesn’t mean that it’s what you want or need. Not all drawing pencils are created equal. Here’s a quick rundown on what to expect from different types of drawing pencils:
First, look at the top of the drawing pencil to see its number.
- H pencils: the H stands for “hard,” which means that these are harder and lighter pencils
- B pencils: the B stands for “black,” which means that these are softer and darker pencils
The range of pencils from lightest to darkest:
9H, 8H, 7H, 6H, 5H, 4H, 3H, 2H, H, HB, F, B, 2B, 3B, 4B, 5B, 6B, 7B, 8B, 9B
The reason why there are so many different types of pencils is because they’re all used for different reasons. A lighter H pencil is great for sketches, especially those you plan to watercolor. They’re also good for line art and precision work given how controlled the lead is. As you move into the B pencils, you’ll find darker and softer pencils that are good for shading.
You’ll want to get a feel for all of these pencils so that you know what you want to use. The difference between a 9H and a 9B is pretty obvious, but it’s more nuanced when you look at a 4H versus a 3H.
Get a set of drawing pencils and see how each of them feel. It’ll take some time, but you’ll eventually understand which pencils you like for certain projects and tasks.
We also shouldn’t ignore charcoal pencils and colored pencils. These aren’t traditional drawing pencils, but they’re often used in pencil artwork. They’re also really fun to play around with.
Have some fun experimenting with different types of drawing pencils. This can be a nice break from working on technique, while also giving you some great knowledge of how your tools work.
All of the Exercises From a Class…That You Pay For
There are a LOT of drawing tutorials and lessons available for free online. So many that it can get overwhelming and make it hard to get started. To make it worse, we know that learning new drawing skills is going to be hard work.
Even if subconsciously, we shy away from the hard work and move on to another free resource. We do this again and again, maybe completing little bits and pieces of things, but never really getting very far or mastering any skills.
It’s time to shell out some cash for a class.
When something’s free, we don’t feel a lot of responsibility for it. We may skim through some of the lessons, skip a few minutes if we get bored, and may even move on without thinking about it. We need a reason to feel invested, which usually means actually investing.
When you pay for a class, you’ve suddenly taken a risk that you hope will be worthwhile. In fact, you’ll work REALLY hard to make sure it’s worthwhile.
Think about the last time you paid for an experience, maybe a tourist attraction or a museum. Did you notice that you paid more attention and took it more seriously than experiences you had for free? This doesn’t mean that the paid ones end up being more meaningful or fun than the free ones. A family picnic can be 10 times better than a crowded amusement park. Our expectations are different though.
When we pay for something, we expect something in return. Because we want to get our money’s worth, we go into the experience with an attitude for making the most out of it. Basically, we try harder.
You can also think about how you felt if you attended and paid for college. Spending large amounts of money or possibly going into debt for an education is a big deal. Having that monetary investment can make a big difference in mental investment.
The moral of the story is that you’ll make more of an effort with your drawing skills if you pay for an art class.
Luckily, there are a couple of ways to go about this, either in person or virtually.
Virtual Art Classes
There are so many great ways to take classes online these days. A lot of them are self-paced, have built in communities, and split up the content into bite-size pieces. Two great places to look are Skillshare, Bluprint and Udemy.
SKILLSHARE
To say that Skillshare is a wealth of art information is an understatement. Look through all of the class options and get a feel for everything available to you. From drawing to painting; character design to perspective drawing; paper crafts to digital art. Skillshare has it all.
When you join Skillshare, you’ll pay a yearly subscription price in exchange for access to ALL of their classes. Given how many classes they have, it’s likely pennies per class that you end up paying. This is pretty cool given that Skillshare teachers are masters in their industries and give you a lot of expert guidance.
Skillshare is a really good choice if you are interested in digital drawing and animation. Even though they have traditional drawing classes, I’ve learned a lot from their Procreate and digital art classes. Skillshare equipped me with a lot of the basic skills I needed to get started drawing with my iPad. Classes range from beginning to advanced, so you’ll have options regardless of where you are in your journey.
Pro tip: pick 1 class and commit to working all the way through it. Do not start another class until you are done with this first class.
The reason why this pro tip is so important is because you can get really distracted by everything Skillshare has to offer. As much as possible, pretend like all of the other classes don’t exist.
Have some fun exploring all of the options to begin with, but once you’ve picked a class, have tunnel vision on that class. Skillshare is a really amazing resource if you can be diligent enough to work through each class until it’s finished.
Grab a discount for a year of Skillshare!
Bluprint
If it seems like Skillshare has too many options that you’ll be distracted by, Bluprint can be a great choice. I like the layout of Bluprint and, while they don’t have as many classes as Skillshare, they cover all of the topics you would need.
I’ve taken a couple of basic technique and character drawing classes through Bluprint and really enjoyed them. Similar to Skillshare, the teachers you’ll find on Bluprint are experts in their fields. They’re also really good teachers. You won’t be lost in the weeds, even if you take a more advanced class.
Like Skillshare, it’s important to pick a Bluprint class and see it through until the end before you start another one. Click the banner and you can get access to all of Bluprint’s classes for 7 days, completely free!
UDEMY
What I like about Udemy is that you pay per class. One fee gives you a lifetime subscription to that class. If you’re worried that you’ll be too tempted to jump around to different classes through Skillshare and Bluprint, Udemy is a great choice. While they won’t stop you from taking more than one class at a time, you have to pull out your wallet everytime you sign up for a new class, which is a natural deterrent.
You probably already know Udemy as a leading platform for online classes. Well, it’s for good reason. Udemy has top-notch classes in a lot of different categories, including drawing. From fundamentals to more advanced techniques, there’s a Udemy class on almost anything you can imagine.
Udemy classes can be expensive, but they run sales all of the time. During a sale, you could get a class for less than $20, which is a great deal given the content you’ll be getting.
In Person Classes
I ended up majoring in English during my undergrad, but I always made sure to take at least one art class every quarter. Sometimes these were dance classes and sometimes they were traditional arts. Even after my undergrad, I took some classes through my local Parks and Rec and even a few at my community college. Whenever I can squeeze it into my schedule, I LOVE taking in person art classes.
Firstly, in person art classes are really fun. I always look forward to taking a break from the chaos of my week to just focus on my art. It’s also really neat to meet other artists and see what they’re working on.
Secondly, in person classes ramp up the accountability factor. Not only have you made a financial investment, but you’ve also made a social investment. People will notice if you don’t show up. Having a scheduled class that you feel obligated to show up to will force you to practice your drawing skills regularly.
You’ll have assignments that you need to complete and can’t just skip like you could with a virtual class. If you’ve been really struggling to make drawing practice a regular part of your life, an in person class is a great way to jumpstart things.
Thirdly, an in person class gives you access to feedback. Whether you’re taking the class for credit or not, you’ll have a teacher whose job it is to help you become a better artist. As you complete assignments, you’ll have individual attention and a way to ask really specific questions about your work. If you get caught up on a given technique, your teacher or other classmates can help you figure it out. Having access to a teacher can speed up your learning and be really helpful as you grow.
If you’re just getting started on your drawing journey, know that your time, effort, and persistence will pay off. All of the activities and options we’ve talked about are great ways to start improving your drawing skills and give you a strong foundation moving forward. Give some of them a try for yourself and see where it takes you!


Diana has been an artist for over 27 years and has training in drawing, painting, digital drawing and graphic design. Diana’s latest obsession is digitally drawing with Procreate and Procreate Dreams. Diana has experience selling her art across a number of platforms and loves helping other artists learn how to make money from their art as well.