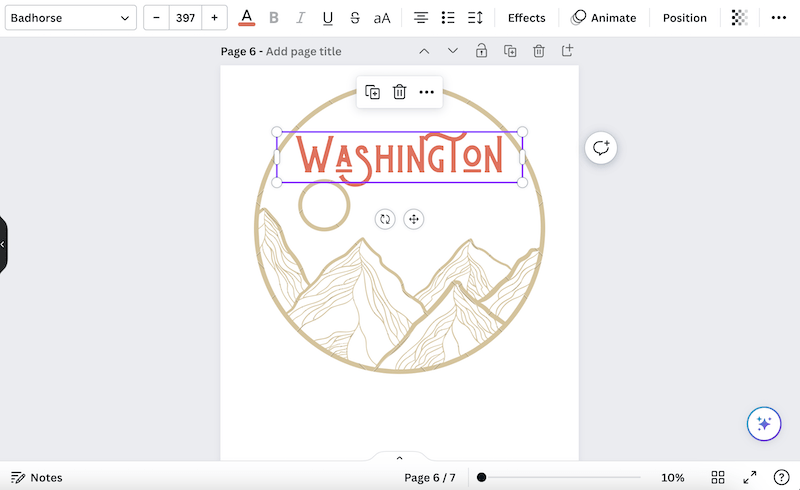
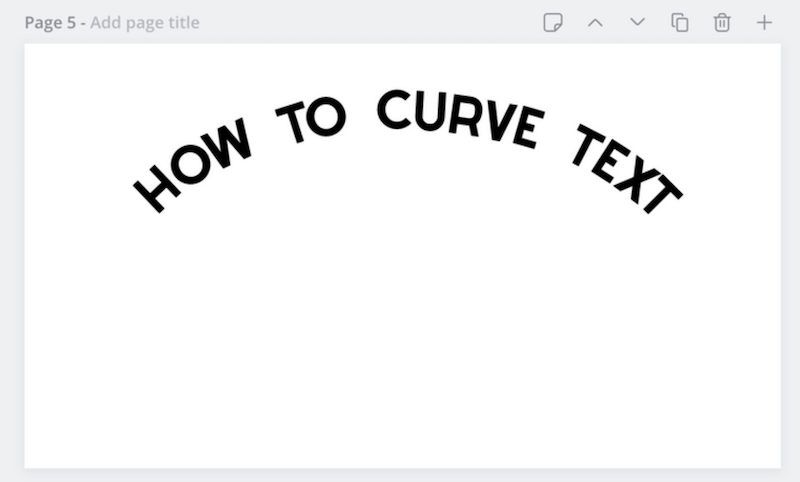
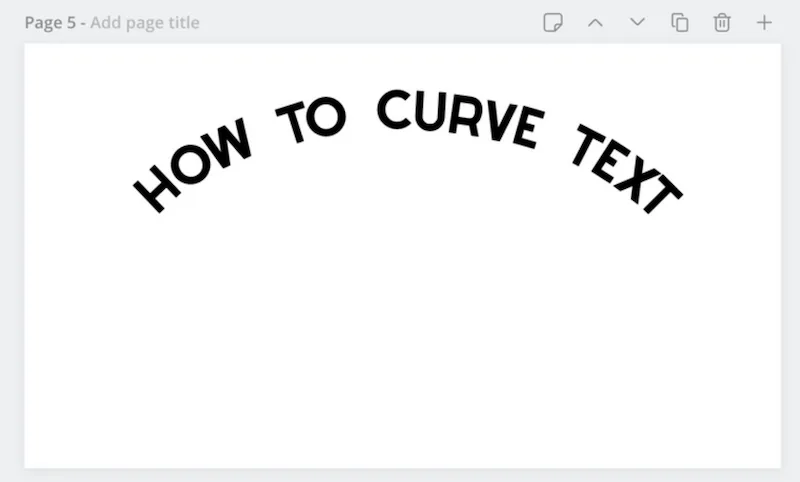
Whether you’re a seasoned graphic designer or not, curving text is something that most of us will need to do at some point in our design lives. Just look around and see how often it’s incorporated into the designs we see around us. Luckily, Canva DOES have a text curving option! There’s also a way to curve your text by hand.
To curve text in Canva, choose the Curve option in the Effects tab. If you want to curve your text by hand, stretch a circle to the shape you will want your text to be. Create separate text boxes for each letter. Using the circle as a guide, rotate each letter around the circle and delete the circle when you’re done.
Firstly, let’s talk about how to automatically curve your text with Canva.
How to Curve Text in Canva Automatically
Canva allows you to automatically curve your text! This can make it really easy to make beautifully curved lettering that you can use for your projects. Here’s what you need to do.
1. Type out your text.

2. Click on Effects
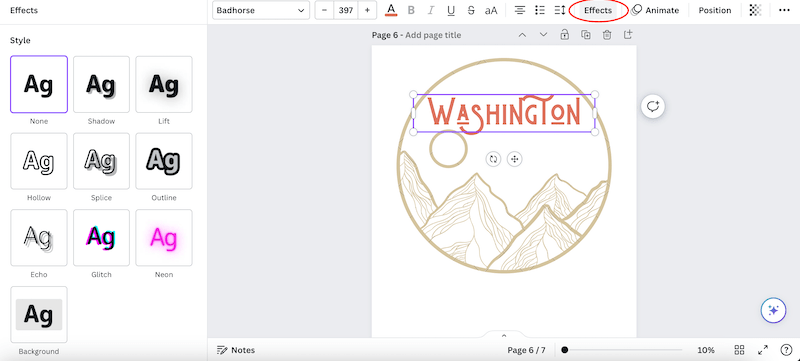

3. Choose the Curve option
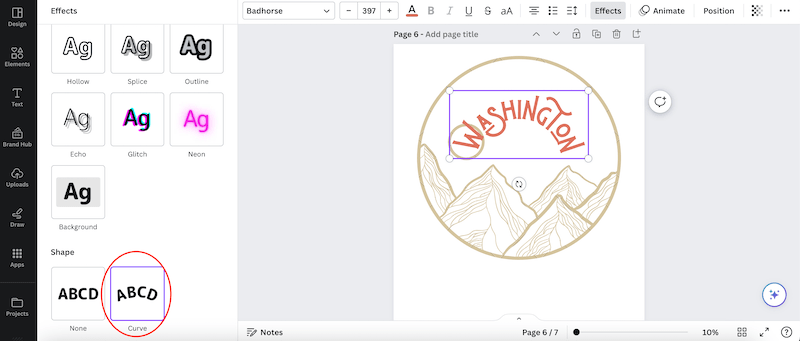
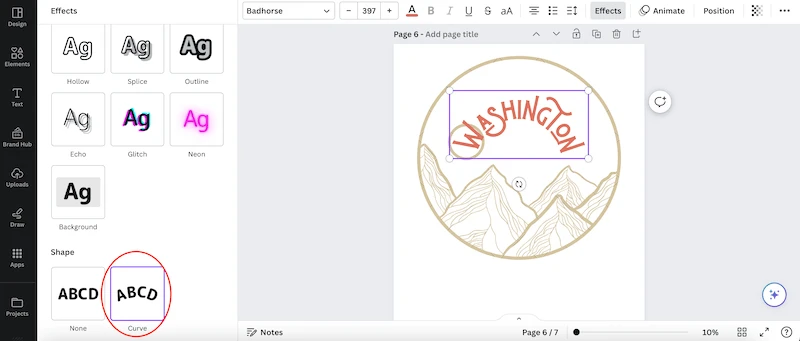
4. Use the slider to adjust the shape of your curve
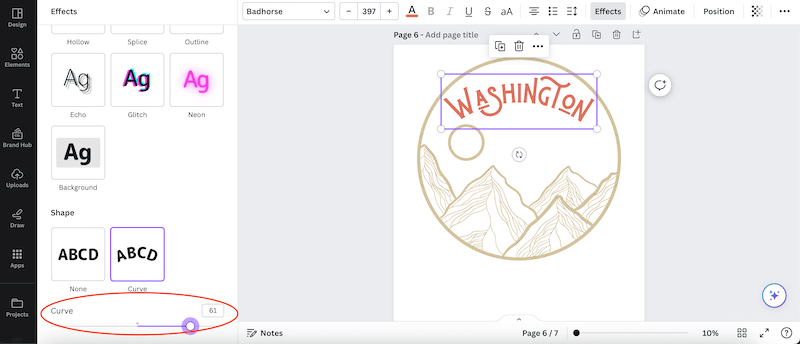
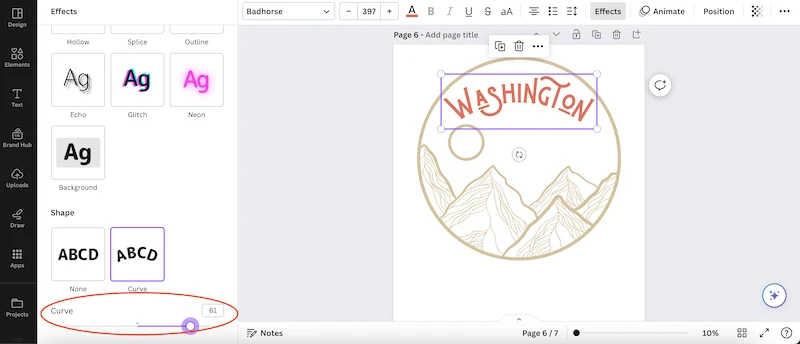
7. Adjust the positioning of your lettering, and you’re done!
You can pair your text curving with other text effects too, like highlighting, shading, and others!
I LOVE that Canva has added this automatic option for curving text. It’s quick and easy and will work for most of your projects in most cases. That said, there will be times when you will want to manually curve your text though, especially if you need a really tight curve.
Let’s talk about how to do that.
How to Curve Text in Canva Manually
You may be thinking that this is a lot of extra work to manually curve your text in Canva. Well, you’re definitely right. But, there are times when you’ll want a specific curve that you can’t achieve with the automated version. So, you’ll need to curve your text with the manual option.
Let’s dive into how it works. Once we get through the steps, keep reading because there are some important things to keep in mind with this technique.
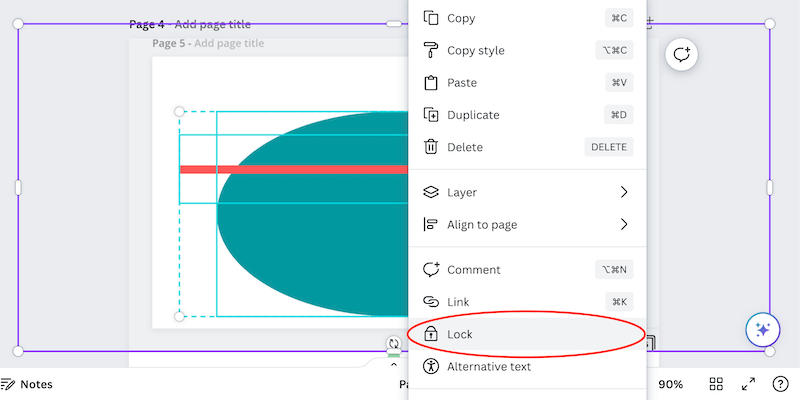
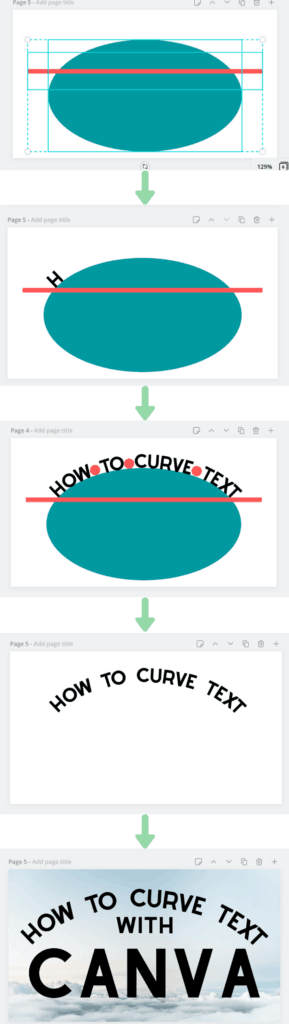
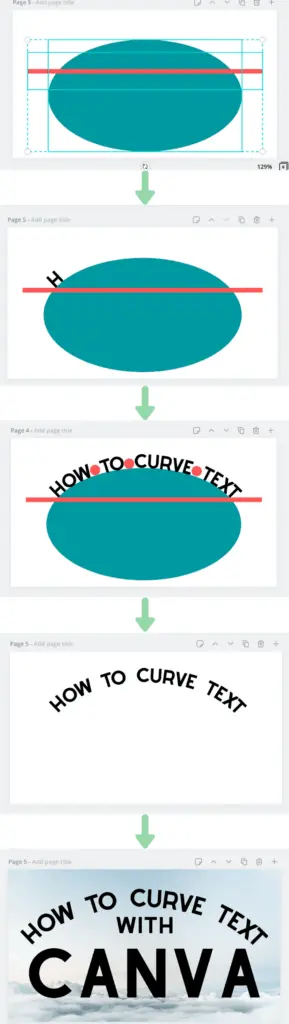
1. Start a fresh document or make sure all other elements are locked (we’ll talk about why it should be fresh and new later). You can find the lock button within the element’s settings

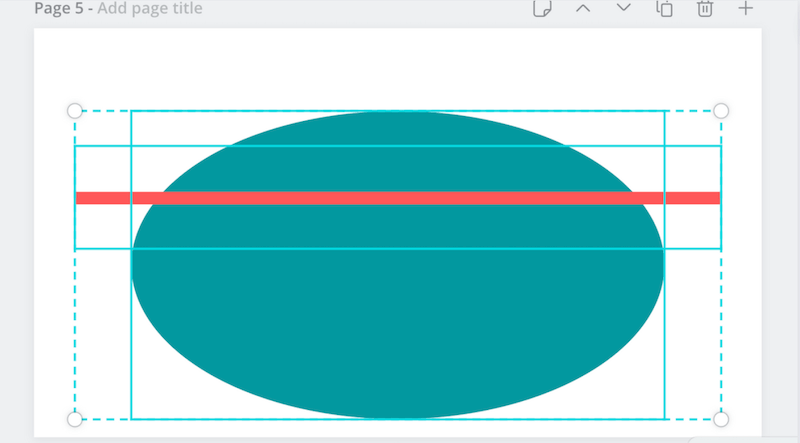
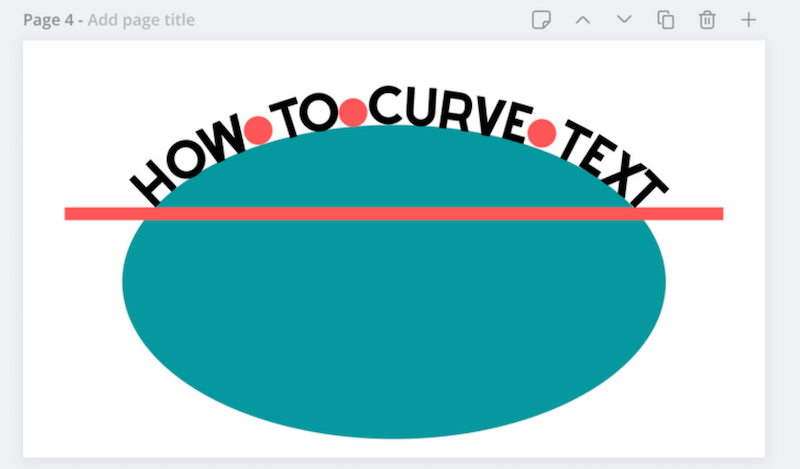
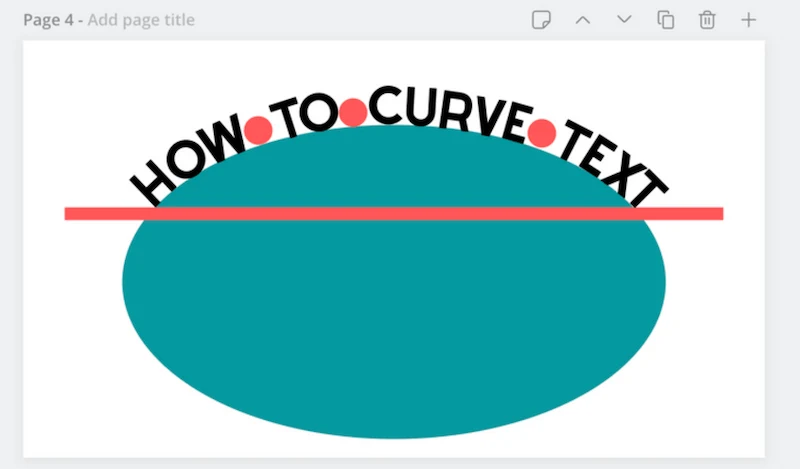
2. Select the circle from the elements tab and stretch it to the shape you’ll want your text to be curved at.
3. To make sure it’s even, put a line across your circle. This is where your line of text will start and end.
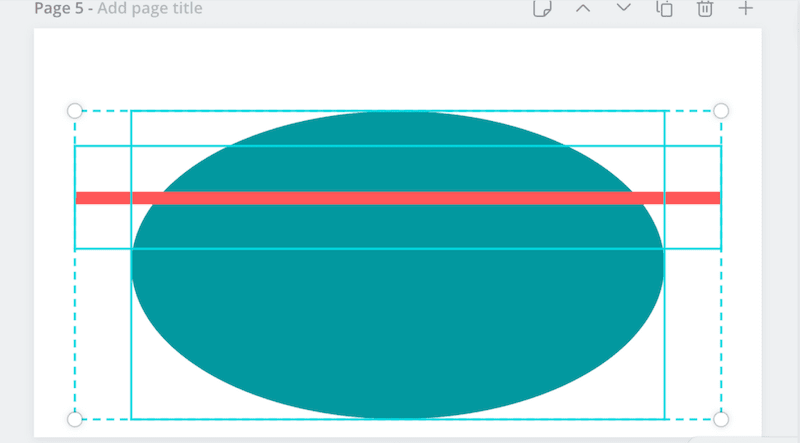
4. Lock the circle and line.
5. Make a text box for your first letter. You’ll need a separate text box for each letter.
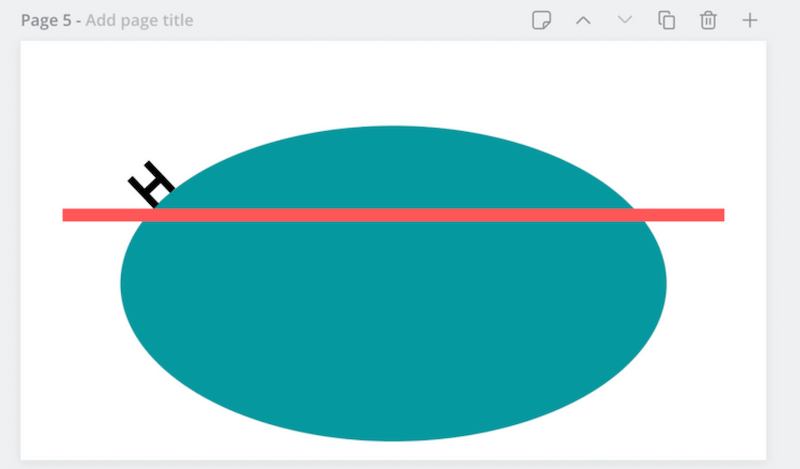

6. Rotate the text box so that it’s aligned with the circle.
7. Repeat for the rest of your letters. Put circles between your words to ensure equal spacing.
8. Delete the circle.
Select all of the letters and group them. Once they’re grouped, you can resize your Canva text together without messing up your curving.
Things to Keep in Mind Curving Text with Canva
As with all workarounds, there are some natural speed bumps that you’ll hit along the way. Well, I’ve hit a lot of them myself and hope that these tips can speed up the learning curve for you and make it a smoother process.
–> Start with a fresh document or make sure all other elements are locked. This hack for curving text leaves you with a TON of individual elements on your document since every single letter is on its own. You don’t want to worry about accidentally moving any other elements as you’re working. Make sure that everything else is locked. Or, curve your text on a fresh document, lock it, and then move it over to your original design. Believe me, this will make your life a lot easier and less frustrating.
–> You won’t be able to change the curve of your text after the fact, so make sure you got it right the first time. If you realize that you need to adjust the curve of your text, even a little bit, you’ll have to start over from the beginning. Unlike programs that have text curving capabilities and can shift everything with one click of a button, with Canva, you’ll have to manually readjust all of the letters again. This is no fun, so make sure you got it right the first time.
–> Duplicate each letter instead of creating new text elements. Whenever you bring over a new text element, you’ll have to adjust it with the proper fonts and sizing. Instead, just duplicate the letter you were just working with. This will transfer over the fonts and sizing, which will save you time. Also, the previous letter will be close to the same angle as the next one, so you won’t have to spend as much time adjusting it as if you started fresh.
–> Your keyboard arrows are your friends. When you move elements with your mouse in Canva, they often make big jumps unless you’re really zoomed in. To make sure that your letters are perfectly positioned, you’ll need to make really subtle movements, which you can only do with your keyboard arrows.
–> You’ll probably have to redo it. It’s really hard to get this right the first time. Even if you curve the text perfectly, you might find that the text is uneven around the circle and that the start and finish aren’t along your guideline. Remember how I said that this workaround is time consuming and frustrating? Yeah, it really is. You’re going to have to readjust it as you work, or redo it all together. Just accept it from the beginning so you don’t get too bummed out.
–> Don’t try to freehand it. Trust me, you’ll end up spending a LOT more time messing with your text if you try to freehand it than if you just follow all the steps to begin with. In fact, if you try to freehand it, you might find yourself going back to follow the steps anyway. It’s extremely hard to figure out the correct angles and spacing without guides. Save yourself the headache and set it up with all of the proper supports from the beginning.
–> It won’t be perfect. No matter how carefully you move around your letters, it probably won’t be perfect. It’s just way too hard to get everything aligned in such a way as to have it be perfect. That said, you can get it close enough that most people won’t be able to tell. Of course, the more time you spend adjusting your letters, the more “perfect” it will be. But, let go of the fact that it’ll be perfect. Perfection is overrated anyway. If you’re really concerned about having perfectly curved text, read the next hack.
Another Hack for Curving Text with Canva
This isn’t my favorite way to curve text, which is why it’s at the end of this post. It does work though and is a good option if you’re familiar with other design programs. Use a program that has text curving features like PicMonkey or something from Adobe and curve your text. Once you’re done, export it with a transparent background and drag and drop it into Canva.
This tactic can be tricky because your text is basically a static picture once you import it into Canva. If you need to make any changes. You have to go back to your other program to make the adjustments and then reimport it. Until you get comfortable with it, you might have to go back and forth quite a few times before you get it right.
The other downside of this option is that you have to learn another program. Granted, you only have to learn the program enough to know how to curve text, but still. You’re not going to want to pay the high price for an Adobe program just so that you can curve text. PicMonkey can do it, so if you’re leaning towards this option, that’s the one I would go with.
I LOVE Canva. It’s the program I can thank for propelling me into graphic design. Using Canva, I’ve made money selling cards, mugs, t-shirts, and more. It has really given me the freedom to turn my visions into actual designs that I can share with the world. Being able to curve text in Canva opens up a lot of possibilities for creativity!


Diana has been an artist for over 27 years and has training in drawing, painting, digital drawing and graphic design. Diana’s latest obsession is digitally drawing with Procreate and Procreate Dreams. Diana has experience selling her art across a number of platforms and loves helping other artists learn how to make money from their art as well.