We’ve all had that experience with Procreate of resizing an object, or an entire canvas, and noticing quality loss. It can be a big problem, especially after working so hard on our art.
When resizing objects in Procreate, limit quality loss by choosing the Bilinear or Bicubic Interpolation settings. When resizing a canvas in Procreate, limit quality loss by working with canvases that are the right size and DPI. If printing, do test prints or talk with your printer.
It can be really frustrating to experience Procreate quality loss when resizing your images or canvases. I completely understand. Let’s talk about the tips and tricks you can use so that you never have to experience that quality loss ever again.
First, let’s dive into quality loss when resizing individual objects within your Procreate piece.
Limiting Quality Loss When Resizing Objects in Procreate
When resizing objects in Procreate with the Transform tool, make sure that the Interpolation setting is not set to Nearest Neighbor. Instead, it should be set to Bilinear or Bicubic. This will limit the pixelation of your object when you resize it.
Important note: we’re talking about LIMITING quality loss, not preventing it altogether. When resizing an object or canvas, it’s likely that at least some quality loss will occur. So, it’s best to keep your resizing to a minimum, if possible.
Before we dive into what interpolation is, here’s how to find the Interpolation settings you need in Procreate.
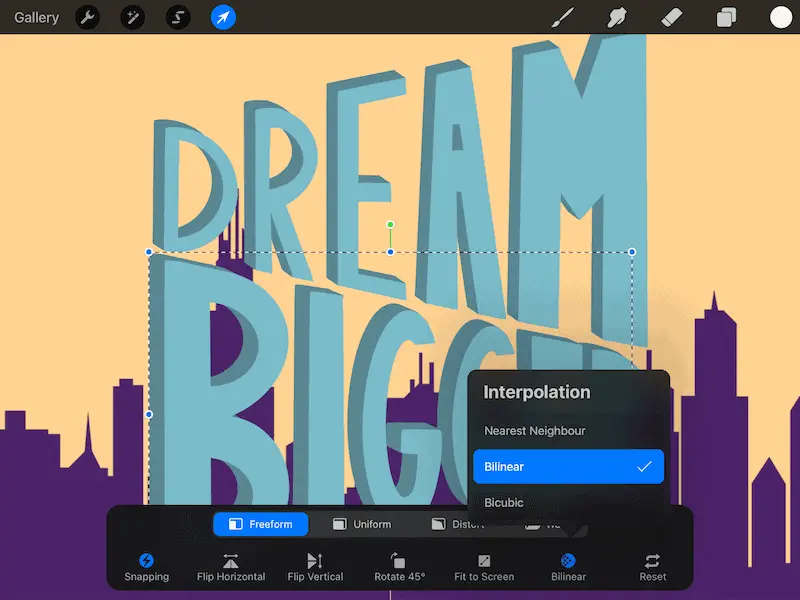
1. Click on the Transform tool in the top menu (the arrow icon).
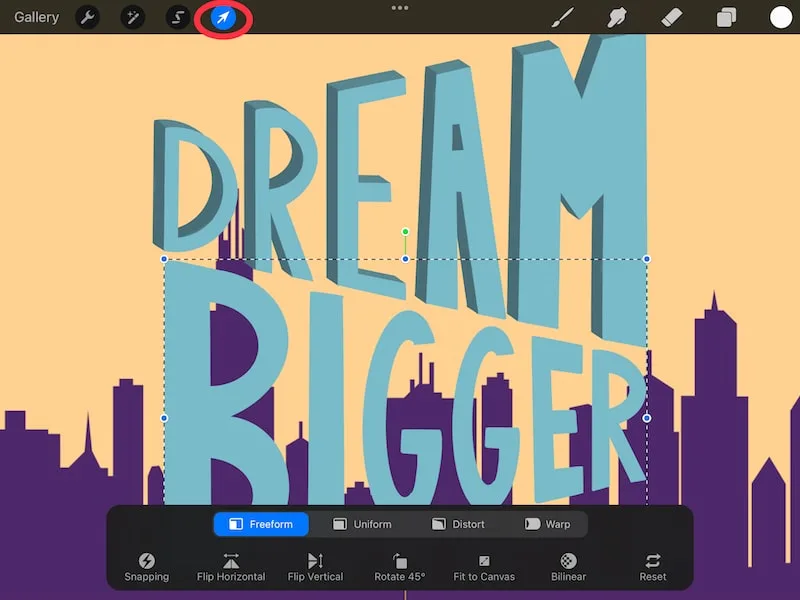
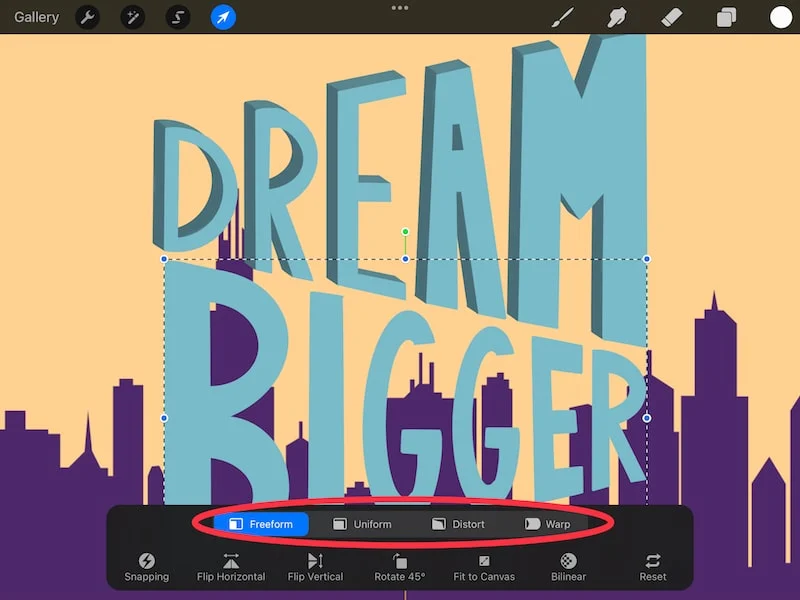
2. Decide whether you want to resize your object with Freeform, Uniform, Distort, or Warp.
3. Underneath those settings, click on the checkered circle located second to last on the right hand side.
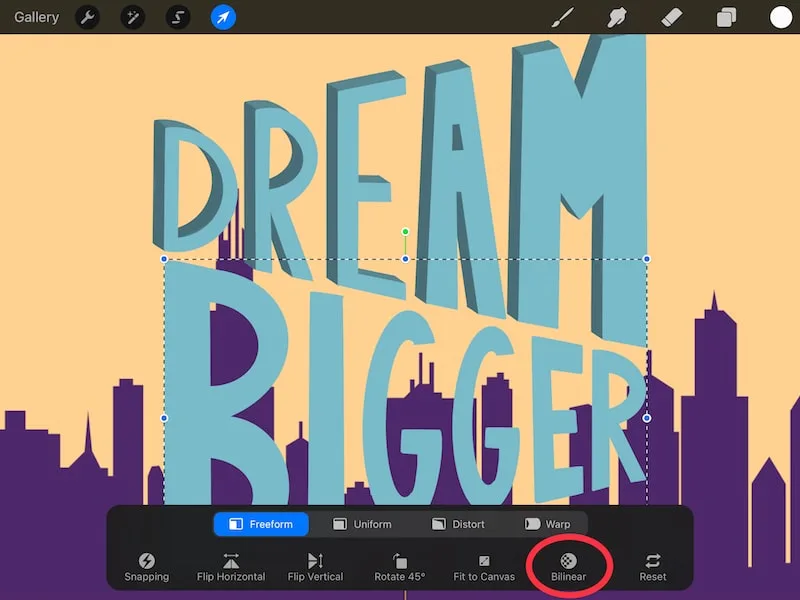
4. Choose either Bilinear or Bicubic.
This will help with the problem, but what actually happened? What do these settings do?
So, Procreate is a raster-based program. This means that your art is made out of pixels. This is why you can see pixelation in Procreate when you resize things or create really small canvases.
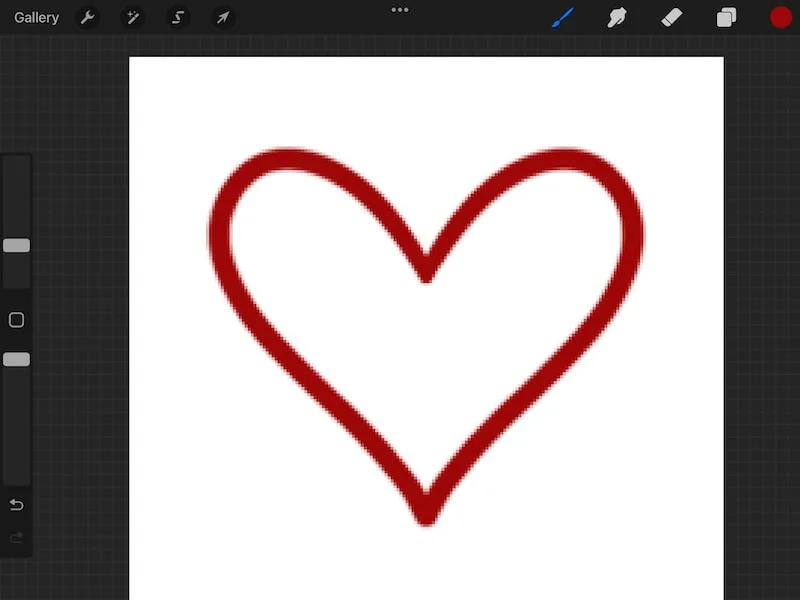
Whenever you resize something, those pixels have to scramble around to accommodate. That’s where interpolation comes in.
In the digital art world, interpolation is a method for adjusting pixels as an image is resized, (source).
Basically, as you resize your raster-based work, interpolation allows for the pixels to make the best approximation of what’s needed to accommodate the new size of your object.
Basically, it tries to re-scramble those pixels in the best way possible.
Not only do the pixels rearrange themselves, but some may also need to be added or removed. Then, there’s a process to determine where those new pixels should be placed, or where the extra pixels should be removed from. This is all an approximation based on the surrounding pixels that currently exist (source).
Of course, the way that your pixels rearrange themselves is going to impact how your resized object looks.
Important note: remember that interpolation happens every single time you resize an object. Every time you resize it, you will lose a little bit of quality, so it’s good to limit the amount of times you resize your objects, if possible. This quality loss is a natural part of interpolation, so be mindful of how many times you resize something.
That’s where the different interpolation settings come in. Let’s dive into each of them.
Important note: the way that these interpolation settings impact your work depends on your specific piece of art. There isn’t a one-size-fits all approach to this because everyone’s artwork is unique and different. That’s why you need to choose the options that work the best for you and your art specifically.
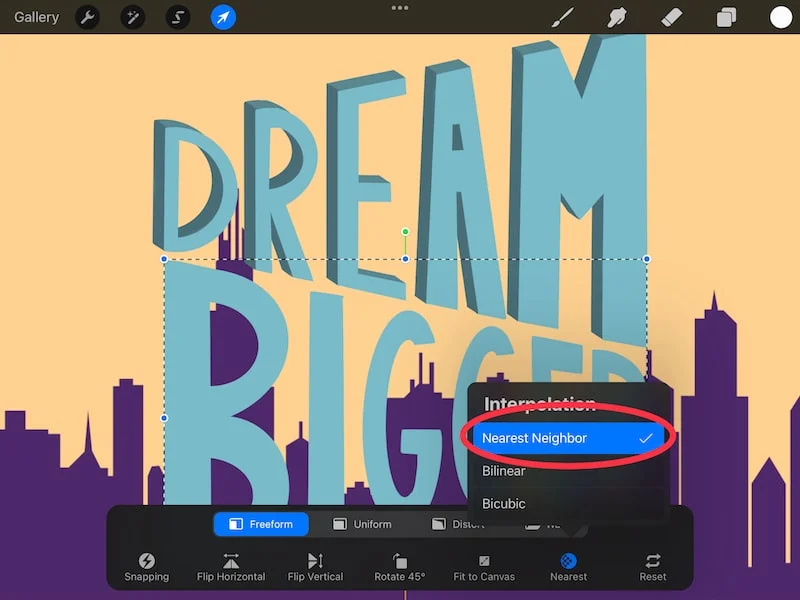
Nearest Neighbor
When you use Nearest Neighbor, it will determine your final result by only considering 1 pixel on each side of your edge. This is the simplest and fastest interpolation method, but it can leave you with a pixelated effect.
That’s why Nearest Neighbor is NOT ideal and you might experience pixelation or quality loss when resizing your objects with it on.
Bilinear
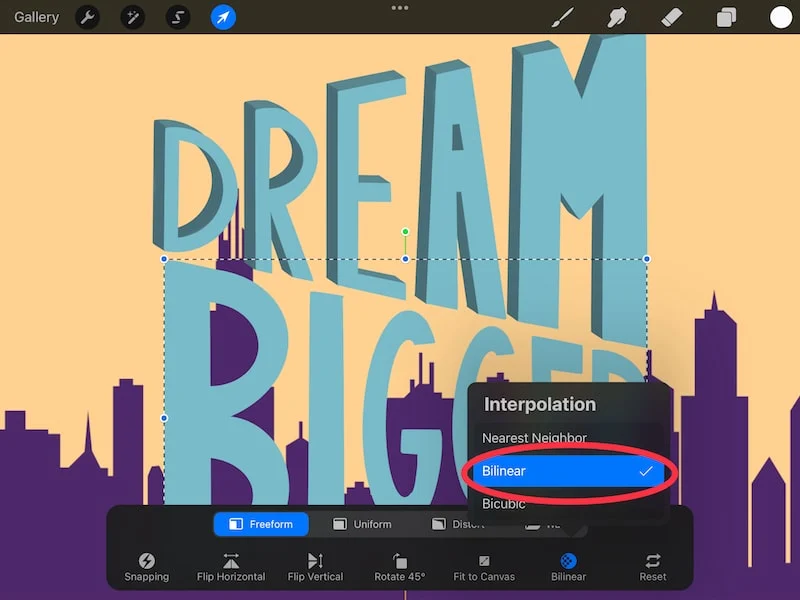
When you use Bilinear, it will look at a 2×2 area (4 total) of pixels around the edge, and take an average of them when determining what your final result will look like.
If you use the Bilinear setting when resizing your object, you’ll generally have smoother edges than you would with Nearest Neighbor.
Bicubic
When you use Bicubic, it will look at 16 pixels around your edge to determine what your final result will look like.
Given how many pixels this interpolation method uses, it will generally give you the cleanest result with the least amount of pixelation.
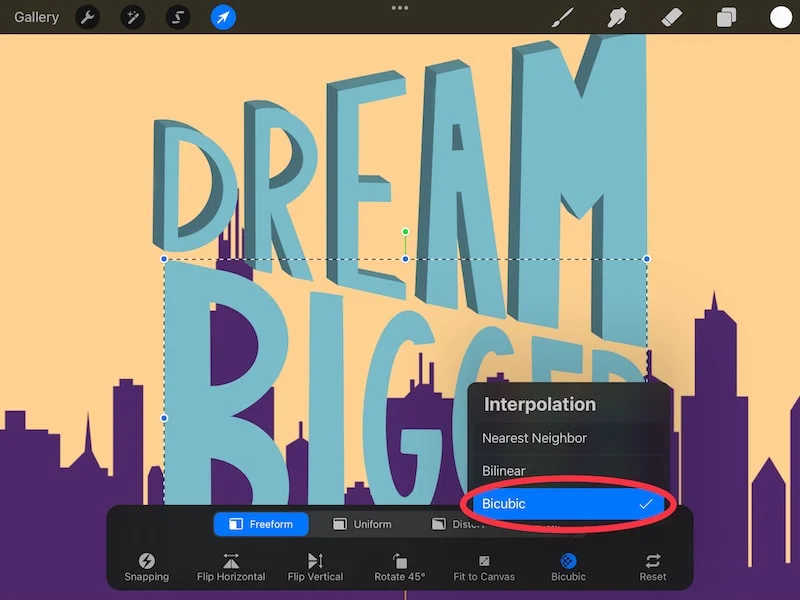
Nearest Neighbor takes the least amount of processing time, Bilinear is a bit more, and Bicubic is the most. Just keep that in mind as you work.
If you want the least amount of quality loss as you resize your objects in Procreate, the Bicubic setting is a good bet. Bilinear is a happy medium if you don’t want to use as much processing power as Bicubic does.
Again, remember that quality loss is a natural part of interpolation so, no matter what setting you use, try not to resize your objects too often.
Alright, now let’s talk about how to prevent quality loss when resizing your entire canvas with Procreate.
Preventing Quality Loss When Resizing Your Canvas in Procreate
To prevent quality loss when resizing your canvas in Procreate, it’s important to create canvases that are the right size and DPI. If printing your art, do test prints or talk with your printer about the size and DPI you need. Generally, print work should be at 300 DPI.
Procreate is a raster-based program, not a vector-based program like Illustrator.
With vectors, you can scale artwork up and down without it ever becoming pixelated. That’s not the case with raster-based art, as we’ve talked about when talking about interpolation.
Raster-based art is formed out of pixels, while vector-based art is formed out of paths.
As you scale vector art, it simply recalculates the paths that make up your object. As you scale pixel art larger and larger, those pixels become further and further apart, leaving you with a pixelated image.
Whomp whomp.
So, how can you get around that?
Ideally, every single one of our designs would be the right size every single time with no need to ever resize them.
Ideally, resize your art as little as possible.
That’s not real life though.
If you do need to resize your art, it’s always better to scale down instead of up. This means that, from the get-go, you want to design your canvases on the larger side while still giving you enough layers to work with.
That way, you can scale your art down to the size you need without worrying too much about losing quality.
It’s also a good idea to set your DPI to 300 if you plan to print it. When you use Procreate’s default canvases that appear in the dropdown when creating a new canvas, it might be considerably lower than that.
To create a canvas at 300 DPI, click on the square icon with the little plus inside of it.
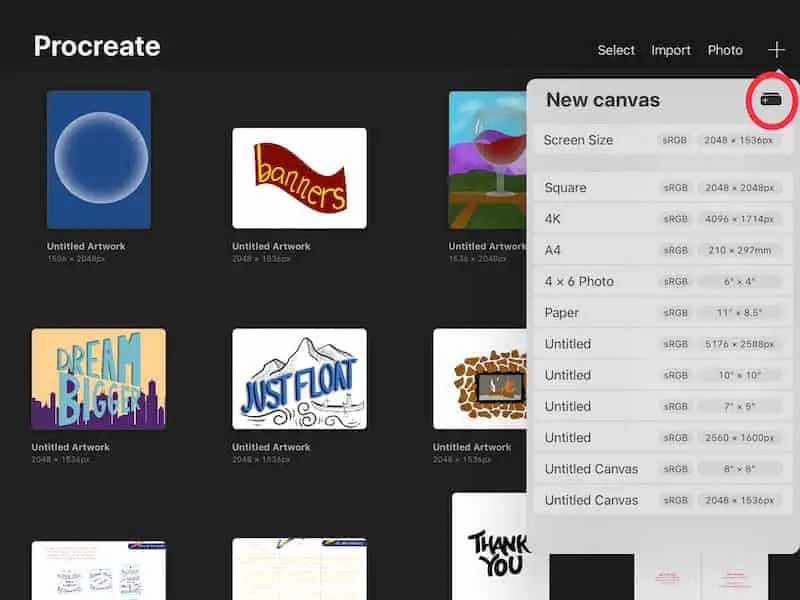
From there, enter your desired dimensions and DPI.
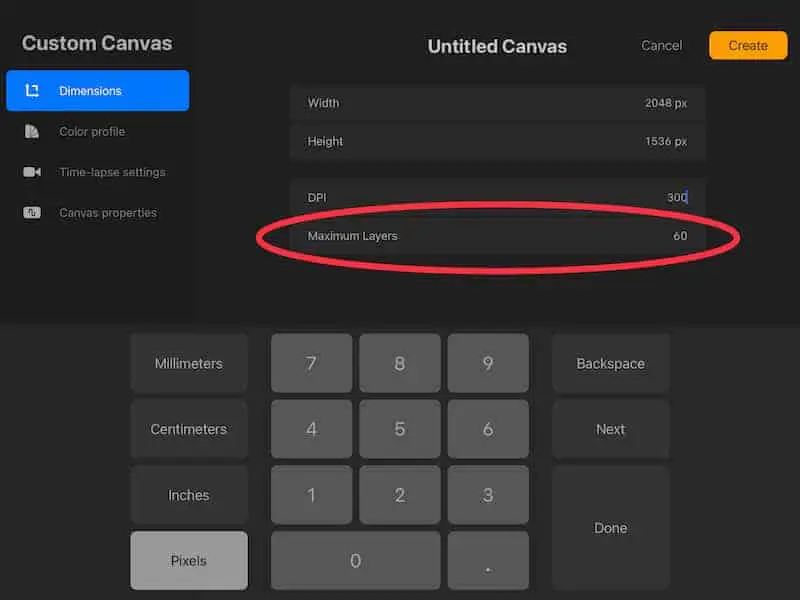
By establishing a larger canvas with a high DPI, you’ll be able to mitigate some of the quality loss that comes from resizing. Of course, pixelation or quality loss is still possible depending on the sizes you’re working with, but this will start you off on the best foot.
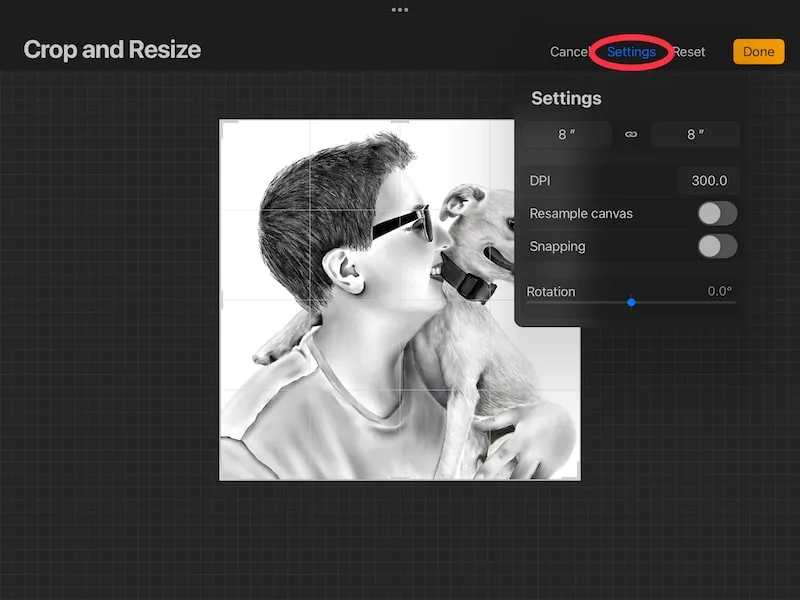
When it is time to resize your work, go to the Crop & Resize settings within the Actions menu.
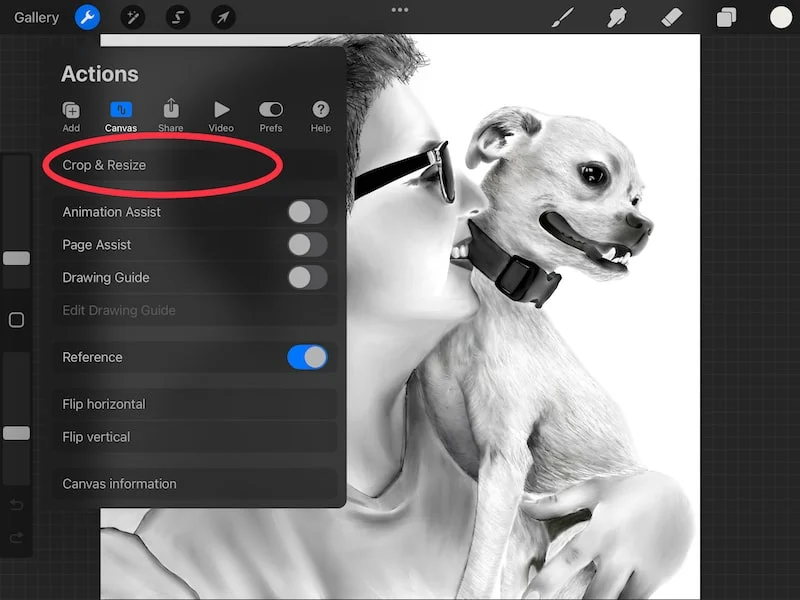
Make changes as needed, trying to minimize your changes as much as possible.
Aside from changing the dimensions of your art, note that changing your DPI will also resize your canvas.
Important note: the bigger you make your canvas dimensions and DPI, the fewer amount of layers you’ll be able to add. When creating a new canvas, or resizing a current one, make sure you don’t max out your Procreate layer limits.
It can be really frustrating to resize your Procreate work and find that it’s declined in quality. When you work so hard on something, you want that to show! With these tips, hopefully you’ll be equipped with the tools and tricks you need to have high quality art every single time, even when resizing.

Diana has been an artist for over 27 years and has training in drawing, painting, digital drawing and graphic design. Diana’s latest obsession is digitally drawing with Procreate and Procreate Dreams. Diana has experience selling her art across a number of platforms and loves helping other artists learn how to make money from their art as well.

