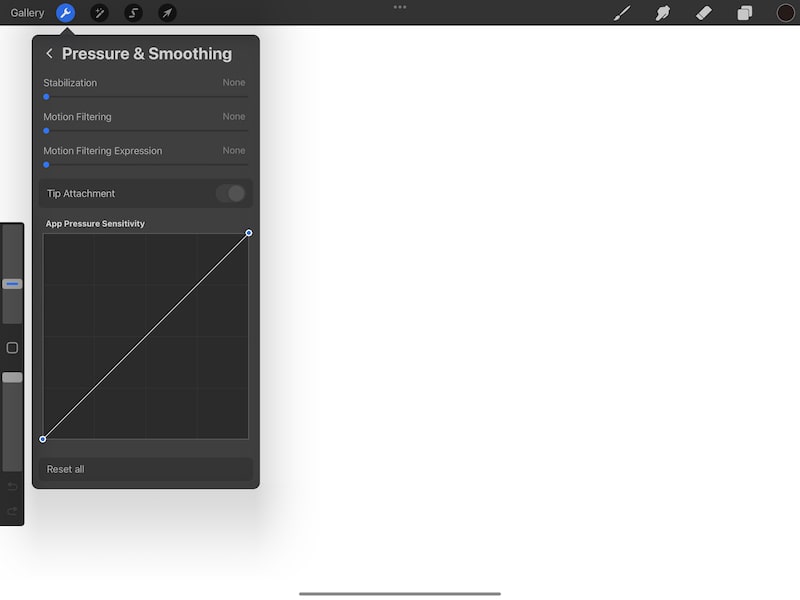
Procreate’s stabilization section of the brush settings include options to adjust the streamline, stabilization, and motion filtering of your Procreate brush. All three of these categories can have a big impact on how your brush works, so they’re important to understand.
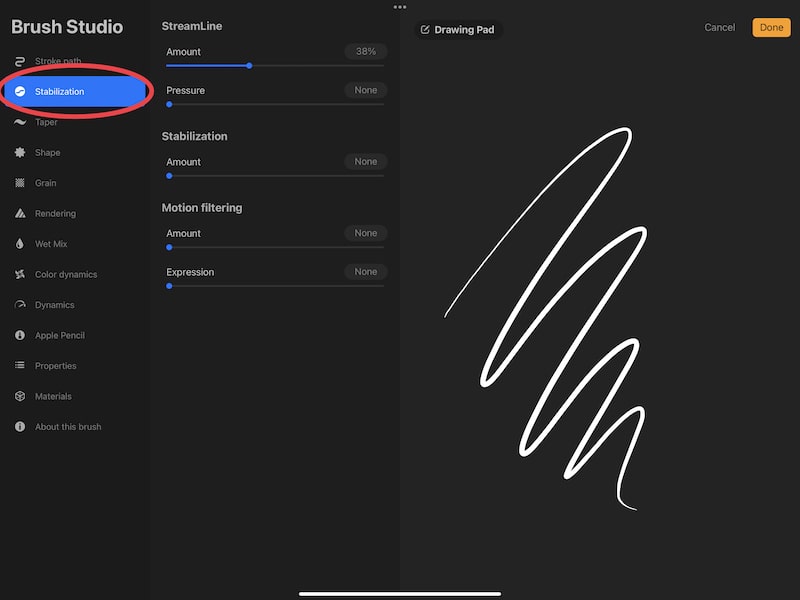
Within Procreate’s stabilization brush settings tab, you can find sliders for streamline, stabilization, and motion filtering. Streamline will work to smooth out the bumps in your lines, while stabilization will work to flatten out your lines. Motion filtering is an advanced method of stabilization.
You may have read that description and been confused. That’s ok! It’s confusing! This is one of those things that you need to experiment with and get a feel for. As you work through this post and look at my examples, grab your iPad and play around with these settings for yourself.
That way, you’ll start to get a sense of how each setting impacts your brush strokes as you’re drawing them.
Before we get started with the details on how stabilization works, let’s talk about how to access the settings.
How to Access the Stabilization Brush Settings in Procreate
The way to access the stabilization brush settings in Procreate will depend on whether you want to apply the effects universally to your entire canvas, or just to individual brushes.
If you want to apply your stabilization settings universally across your entire canvas to every brush you use, navigate to the Actions tab (the wrench icon). Tap on the Prefs tab and the Pressure and Smoothing button.
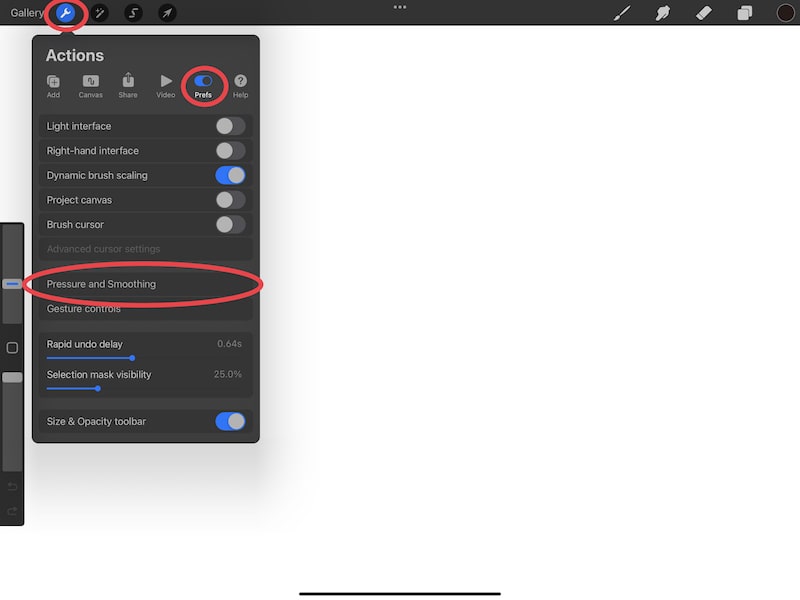

Here you will see sliders for stabilization and motion filtering, and other settings.
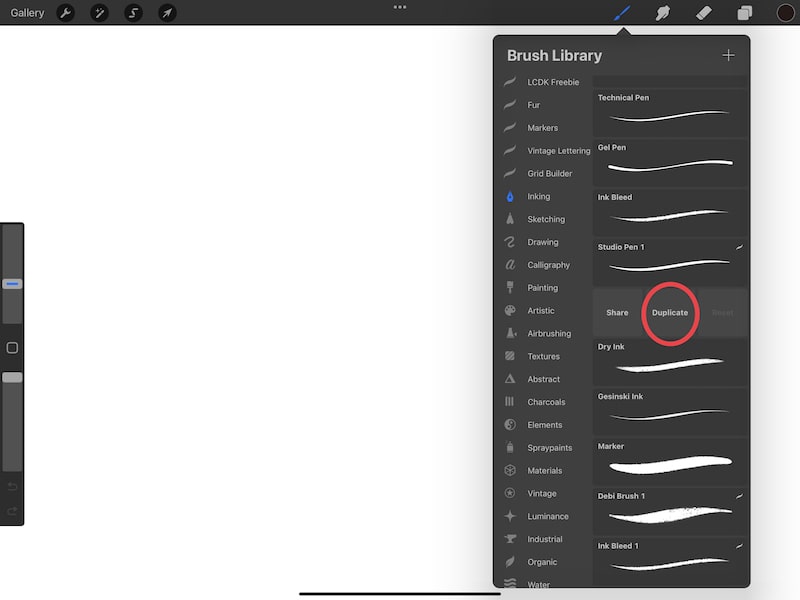
If you want to apply stabilization effects for an individual brush, go into your brush library and find the brush you want to work with.
Important note: before you start messing around with your brush settings, make a copy of your brush! That way, you can play around with the copy of your brush, without impacting the original.
To make a copy of a brush, swipe left on it and tap the Duplicate button.
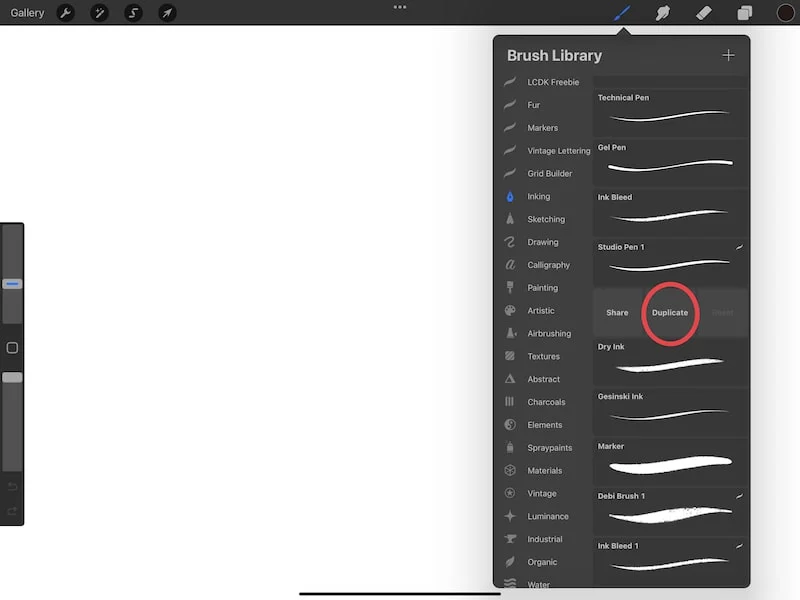
Once you’ve duplicated the brush you want to work with, tap on it again to open its settings. Then, tap on the Stabilization tab on the left hand side.
Alright, now that we’re in the Stabilization section, let the fun begin!

Using Procreate’s Streamline Brush Settings
When you increase the streamline slider for your brush, it will work to smooth out any bumps, jolts, and shakiness in your lines. Think of a jagged line versus a flowy one. Increasing the pressure slider will make it so that the impact of the pressure you apply to your stylus will take longer to impact your stroke, making it smoother and more gradual.
If you do any lettering or calligraphy, streamline is a great setting to know about. In fact, many brushes that feel silky smooth and are so fun to write with often have some streamline applied from the get go.
Here’s why.
For this example, I’m going to use a copy of the Studio Pen. This is a brush that, by default, has streamline applied. That’s partly why it’s such a smooth and flowy brush.
To begin with, I turned the streamline slider all of the way down. Here’s what it looked like:


Next, without changing my letting or brush strokes at all, I turned the streamline slider all of the way up. Look at the difference:

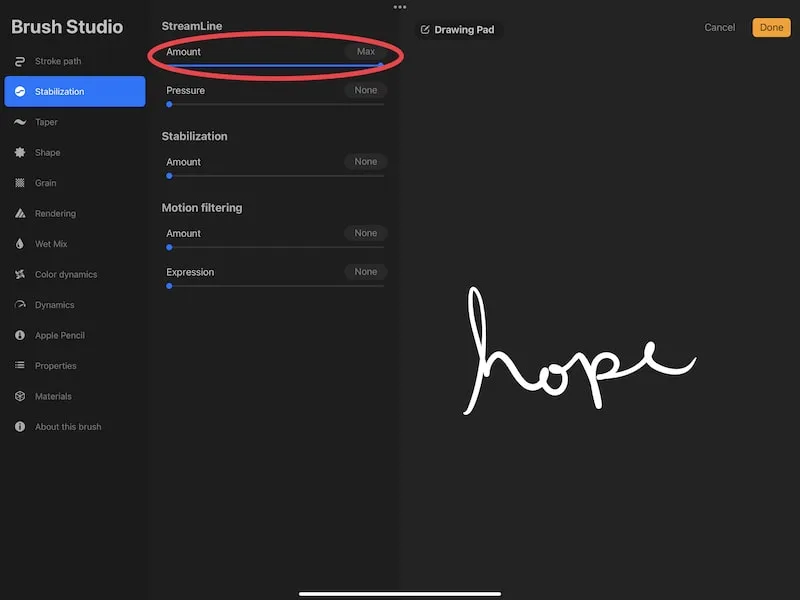
You can adjust your slider anywhere in between the minimum and maximum to get your desired effect.
There’s also a pressure slider within the streamline settings. This slider will impact how the pressure from your stylus will impact your line.
If the slider is set to no pressure, the pressure you apply to your stylus would be applied quickly, as normal. If you turn up the pressure slider, it will be applied more slowly as you draw. This can give you more control over how the pressure is applied to your line.
While your own experimentation is important for all of these settings, it can be especially helpful for this one, as pressure is something you really have to get a feel for as you work with your stylus and brush strokes.
Using Procreate’s Stabilization Brush Settings
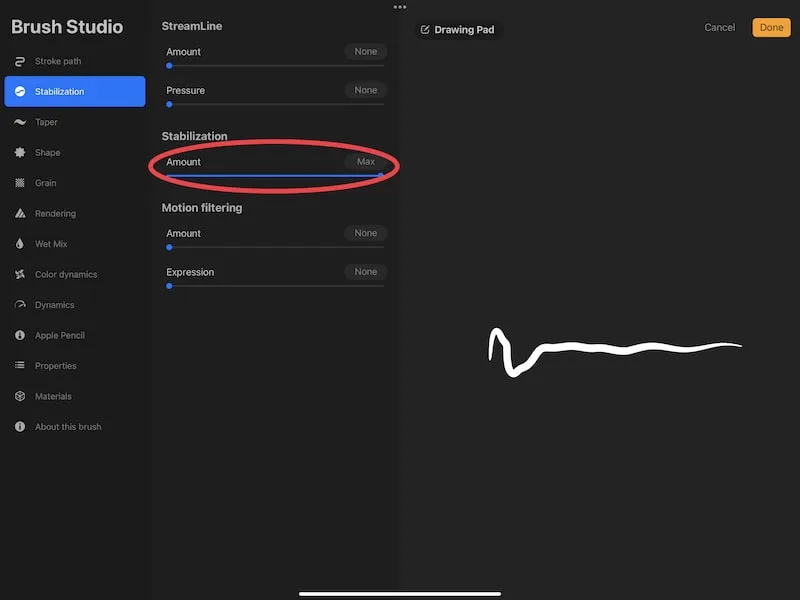
When you increase the stabilization slider for your brush, it will work to flatten out your line. The reason for this is because the tool is taking an average of the brush stroke so that it can average out the wobbles, bumps, and shakes. In practicality, this has the effect of smoothing and flattening your stroke.
I know this sounds strange on the surface, so let’s look at an example of stabilization in action.
Here’s an example of the copy of the Studio Pen I made with all of the sliders turned down, including stabilization:


Next, without changing my letting or brush strokes at all, I turned the stabilization slider all of the way up. Look at the difference:
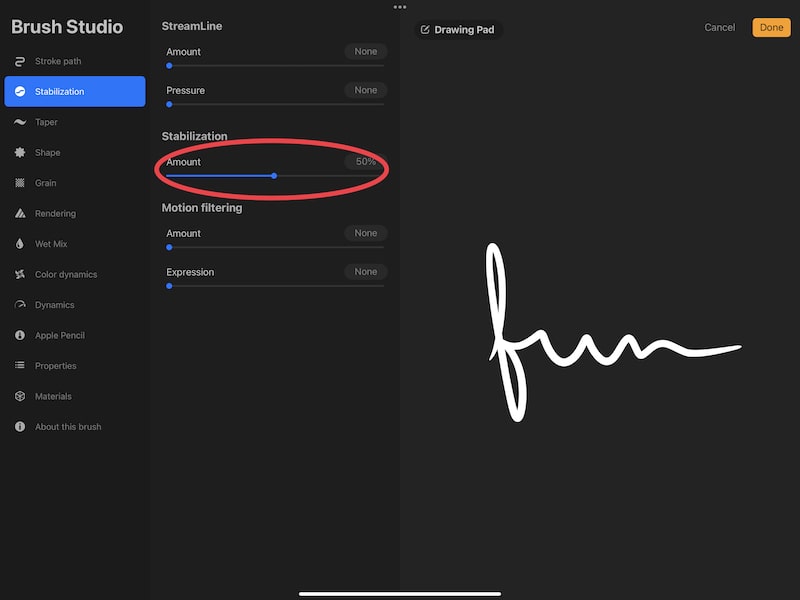
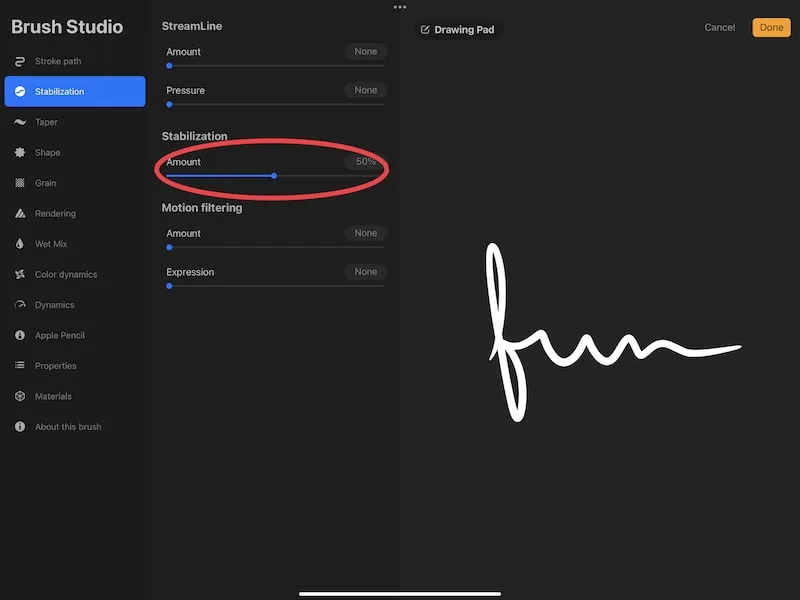
As you can see, it essentially flattened my brush stroke.
Here’s an example of the slider in the middle range so that you can get a better look at the practical implications of this effect. If you don’t overdo it, it can create a really pretty stretched and flowy effect to your lines.
Our last setting is another version of stabilization, so let’s go ahead and jump into it.
Using Procreate’s Motion Filtering Brush Settings
Procreate’s motion filtering effect is the same as stabilization, but it is more advanced. It is used in conjunction with the expression slider for more accurate control. Instead of taking an average of the wobbles, bumps, and shakes in the brush stroke, it deletes them entirely. In practicality, this has the effect of smoothing and flattening your stroke, sometimes to the extreme of creating a line.
Motion filtering is a more advanced version of stabilization.
This doesn’t necessarily mean that it’s “better” to use the motion filtering slider instead of the stabilization slider. As you’ll see, they have different effects on brush strokes. So, you’ll want to get a feel for how each one works so that you can choose one or the other based on your needs.
Remember that the stabilization tool takes an average of the wobbles, bumps, and shakes of the brush stroke. With motion filtering, the extreme wobbles, bumps, and shakes are deleted entirely.
This means that things are generally flattened out much more with the motion filtering slider than the stabilization slider.
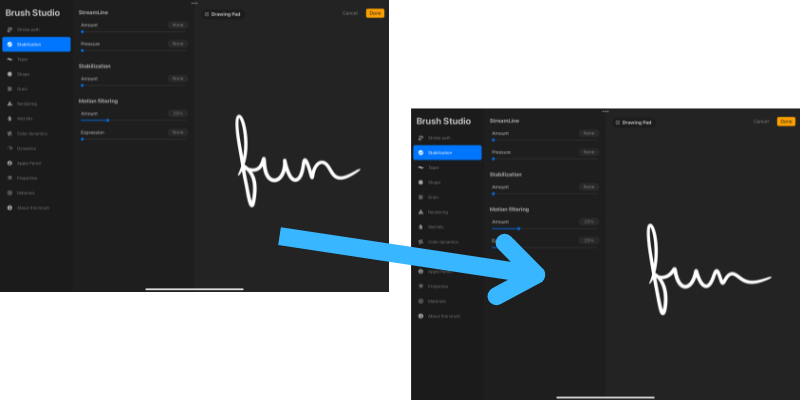
To see this, let’s use the same lettering example that we used for the stabilization section. In this case, I’ll turn all of the sliders down, except for the motion filtering amount slider that I’ll turn all of the way up.

As you can see, it turned my lettering into a line.
Clearly, this is a feature you probably won’t use at its max capacity very often. In moderation though, it’s pretty neat, especially when it’s paired with the expression slider.
As you just saw, the motion filtering amount slider does a great job of pulling all of the movement out of my lines. Well, the expression slider can make up for that and bring the movement back to my lines.
Important note: the expression slider will only work if the amount slider is already activated.
I suggest adjusting them together at the same time so that you can adjust both of them to your needs.
To give you an idea of the impact of the expression slider, here’s my amount slider at 25%, with no expression, compared to adjusting my expression slider to 25% as well.

Take time to experiment with both of these sliders together so that you can get a sense of how they work together to impact your lines.
While Procreate’s stabilization brush settings can be confusing at the outset, they can be really fun and powerful once you play around with them and get used to everything they can do.
It’s also important to remember that brush settings don’t function in a vacuum. All of the other settings that make a brush look and feel the way that it does also impact how the stabilization settings will look and feel.
For example, I would have had a different experience playing around with the stabilization settings for one of the drawing pencils instead of the studio pen.
To really get familiar with everything that the stabilization settings can do, make copies of different types of brushes – pens, pencils, paintbrushes, etc. See how adjustments to the stabilization sliders have different impacts depending on the type of brush you’re using.
And, ultimately, don’t forget to have fun!
Check out more posts about Procreate brushes if you want to keep reading:
Ultimate Guide to Procreate Brush Taper Settings
How to Reset Procreate Brushes
How to Export Procreate Brushes the Easy Way
How to Stop Procreate Brush Opacity Buildup
How to Make a Stamp Brush in Procreate the Easy Way


Diana has been an artist for over 27 years and has training in drawing, painting, digital drawing and graphic design. Diana’s latest obsession is digitally drawing with Procreate and Procreate Dreams. Diana has experience selling her art across a number of platforms and loves helping other artists learn how to make money from their art as well.