When you create an animation in Procreate Dreams, there are a number of settings you can adjust.
In today’s tutorial, we’re going to dive into all of the Dreams project settings so that you can customize your project and your workflow to your needs.
How to Access the Project Settings
To find the project settings in Procreate Dreams, tap on the name of your project in the left hand corner of your Procreate Dreams workspace.

You will see a menu of settings pop up.
Let’s walk through them!
Procreate Dreams Properties Submenu
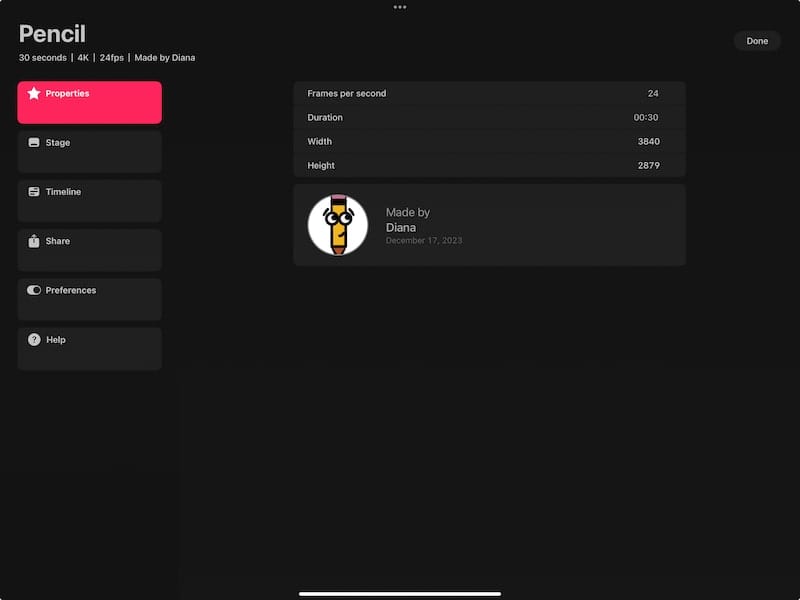
Within the properties menu, you’ll find options to customize the size, duration, frames, and signature of your project.

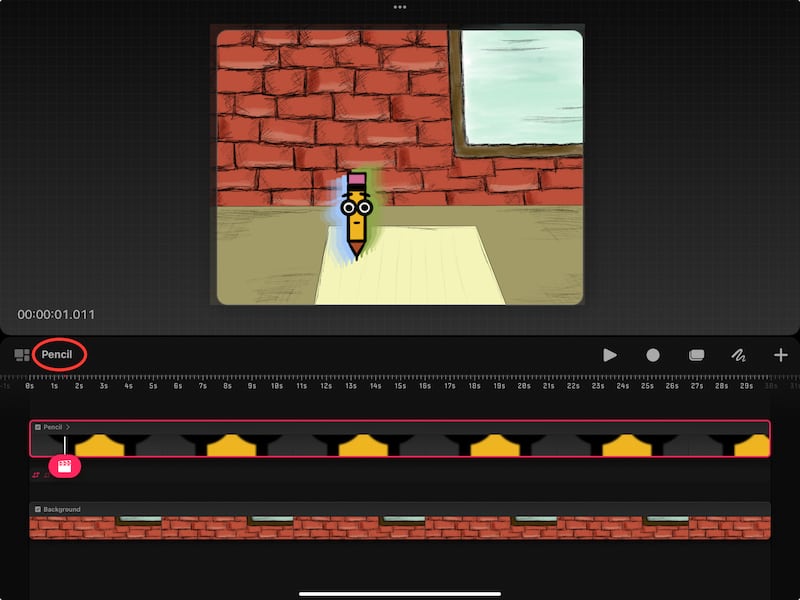
–Frames per second: this determines the number of images that will appear within each second of your animation. As you can see below, my frames per second is 24, which means that I’ll have 24 images (frames) in each second of my animation.
24 frames per second is the default and the standard.
While it’ll depend on your animation, higher frame rates generally result in smoother animations. This will vary widely depending on how you design your animation, but that’s the general concept.
That said, take time to research this before deviating from the 24fps default.
Things can get interesting when you raise or lower your frame rate, so it’s good to know what you should expect at your chosen frame rate before you get started.
–Duration: this determines how long your overall animation is.
–Width and Height: these two settings will determine the size of your animation.
–Made by: at the end of your list of properties settings, you’ll see a box that you can use to give your animation your stamp of creation.
Tap on the face figure to add an image of your choice. I’ve chosen my pencil character!
Then, tap on the “Made by” area to enter your desired attribution.
The date below this will show the current date.
Procreate Dreams Stage Submenu
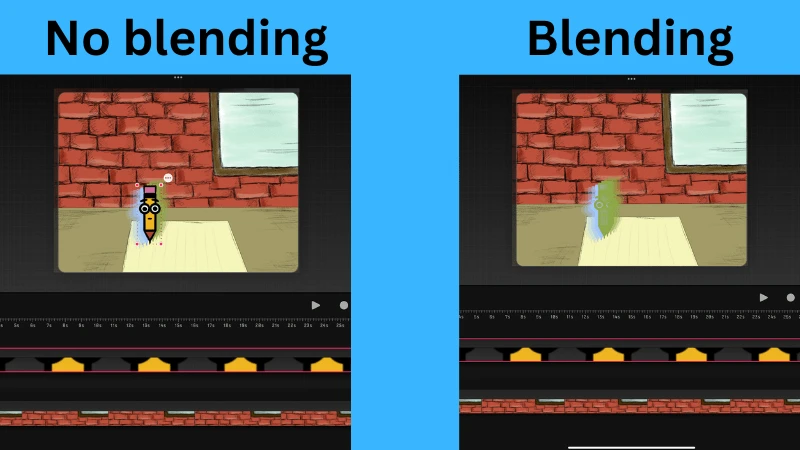
Within the stage submenu of your properties menu, you’ll see a toggle to blend your onion skins with your primary frame.
This can be useful if you need to see your onion skins more clearly than your image. Take a look at the example below. The image on the left has the toggle off, while the one on the right has the toggle on.

Procreate Dreams Timeline Submenu
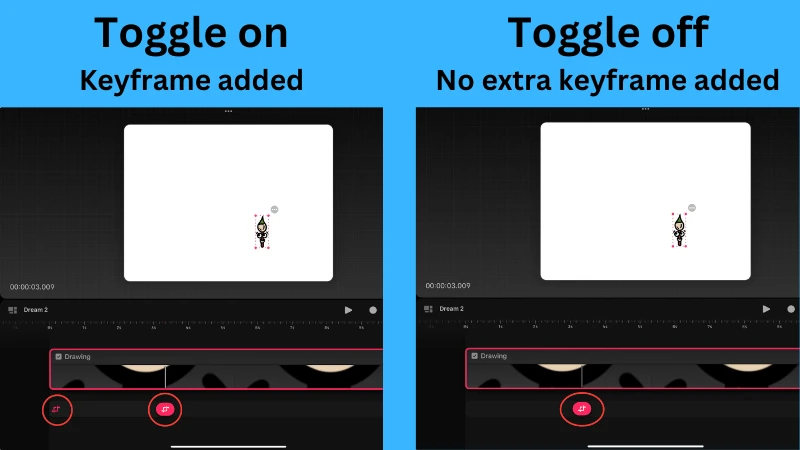
Within the timeline submenu, you’ll be able to customize how your first keyframe is added, as well as your playback modes.
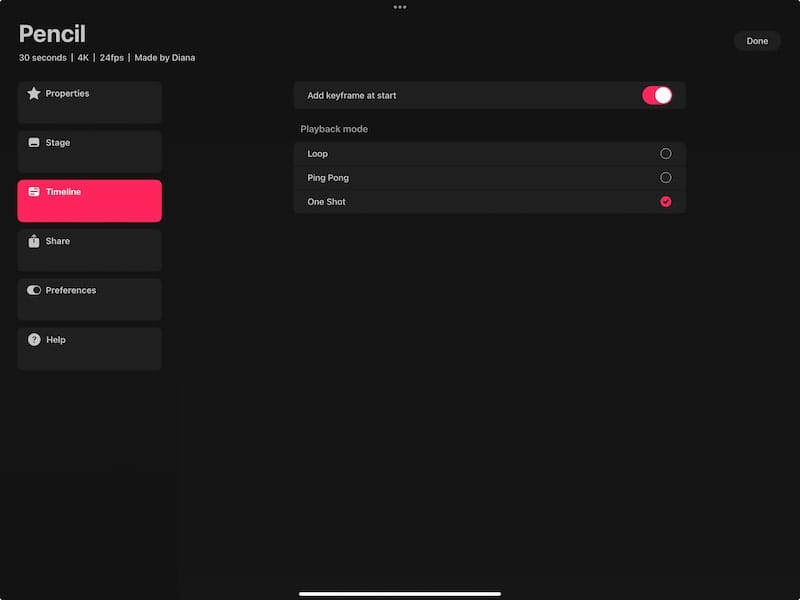

–Add keyframe at start: keyframes are where the action of animation happens. Movements, splits, effects – they happen in between keyframes.
When you first begin a project, you won’t have any keyframes because you haven’t started animating yet.
Once you want to lay down your first keyframe, that’s where this setting will come into play.
If you have this toggled on, a keyframe will automatically be added to the beginning of your project, in addition to the keyframe that you create. This will leave you with two keyframes – the one at the beginning and the one you create.
If this is toggled off, the only keyframe that will be added is the one you create.
Take a look at the example below.

–Loop: if you choose to loop your animation, it will play over and over again until you decide to stop it. Each time it plays, it will start at the beginning.
–Ping Pong: if you choose to ping pong your animation, it will play from start to finish. Then, it will play again, but this time it will play from finish to start. It will continue to flip flop from start to finish and finish to start until you stop it.
–One Shot: if you choose to play your animation in one shot, it will play from start to finish one time. Then it will stop.
Procreate Dreams Share Submenu
Within the share submenu of your properties menu, you’ll find a number of options for exporting your project.
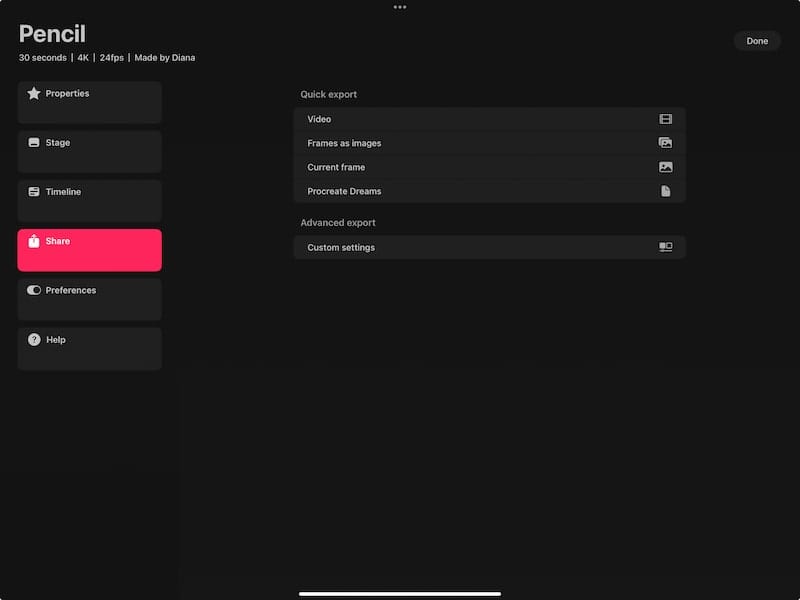

–Video: this option will export your project as a video. This will be a .mp4 file.
–Frames as images: this option will export each of your frames as a separate image. These will be .png files. Be mindful of how many frames you have before doing this!
–Current frame: this option will export the frame you currently have selected as an image. This will be a .png file.
–Procreate Dreams: this option will export your project as a native .dreams file. This is a great option for transferring projects to different iPads, as well as backing up your work. I’m a huge fan of backing up my work so I don’t lose it if something ever happens to my iPad.
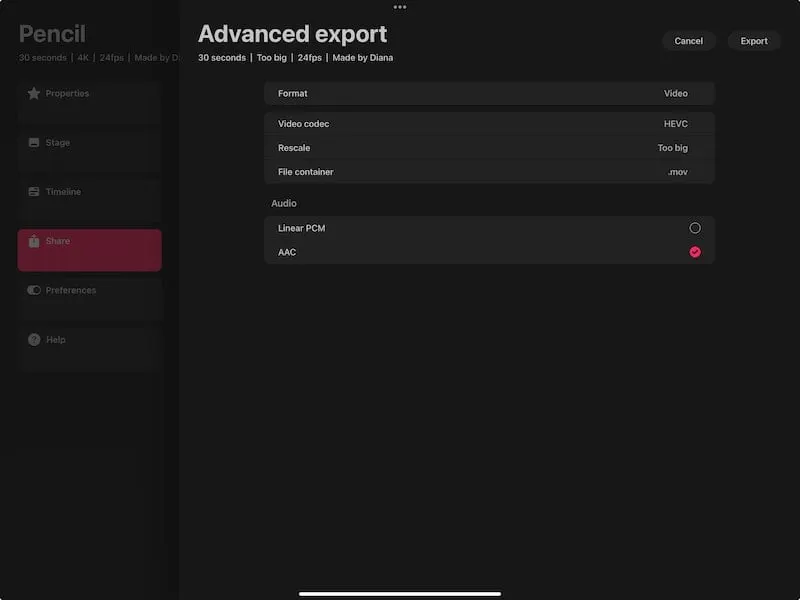
–Advanced export: if you tap on this button, you’ll see a menu of options for customizing your file prior to exporting it. These options will allow you to deviate from the video export option that I mentioned above depending on what you need for your project.

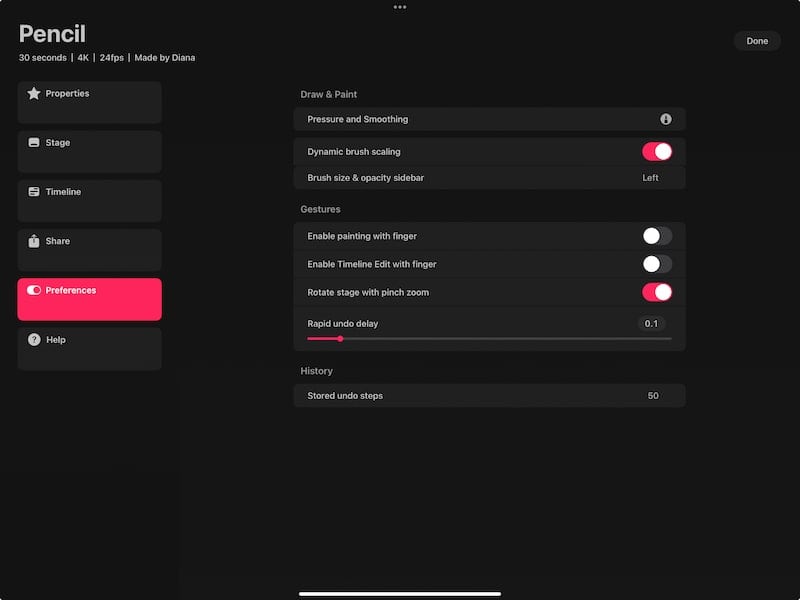
Procreate Dreams Preferences Submenu
Within the preferences submenu, you’ll find a number of options for how your brush behaves when you’re drawing. You’ll also find some customization options for your gestures and undo history.

–Pressure and Smoothing: if you tap on this button, you’ll see settings that will impact how your Apple Pencil works as you’re drawing. If you’re familiar with Procreate, these might look familiar.
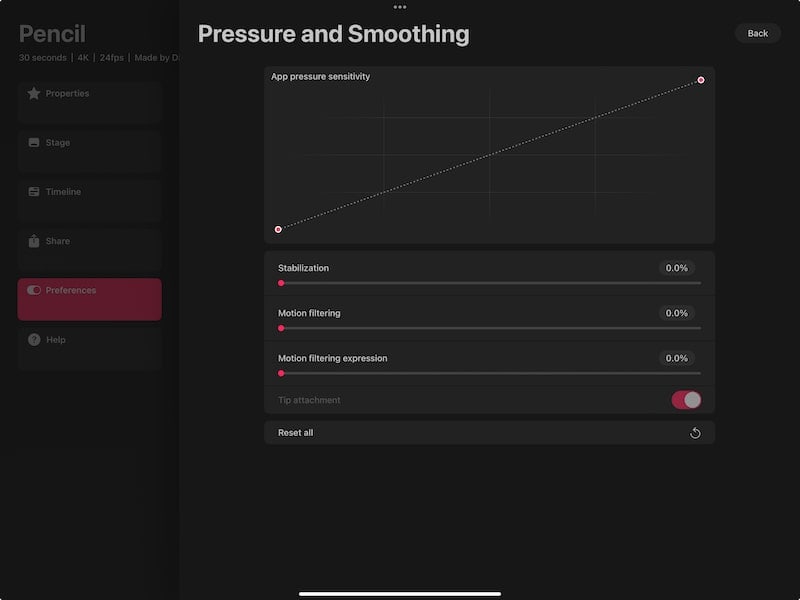

–App pressure sensitivity: this will let you customize the amount of pressure you need to use with your Apple Pencil while drawing.
You can add up to 6 points to your curve.
The horizontal axis represents the pressure you will need to exert on your Apple Pencil.
Creating a curve that veers to the right means that you’ll need to push harder on your Apple Pencil as your draw. Creating a curve that veers to the left means that you won’t need to push as hard on your Apple Pencil as you draw.
The vertical axis represents the value of the line you draw.
Creating a curve that veers towards the top means that your lines will have more opacity and be thicker. Creating a curve that veers towards the bottom means that your lines will have less opacity and be thinner.
I personally use the default pressure settings. I’ve gotten used to them and feel like they work for me! But, if you feel like they don’t work for you, feel free to experiment to find a curve that works for you.
–Stabilization: the higher you slide the stabilization slider up, the more “stable” your lines will become as you draw them.
–Motion filtering: the higher you slide the motion filtering slider up, the more of your hand movements will be “filtered” out of your lines. This means that if your hand shakes or moves as you draw, this setting will minimize that movement in the lines you draw.
–Motion filtering expression: this will only work when motion filtering is activated. With motion filtering activated, motion filtering expression will add some “expression” back to your lines. The reason this is important is because motion filtering on it’s own can create lines that are too rigid.
–Tip attachment: this will be inaccessible unless you have motion filtering activated. This setting will determine how and where your stroke starts.
–Dynamic brush scaling: when you have this toggled on, your brush will stay the same pixel size as you zoom in and out of your canvas.
I personally always have this toggled on because I zoom in and out of my canvas a lot. For me, it would lead to a lot of inconsistencies if my brush size changed every time I did that.
–Brush size & opacity slider: this will allow you to place your brush size and opacity slider on either the left or right side of your screen.
I keep mine on the left because I am right handed and feel that it’s out of the way when it’s on the left. Choose what’s correct for you!
–Enable painting with finger: keep this option enabled if you want the ability to draw on your canvas with your finger.
Personally, I turn this off. I have way too many gestures that require me to touch my canvas with my finger so, when I have this enabled, I feel like I make a lot of accidental marks on my canvas.
–Enable timeline edit with finger: enable this option if you want the ability to edit your timeline with your finger.
I have a guide on using the timeline in Procreate Dreams if you want to learn more!
–Rotate stage with pinch zoom: keep this option enabled if you want to be able to rotate your stage while zooming.
I love this feature! It’s a primary reason why I have finger painting turned off because I’m constantly touching my canvas to rotate it and don’t want to leave accidental marks on it while I do so.
I find this feature to be really helpful when making my drawings, but it really depends on your style and preference!

–Rapid undo history: tapping two fingers on your screen will enable the undo feature. One tap will undo one action. But, if you hold down two fingers on your screen, you will continually undo actions until you lift your fingers from your screen.
This slider determines how quickly this progression of undos occurs. Essentially, hold down your two fingers on your screen, the amount of time you’ve selected will pass, and then a cascade of undos will begin.
–Stored undo steps: Procreate Dreams will store a certain amount of your actions so that you can undo them later. These are stored regardless if you close the app and come back to your work later.
It’s important to weigh your options here. Increasing your undo history will increase your file size and reduce the storage on your iPad. That said, decreasing your undo history too drastically can leave you without enough options if you need to undo things.
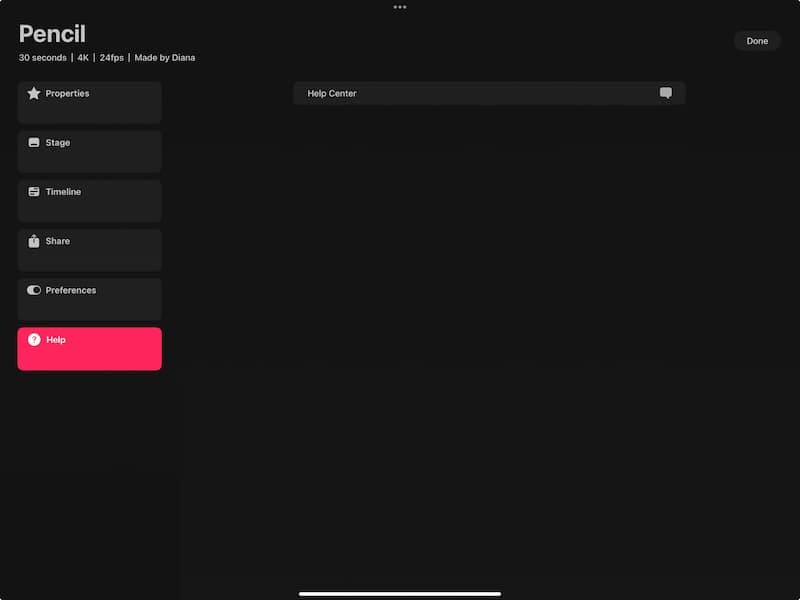
Procreate Dreams Help Submenu
The help submenu has a link that will take you to the Procreate Dreams help center.

There we go! The Procreate Dreams settings have a lot going on with them. Be patient with yourself as you learn them! Have fun and focus on how these settings can improve your animations!


Diana has been an artist for over 27 years and has training in drawing, painting, digital drawing and graphic design. Diana’s latest obsession is digitally drawing with Procreate and Procreate Dreams. Diana has experience selling her art across a number of platforms and loves helping other artists learn how to make money from their art as well.