Keyframes are what turn your drawing into an animation! Much of this has to do with moving, scaling, and splitting your work so that your characters behave the way you want them too.
There are also some neat effects that can be done with keyframes that are so fun to explore.
As a longtime Procreate user, I found myself staying in my comfort zone when I first started using Dreams. I would continually work on my drawing as a way to stall my leap into keyframes.
Well, once I took the plunge into keyframes, I was ecstatic! There was a learning curve, yes. But, it was a fun one. To say that this technology is cool is an understatement.
If you have felt nervous about leaping into the world of Procreate Dreams keyframes, you’ve come to the right tutorial. I totally get it! And this tutorial is here to help.
Since keyframes play such a fundamental role in creating our animations, I’m going to split this tutorial into two parts – move keyframes, filter keyframes, and the edit feature.
You can check out my tutorial about filter keyframes here!
I also have a tutorial on splitting your content with the edit feature!
Today, we’re going to talk about move keyframes that can put your characters into motion.
Let’s get started!
How to Activate Keyframes
There are two primary ways to add keyframes to your animation – using perform mode, or manually adding them to your Procreate Dreams timeline with the playhead.
When you add keyframes, you’ll see them appear in a separate keyframe track. This will appear below your content track in your Procreate Dreams timeline.

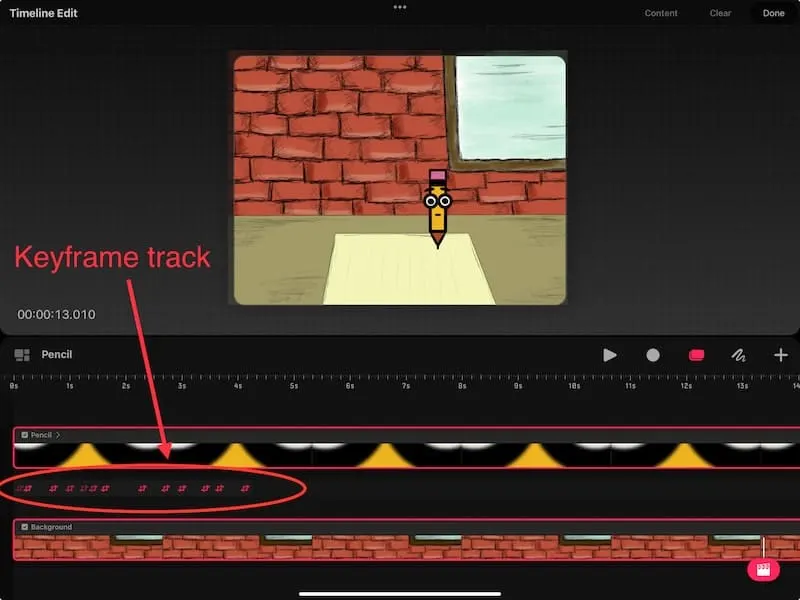
Each of these symbols represents a keyframe.
Using Perform Mode to Add Keyframes
Activate Perform mode by tapping on the circle icon. While it’s active, this icon will turn into a square. Tap on it again to deactivate it.

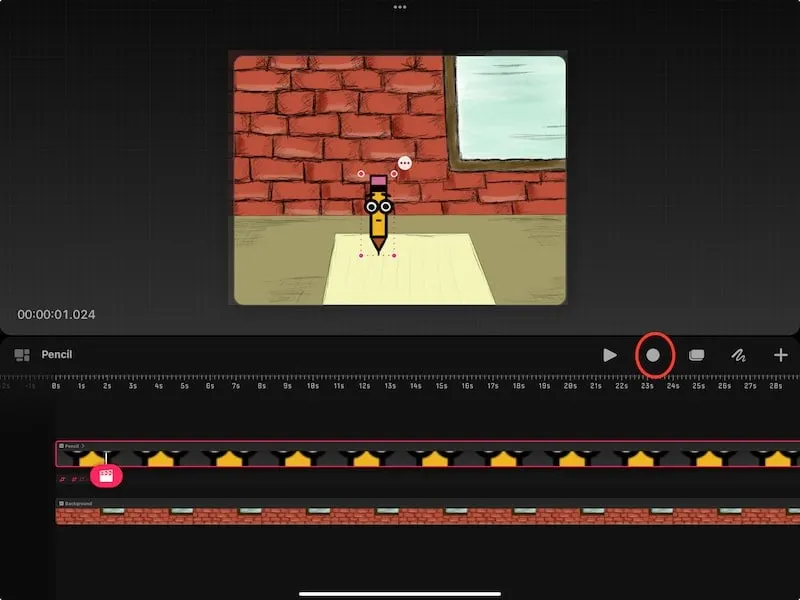
Perform mode lets you move your characters around your stage (the stage is the area where your animation is visible in your Procreate Dreams workspace).
This allows you to automatically add keyframes to your work as you move your characters around. I drag my character to the right, which triggers a keyframe to be added that tells my animation to move my character to the right.
THIS IS SO COOL!!
Perform mode was my introduction to keyframes because it was SO much fun! If you’re new to Procreate Dreams and keyframes I suggest experimenting with Perform mode as well.
While it can take skill to master, it’s fun to see your animations instantly come to life with a few movements of your finger or stylus.
Import one of your Procreate art pieces into Procreate Dreams, turn on Perform mode, and see what happens! Go in with the goal of learning and having fun, not creating a perfect animation from the get-go.
Perform mode deserves its own post, so stay tuned! In relation to laying down keyframes, understand that every time you move your character, you create a keyframe.

Sometimes, these motion keyframes will be exactly what you need, and you’ll be done! Other times, it’ll be a great way to initially lay down a foundation of keyframes that you can build upon. It might be a mixture of both!
Either way, you can always adjust the keyframes that you lay down in Perform mode, so feel free to have fun with it!
How to Manually Add Your First Move Keyframe
If you want to manually add your first keyframe to your Dreams animation, tap anywhere on the content you want to add your keyframe to.
So, if I want to add a keyframe to my pencil character, I would tap anywhere on the track that contains my pencil content. This will activate the playhead, which is displayed with a clapperboard icon.
Drag this clapperboard around until you find the exact location where you want your keyframe to be. Once you add your keyframe, you can’t move it, so do your best to find the correct location.
If you make a mistake, tap two fingers on your screen to undo it. You can also delete unneeded keyframes later.
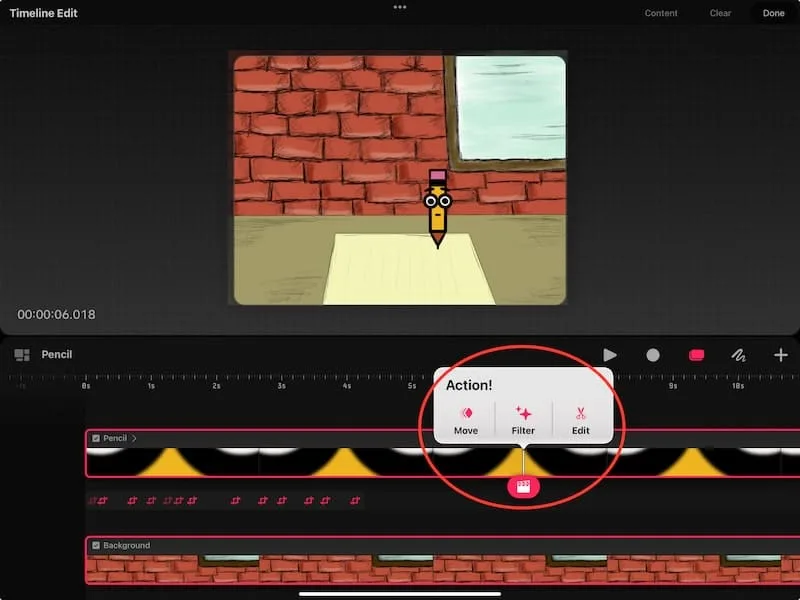
Once you have the clapperboard positioned, tap on it. Here you will see all of your keyframe options. We’ll talk about all of the keyframe options soon!
Adding Additional Move Keyframes
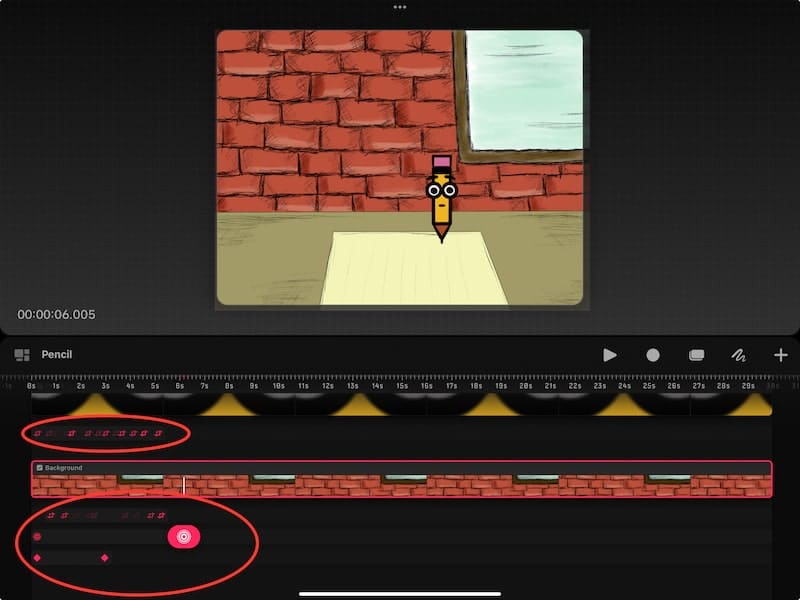
When you start adding keyframes, you’ll notice new tracks appear. You will have a new track for each type of keyframe you add for EACH content track.
So, if I add keyframes to my pencil character, I will have new tracks appear below my pencil character. If I then add keyframes to my background, I will have new keyframe tracks added below my background tack.
There will be a new track for EACH type of keyframe (except for split keyframes. This will split your content, but NOT add a new track). So, if I add movements to my character, I will have a track for that. If I then add a filter, another track will appear for that. Same for my background.

Once these tracks are established, I can use them to add additional keyframes of the same type.
For example, if I want to add more movement keyframes, I can tap anywhere on the movement track. This will automatically create a new movement keyframe without having to sort through all of the other keyframe options.
Important note: when you initially tap on the keyframe track to manually add a movement keyframe, the icon will be dull. This means that it’s still pending. At this point, you can still drag it around until you land on the exact position where you want it to be.


Once you find the right position, tap on the icon. It will turn white, which means that your keyframe has been placed. Once your keyframe has been placed, you can’t move it around anymore. You would need to create new keyframes, while deleting any you don’t need.


To delete keyframes, hold down on them until you see a menu appear with a delete button.
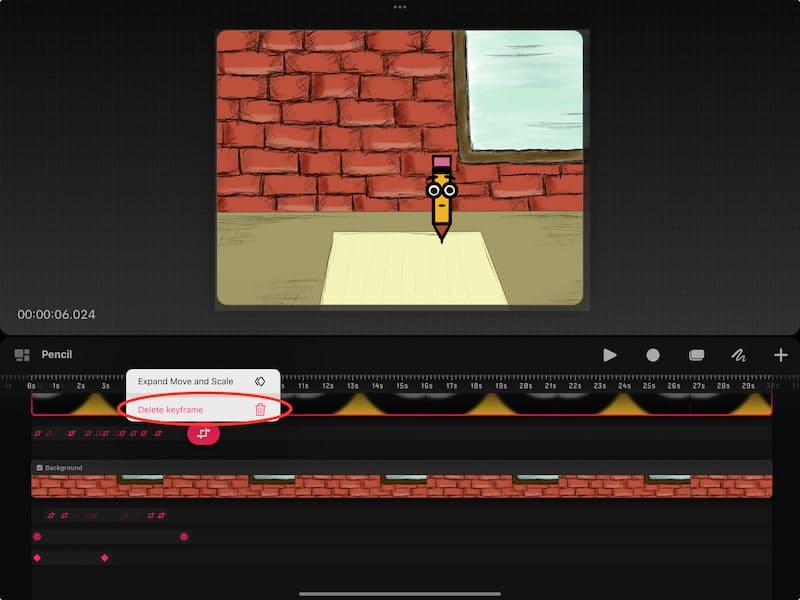

Pretty handy! I can also tap on my content at any time to activate the playhead to manually sort through my keyframe options from there. Either way works!
Using Perform Mode and Manual Keyframes at the Same Time
We’ve talked about adding movement keyframes via Perform mode, as well as adding them manually. What’s really cool about Dreams is that you can combine these two approaches.
Let’s say that I start off with my pencil character in Perform mode. I move him around my stage and lay down some movement keyframes.
Then I decide that I want to add some movement keyframes manually. I turn off Perform mode by tapping on the square icon. Next, I tap on the spot within my movement keyframe track where I want my new movement keyframe to be.
I go through the process of adding manual keyframes as we talked about earlier.
Then I decide I want to use Perform mode again.
Important note: if you use Perform mode in the middle of your project, tap on your content track to activate the playhead in the exact location you want to start. Then, start Perform mode.
Wherever the clapperboard is when you start Perform mode is where your Perform mode keyframes will start to be recorded.
Adjusting Movement Keyframes
Once your movement keyframes are placed, you can manually adjust the impact they have to your work.
For example, if my keyframe is applied to my pencil character, I can make adjustments to how this keyframe positions my character on my stage.
One of the ways to do this is to tap on the keyframe to select it. Then, tap again to open the settings. Here you can make granular adjustments to the positioning that this keyframe applies to your character.

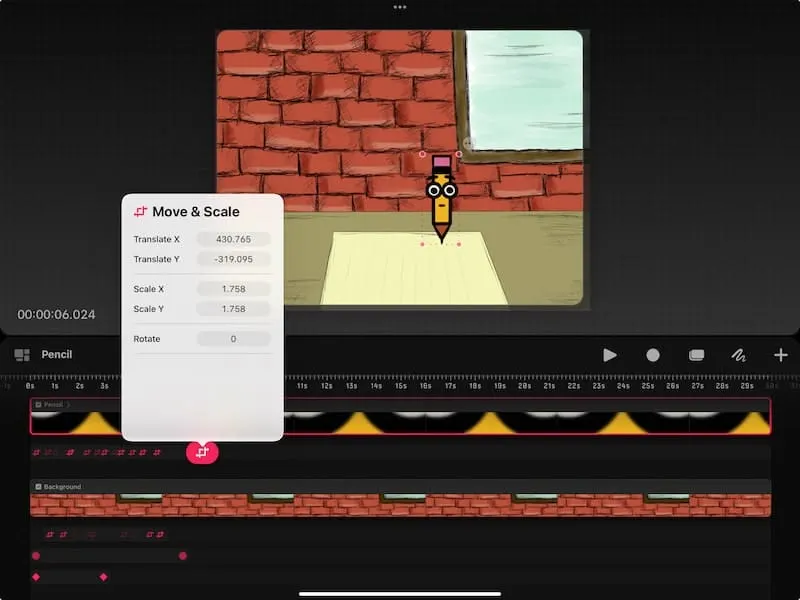
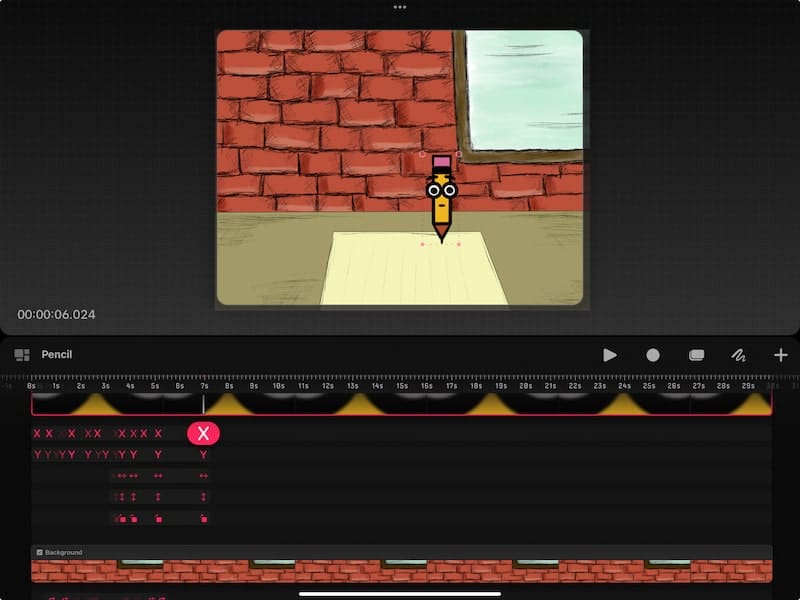
Another option is to tap on the keyframe track itself. This will expand it to show you the various positioning factors you can adjust.

How to Use Warp and Distort Keyframes
Within the selection of Motion keyframes, you’ll see options to warp and distort.
I LOVE these options because they can allow you to make adjustments to your characters without having to redraw them. This is so helpful!
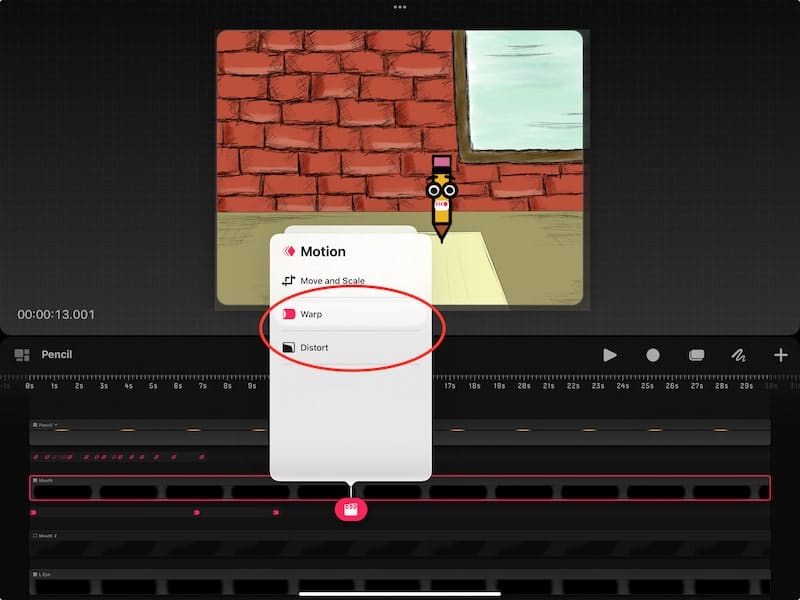
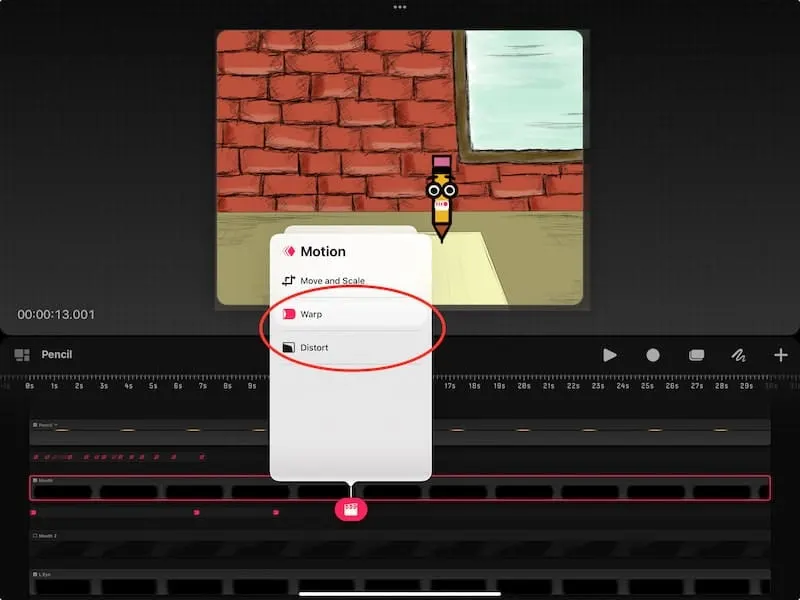
For example, if I want to change the position of the mouth for my pencil character, I can warp it into a different position without redrawing it.
Important note: warp and distort only work with individual layers. You CANNOT warp or distort a group of layers.
If you get an error message when trying to warp or distort, check your layers to make sure you’re not using a group.
When you add warp and distort keyframes, you need to add them manually by tapping on your content to activate the playhead, tapping again, and choosing warp or distort.
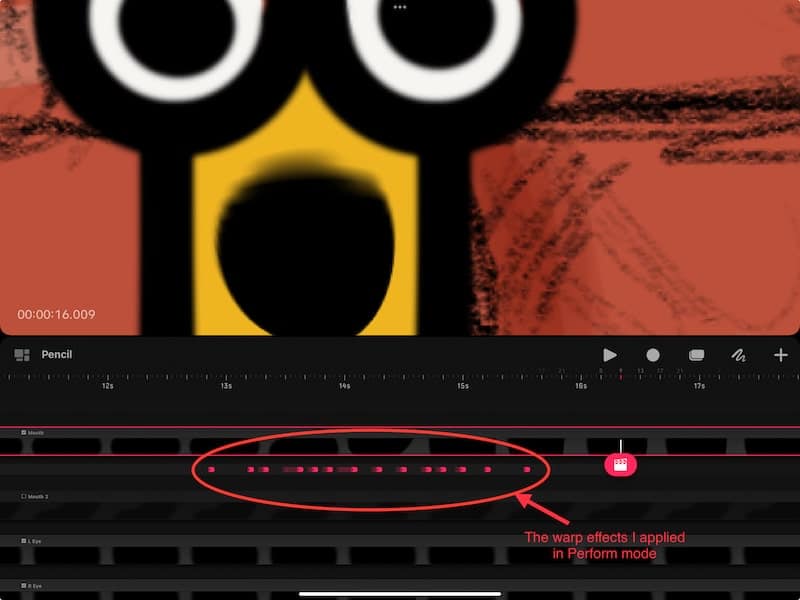
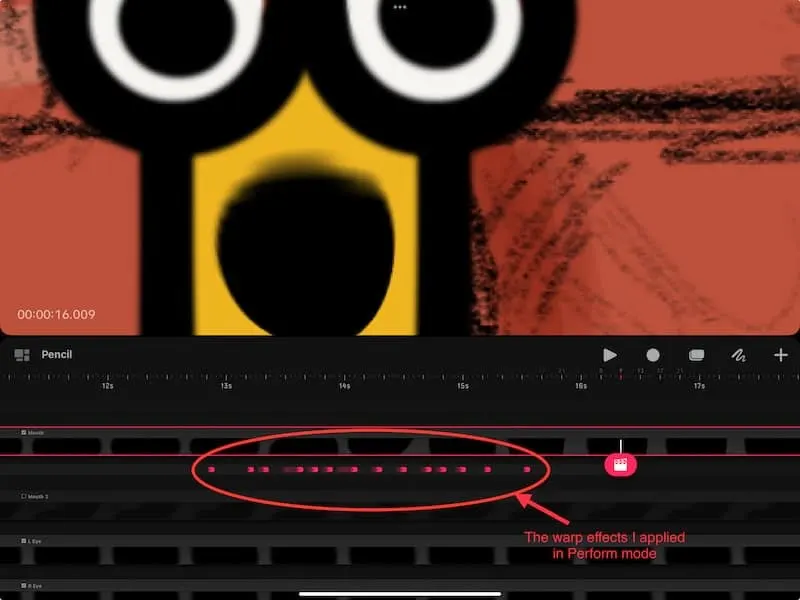
You can use warp and distort in Perform mode as well.
To do this, tap on the circle icon on the right of your screen to activate perform mode.
Then, tap on your content to activate the playhead where you want your warp or distort effect to begin.
As you make changes to your drawing with the warp or distort feature, they will be recorded in real time.
I personally love using this feature for elements like mouths or arms because I can make slight adjustments without redrawing them.
To disable perform mode, tap on the square icon on the right side of your screen.
Motion keyframes are a big part of what turn your static art into a moving animation. This is why they are so important! And overwhelming! If you feel overwhelmed by everything that these keyframes can do, take it slowly. This is a learning process that should be fun!


Diana has been an artist for over 27 years and has training in drawing, painting, digital drawing and graphic design. Diana’s latest obsession is digitally drawing with Procreate and Procreate Dreams. Diana has experience selling her art across a number of platforms and loves helping other artists learn how to make money from their art as well.