Procreate’s transform tool is so important for selecting and moving objects, resizing your art, and so much more. Once you get a grasp of everything that Procreate’s transform tool can do, you’ll really be able to take your art to the next level.
Click on the arrow icon in Procreate’s top menu to activate the Transform tool. Within the Transform tool’s settings, you can resize, warp, distort, flip, rotate, or change the interpolation of your design. These settings will only be applied to whatever is on the layer you currently have selected.
I LOVE Procreate’s transform tool. It really can do a lot of amazing things that will save you a lot of time and effort as you create your artwork. Once you learn everything it can do, I’m sure you’ll love it just as much as I do. Well, I’m kinda weird with my love affair with Procreate, but I’m sure you’ll still be pretty stoked.
Before we dive into all of the settings, we need to talk about an important quirk of the transform tool. If you don’t understand this right off the bat, it will endlessly frustrate you.
What are we talking about? Layers.
Can You Use Procreate’s Transform Tool on Multiple Layers at Once?
You can use Procreate’s transform tool on multiple layers at once by selecting all of your desired layers before clicking on the transform tool. This will let you apply your transform features to as many parts of your art you would like, regardless of how many different layers they are all on.
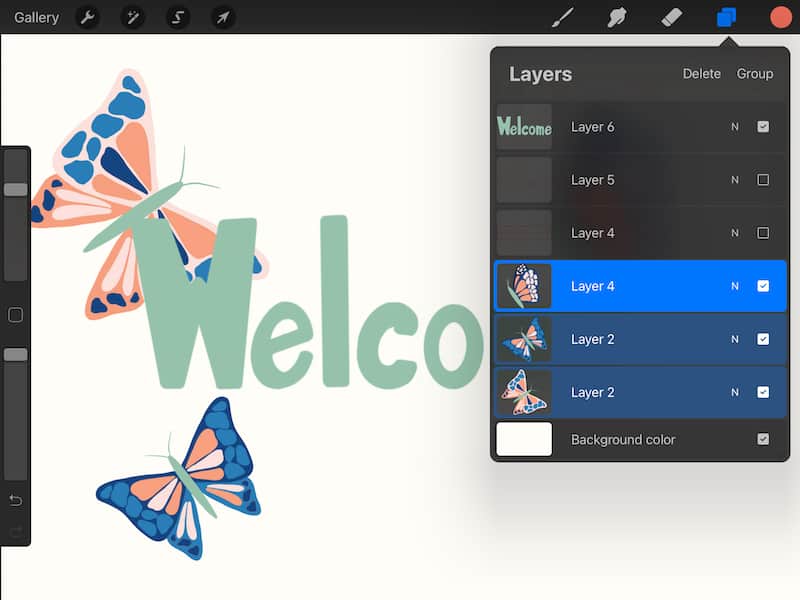
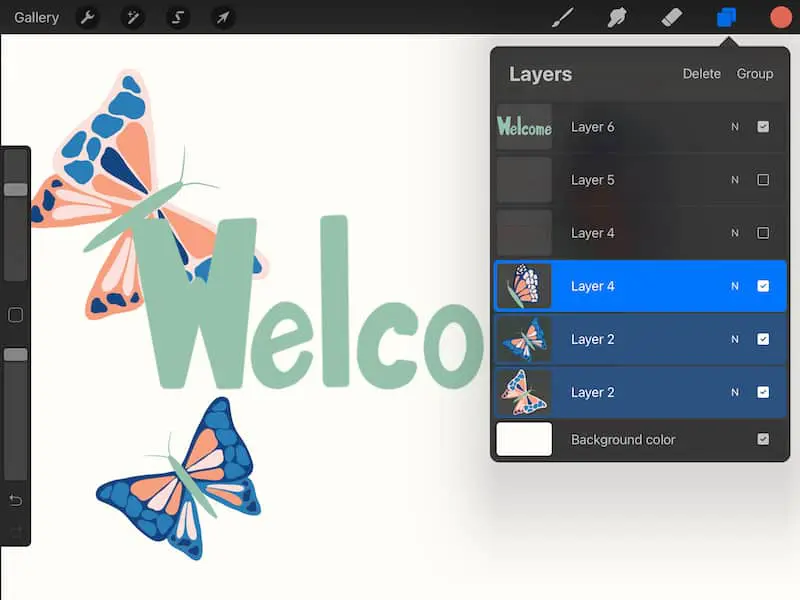
There are a lot of Procreate features that can only be used with one layer at a time. Adjusting layer opacity is one of them. This can be a headache if you have a lot of layers.
Luckily, the transform tool plays nicely with multiple layers. Liquify also works nicely with multiple layers, which is rare for settings within the Adjustments tab.
Important note: I have a guide on selecting multiple layers in Procreate if you need a refresher on that before you dive into the transform settings.
That said, you need to be organized and careful. If you have a lot of layers, it’s easy to lose track of your layers and transform things you didn’t mean to, or vice versa.
This is where layer groups become really important. If you have a lot of layers and you want to keep track of transforming them, I suggest putting them all in a group. You can even name the group according to the transform feature you plan to use with them. It sounds neurotic, but it could save you time down the road.
Ok, making sure you have your layers situated is a prerequisite of using Procreate’s transform tool. Once you have that sorted out, you’re ready to move on to the transform tool’s great features.
How to Select and Move Objects and Lines with Procreate’s Transform Tool
When you click on Procreate’s transform tool, you will be able to use your finger or stylus to move your objects and lines around your canvas. This only applies to one layer at a time. The layer you have highlighted in your layers panel will be selected when you click on the transform tool.
Selecting and moving objects within your canvas is the transform tool’s most basic function. Without clicking any additional settings within the transform panel, you can simply click the arrow icon and then push objects around your screen.
Again, this can only be done with one layer at a time. If you have multiple layers that you need to move at once, you won’t be able to unless you merge those layers. Be EXTREMELY careful with merging your layers. You won’t be able to un-merge your layers later, so be 100% sure that you want to merge your layers before doing so.

I have a YouTube video that you can watch to learn why I’m so cautious with merging my layers in Procreate.
Again, selecting and moving objects is something you can do with the transform tool “out of the box,” so to say. Without using any other settings, this is the most basic and fundamental use of Procreate’s transform tool.
That said, there is one setting that you might want to adjust before moving your objects around your canvas.
How to Move a Selection with Procreate’s Transform Tool
To move a selection in Procreate, use the Selection tool to isolate the design elements that you want to use. Once your elements have been selected, click the Transform tool. This will allow you to move only the elements that you’ve selected with the Selection tool.
In this article, we’re talking a lot about moving all of the elements that live on a certain layer. Luckily, the Transform tool is capable of more than this. If you have only certain elements that you want to isolate on one of your layers, use the Select tool to do so.
There are a couple of options you have within the Select tool settings: Automatic, Freeform, Rectangle, or Ellipse. Choose whichever one that makes sense for isolating your elements.
Once you’re done, click on the Transform tool and you’ll see whether you’ve properly selected your desired elements or not. Now you’ll be able to use all of the Transform tool’s functions, but with just that isolated selection of design elements.
I have a full guide on using the Selection Tool if you want to learn more about everything it can do!
How to Use Procreate’s Transform Tool’s Snapping and Magnetics Settings
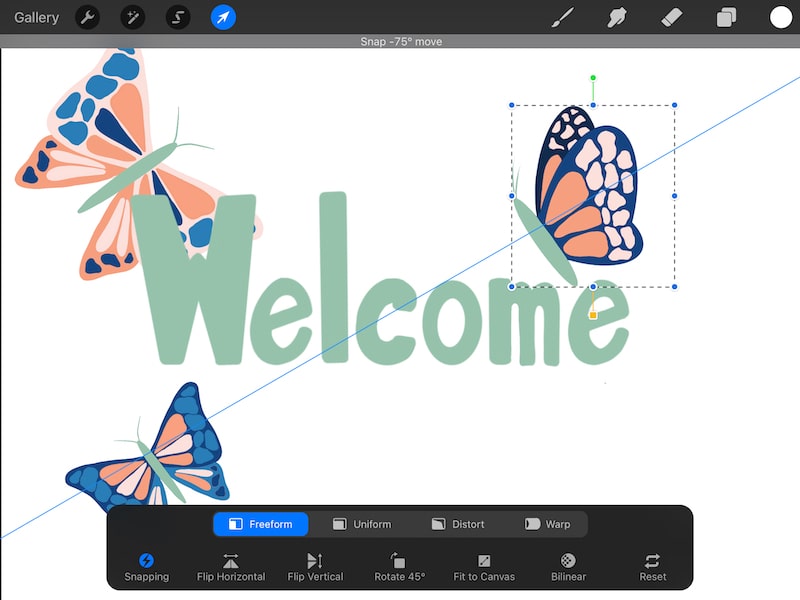
Procreate’s snapping and magnetics settings impact how your object moves around your canvas. Snapping will help align your object with other objects on your canvas, or important landmarks like the centerline. Magnetics will help you move your objects according to specific degrees.
Let’s look at these more closely.
Snapping: when snapping is turned on, you’ll find that your object pauses when it aligns with other objects on your canvas. It will also do this when it aligns with the vertical or horizontal center line. You’ll see blue and yellow lines appear to show you how this alignment is being determined.

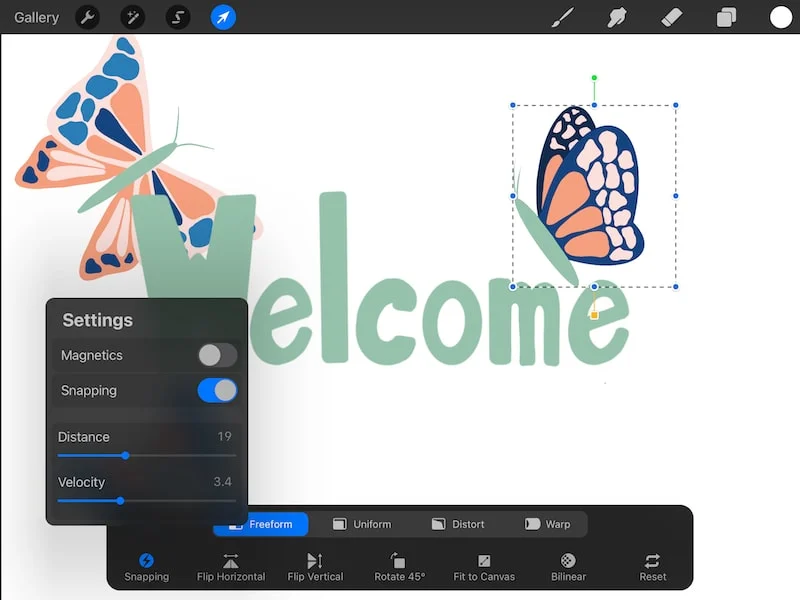
When using snapping, you can adjust the Distance and Velocity.
Distance: distance determines how quickly your object triggers an alignment line. When you increase your distance, your object will snap to your alignment lines more quickly. When you decrease your distance, your object will snap less quickly. If you decrease your distance to nothing, your object will glide along your canvas without snapping. You will still see the alignment lines, but you will not feel the snapping effect.
Velocity: velocity determines how many alignment lines your object will trigger. When you increase your velocity, your object will trigger all of the alignment lines around it unless you are moving it quickly across your canvas. When you decrease your velocity, your object won’t trigger as many alignment lines unless your object is close to them. When you set velocity to none, you won’t trigger any alignment lines as you move your object around your canvas.


Magnetics: when magnetics is turned on, you will see more precise alignment of your objects according to different angles on your canvas. This is especially great if you need objects to be evenly spaced.

Now, let’s dive into the other settings that you can use to take your use of the transform tool to the next level.
How to Use Procreate’s Transform Tool’s Resize Settings
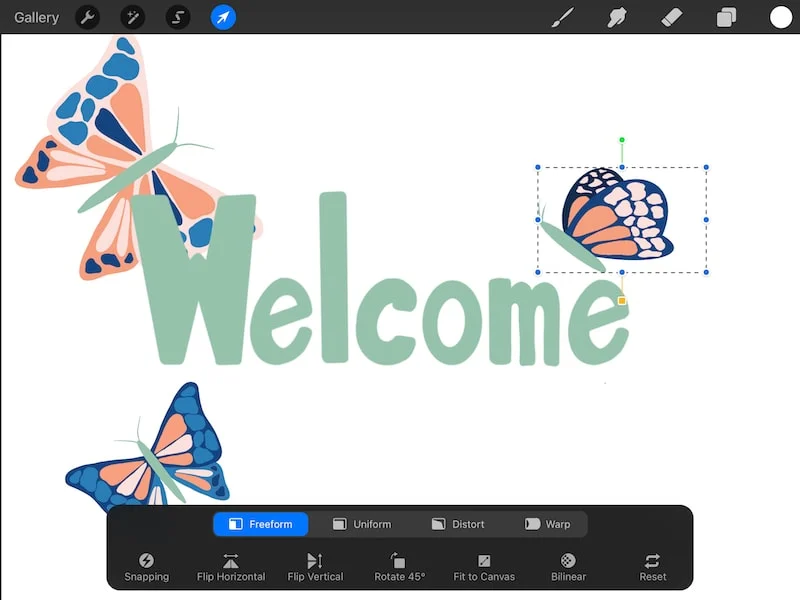
With Procreate’s transform tool, you can resize your objects with four different settings: freeform, uniform, distort, and warp. Freeform does not maintain the proportionality of your object, while uniform does. Distort and warp give you unique ways to reshape your object.
Let’s dive into each setting individually. Make sure to read until the end of this section, as we’ll talk about a SUPER important consideration you need to keep in mind so that your objects don’t lose quality as you resize them.
Freeform: the freeform setting will resize your object without regard for the proportions of it. That means that it could end up squashed or stretched depending on how you move it.

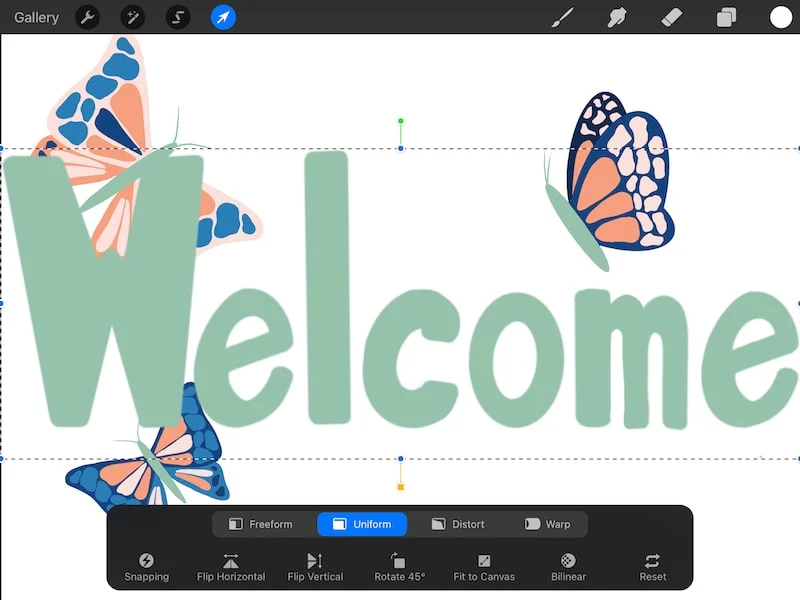
Uniform: the uniform setting will resize your object proportionally. This means that your object will look exactly the same, just smaller or bigger. This is the option you’ll want to use if you only want to resize your work without changing its appearance.


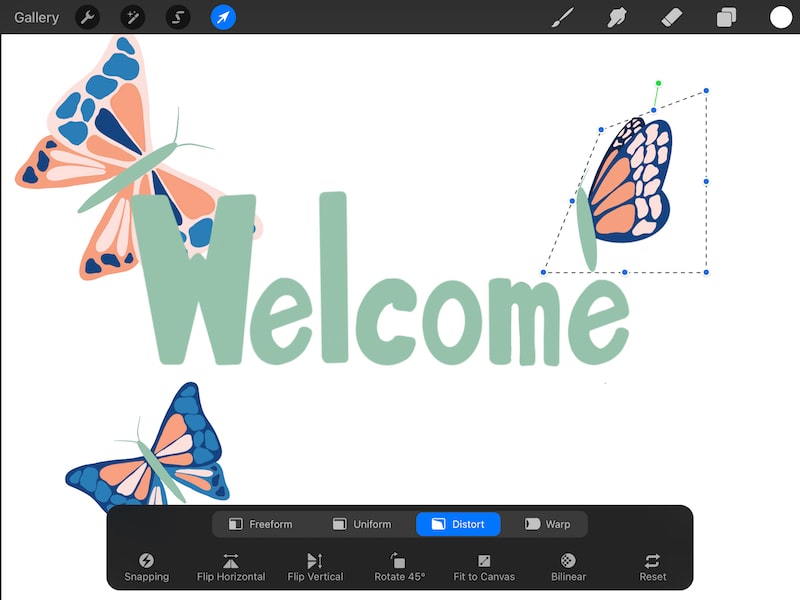
Distort: when you resize something, you’ll notice a grid that forms around it with points on each corner and along the sides. With the uniform and freeform settings, all of these points will move at the same time. With the distort setting, they don’t. When you move one point of your resizing grid, the other points will stay static. This results in a distorted look for your object.

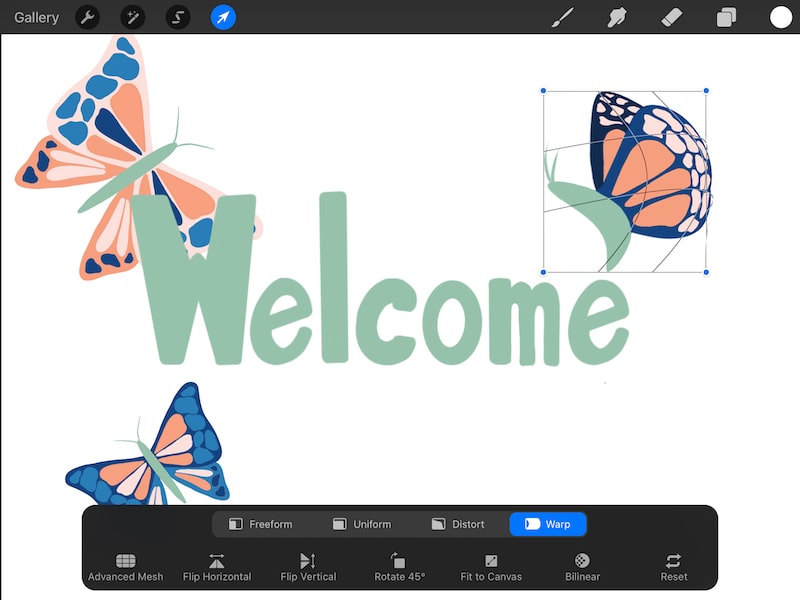
Warp: the warp setting is similar to distort, but with a very important difference – you can warp the middle of your object, not just the sides. When you use distort, you impact your object at the corner or the side, wherever you have dragged the dot. With warp, you can pull on your object in the middle of it. You can pull on your object anywhere where the grid is. This can give you a really neat and unique effect!

Now that we’ve talked about the different ways to resize your objects with the resize tool, let’s talk about some consequences of doing so.
Considerations When Resizing Your Work with Procreate’s Transform Tool
When you resize an object in Procreate, you run the risk of quality loss due to interpolation. It’s best to use the Bilinear or Bicubic settings when resizing your objects to avoid pixelation. These settings can be found by clicking on the Bilinear button within the transform tool settings.
Whenever you resize an object, Procreate has to figure out how to recreate your object at its new size. Generally, this happens so quickly that you don’t even notice it.
There is a lot happening behind the scenes though, and it isn’t always a great thing for the quality of your object. Everytime you resize something, you basically scramble it and put it back together. Depending on the settings you choose, this could result in quality loss for your object.
I have a full guide on stopping quality loss when resizing your objects in Procreate. This dives into everything you need to know about interpolation and the three settings you have to choose from within there.
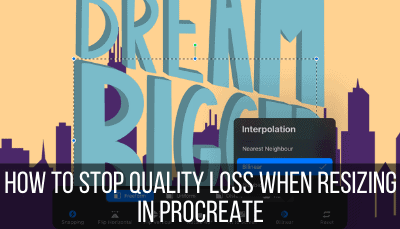
If you want the quick version, my suggestion is to choose Bilinear or Bicubic. Bilinear tends to be a happy medium that I haven’t had a lot of issues with. If you’re really concerned about quality loss though, or you plan to do a lot of resizing, go with Bicubic. If you notice your iPad lagging or crashing, switch back to Bilinear.
The BEST way to avoid quality loss when resizing your Procreate work is to avoid resizing your work a lot. Everytime you resize something, you lose more and more quality. If possible, resize as minimally and precisely as possible.
I really suggest checking out my guide about interpolation and quality loss in Procreate in order to learn everything you need in order to get the best results.
Ok, now that we’ve talked about the complicated aspects of the transform tool, let’s finish things up by reviewing the straightforward aspects. Sounds nice, right? These settings are fairly self explanatory, so I’m going to put them all in one section.

How to Use the Rest of Procreate’s Transform Settings
The rest of Procreate’s transform settings include flip horizontal, flip vertical, rotate 45 degrees, fit to screen, and reset. Each of these transform settings will impact your object in different ways.
Let’s look at these individually.
Flip Horizontal: the flip horizontal setting will flip your object right side or left. This is the same as turning your object over.
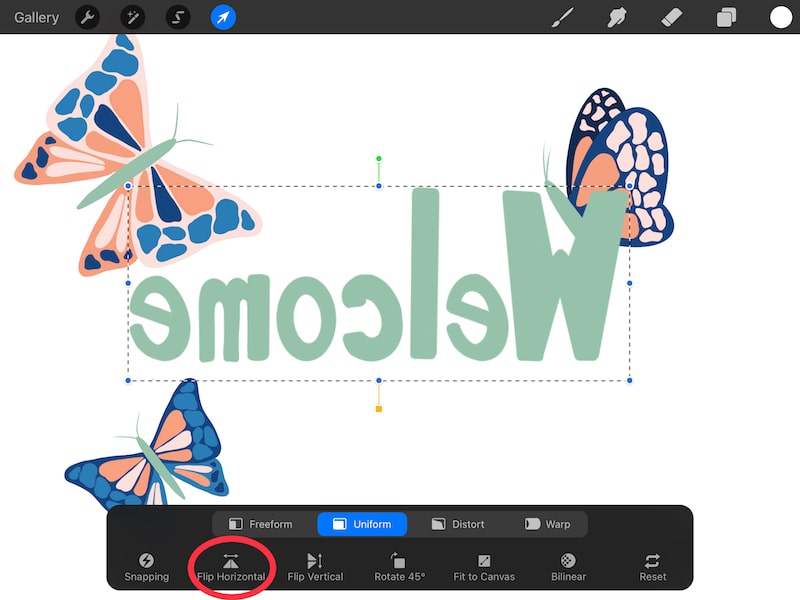

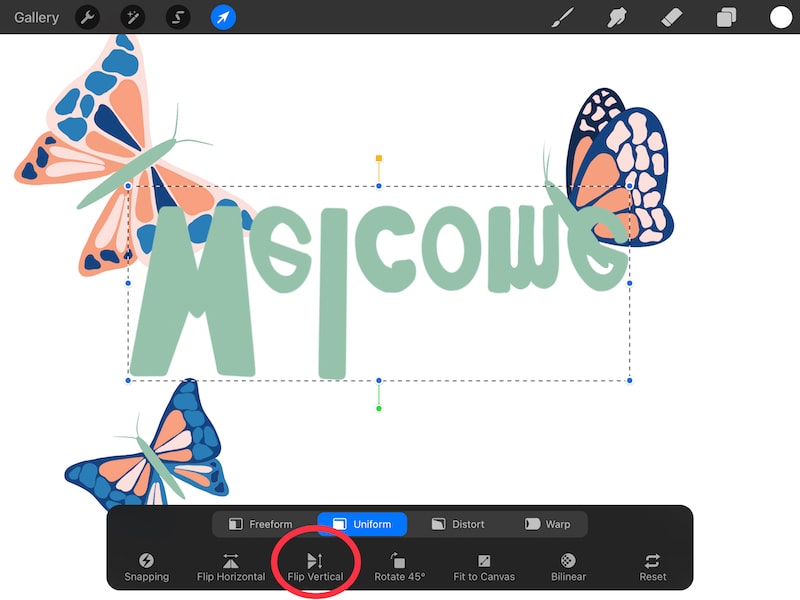
Flip Vertical: the flip vertical setting will flip your object top to bottom. This is the same as turning your object upside down.

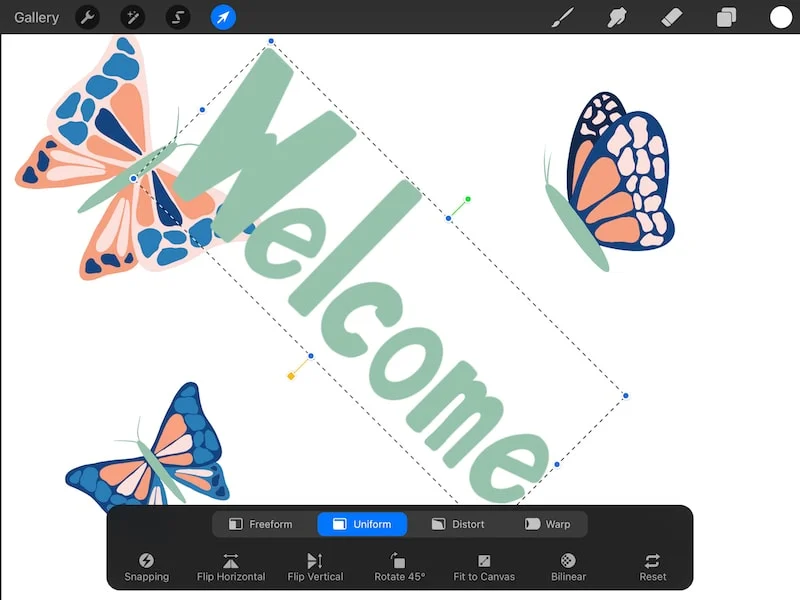
Rotate 45 Degrees: the rotate 45 degrees setting will rotate your image clockwise exactly 45 degrees. You can rotate it over and over again until you’ve made a full circle.

Fit to Canvas: the fit to canvas setting will make your object as big as your canvas. This is especially useful if your entire design is too small or too big and you want to quickly adjust it so that it’s the same size as your screen.

Remember that if you want to do this with your entire design, make sure you have all of your layers selected.
Reset: if you aren’t happy with the adjustments you’ve made to your art with the Procreate tool, you can reset everything with the reset button. Unlike the undo feature that undos things step by step, the reset button will take you back to the very beginning before you even started transforming anything.
Important note: DON’T close the transform settings until you’re confident about what the adjustments you’ve made to your art. If you close the transform settings and reopen them, you will not be able to reset everything. It starts fresh.
This is similar to the undo feature. If you close Procreate or return to the Gallery, you will lose your undo history. So, just make sure you’re confident in your transform changes before closing your transform settings.
That said, the undo feature still works with any changes you’ve made with the transform tool. If you’ve closed the transform settings and realize you aren’t happy, simply double tap your screen to undo what you’ve done. This is also good if you simply want to undo the last change you’ve made with the transform tool instead of resetting the entire thing.
As you can see, there’s SO much you can do with Procreate’s transform tool, from selecting and moving objects to distorting and warping your art. Take some time to experiment with your transform settings and see how they can really take your art to the next level.


Diana has been an artist for over 27 years and has training in drawing, painting, digital drawing and graphic design. Diana’s latest obsession is digitally drawing with Procreate and Procreate Dreams. Diana has experience selling her art across a number of platforms and loves helping other artists learn how to make money from their art as well.